General Information
Default Menu Location: Transaction >> Procurement >> Quick Buy
Screen Name: QUICKBUY
Function: The Quick Buy screen makes recommended stock replenishment purchase and production orders for items based on inventory availability and min/max settings. You can also transfer items from one warehouse to another from Quick Buy.
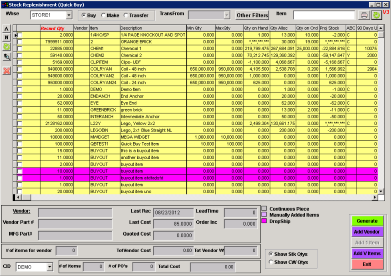 Quick Buy - Click for full image |
Basic Guidelines for Items in Quick Buy
The Quick Buy screen follows some basic guidelines in order to produce recommended restock quantities.
First, the following must be true in order for an item to even show up in Quick Buy:
1. The item must be a stock item.
2a. The Projected Qty must be less than or equal to the minimum qty AND the Order Qty must be greater than zero.
OR
2b. The Projected Qty must be less than zero AND the Allocated Qty must be greater than zero.
The exceptions to these rules are items that are manually pushed to Quick Buy from the Sales Order screen.
Buy/Make/Transfer
Buy
Select
Buy to display stock,
non-production items that meet the basic guidelines and items that have been manually pushed to Quick Buy.
When you click Generate, you will be asked to generate Vendor Bids or Purchase Orders. You will also be asked to select a PO type.
Drop Ship lines will be processed in a second pass so that you can specify the correct type of PO to create. Drop Ship lines are always broken out onto a separate PO for each vendor (they'll never be combined with standard stock purchases coming into your warehouse).
Drop Ship lines are always separated by Sales Order. If two or more sales orders have the same ship to and you're purchasing direct ship items from the same vendor, Quick Buy will not consolidate these onto the same PO.
Make
Select
Make to display stock,
production items that meet the basic guidelines.
When you click Generate, you will be asked for a PWO Due Date for all work orders. This due date can be changed on the PWO screen if needed.
Transfer
Selecting
Transfer displays the same set of items as
Buy, but also displays other columns in the grid and allows you to transfer from one warehouse to another instead of purchasing the items.
Select a source warehouse in the TransFrom field and then click Refresh.
See the
Transfer Columns section for the additional columns available to you.
You will not be able to select a line that has an available qty less than the RRQ.
You will be notified if you try to select a line where transferring the RRQ will force your source warehouse's qty below the min qty.
When you click Generate, the program will look for the next available Intercompany Shipping Event (based on the Cut-Off Date) between your source and target warehouses.
You will be notified if no Shipping Events exist. In this case, set up a new SE between the two locations and use a cut-off date that is after today.
Manually Added Items
You can manually add items to Quick Buy via the
Add 1 Item and
Add V Items buttons.
Items added via these buttons will be highlighted in purple in the grid.
Add V Items
Click this button to add items for the vendor that's selected in the grid (the row your cursor is on).
Items that are added via the Add V Items button meet the following criteria:
- Item is not already in Quick Buy
- Vendor is setup for the item in the Item Master C/V part tab
- On Hand Qty is below its max level
- Item has been sold in the last 60 days
- Item has been sold since it was last received.
Columns
Recmd Qty: Recommended Reorder Qty (RRQ). This column can be changed directly in the grid.
Cost: Unit Cost. This will be the Vendor Quoted Cost unless that is zero, then it will be the Last Received Cost. This column can be changed directly in the grid.
Extend Cost: Recmd Qty * Cost. This field will automatically update if you change the Recmd Qty or Cost fields.
Vendor: The default vendor ID for the item. Double-click to drill down into the
Organization screen. Right-click to change the vendor.
Item: Item Code. Double-click to drill down into the
Item Master screen.
Description: Item Description.
Qty on Hand: Current on hand quantity in the selected Owner/HeldFor/Warehouse.
Qty Alloc: Current quantity allocated (SO and PWO inputs) in the selected Owner/HeldFor/Warehouse.
Proj Stock: On Hand quantity minus Allocated quantity plus On Order quantity (PO and PWO outputs).
Min Qty: Owner/HeldFor/Warehouse minimum quantity.
Max Qty: Owner/HeldFor/Warehouse maximum quantity.
Order Quantity: Owner/HeldFor/Warehouse order quantity.
Item Class: Item Master Class.
Stk Code: Item Stocking Code for Owner/HeldFor/Warehouse.
ABC:
Item ABC Code.
SO#: Linked Sales Order number if the item was pushed to Quick Buy from a SO.
Proj Days Inv: Days of Inventory left based on the Projected Stock and Trending Days. This column hides itself if Usage is not calculated in the Other Filters section.
RRQ Days Inv: Days of Inventory based on the RRQ, Projected Stock, and Trending Days. This column hides itself if Usage is not calculated in the Other Filters section.
# of Cust: The number of different customers that have had the item shipped to them during the Trending Days period.
Gross Wt: The gross weight in pounds based on the item's unit weight and RRQ.
Best Buy $/#/%: Vendor Best Buy numbers for dollars, weight, and the percentage discount given.
U1-U5 Columns: These columns are based on the Inventory Usage Buckets rule. The Last columns are last year this time, last bucket days. The Next columns are last year this time, next bucket days. For example, if today is March 1 2022 and U1 is 30. U1-Last would be February 2021, U1-Next would be March 2021.
Transfer Columns
A new set of columns will appear in the grid if you decide to transfer material from one location to another to fulfill the replenishment quantities. Each column has
(TS) in the column header to denote it as the Transfer Source warehouse.
On Hand (TS): Current on hand quantity in the selected Xfer From Warehouse.
On Order (TS): On Order quantity in the Xfer From Warehouse.
Allocated (TS): Allocated quantity in the Xfer From Warehouse.
Avail (TS): Available quantity in the Xfer From Warehouse.
Projected (TS): Projected quantity in the Xfer From Warehouse.
Min Qty (TS): Minimum quantity in the Xfer From Warehouse.
Max Qty (TS): Maximum quantity in the Xfer From Warehouse.
60 Day Usage (TS): Usage quantity in the last 60 days in the Xfer From Warehouse.
Other Filters
Click the Other Filters button to open a window displaying all of the filters that can be used in Quick Buy.
You must set your filters before running Quick Buy. You cannot refresh the grid and then select filters.
FAQ
Q: How do I delete an item that was pushed to Quick Buy from a Sales Order.
A: Select the items you want to delete and click the small red
X button on the left-hand side of the screen.
Q: How do I change the cost of an item in Quick Buy?
A: You can change the cost directly in the grid. Type over the cost in the Cost column.
Q: How do I change the Vendor of an Item?
A: Right-click the Vendor ID in the Vendor column. This will open the Change Vendor screen. You can select a vendor that's already setup for the item or add a new vendor by clicking the New button.
Q: I need to add an item in order to meet my vendor's value/weight minimum. What's the best way to do that?
A: You can manually add items for a vendor by using the
Add 1 Item or
Add V Items buttons.
More info on those here.
Q: I'm trying to transfer items from one warehouse to another, but Adjutant keeps telling me there are no shipping events setup. What am I doing wrong?
A: First, you must be using Shipping Events (the
Logistics module). Second, there must be a Shipping Event setup with the warehouse equal to your TransFrom warehouse and a ShipTo equal to your Quick Buy warehouse. Third, that Shipping Event must have a
Cut-Off Date that is in the future. Make sure your SE has a cut-off date.
Q: How can I print a selected list of specific items?
A: The print button will by default print all of the items that are displayed on Quick Buy. If you have a filtered list, it will only print those filtered items. However, with the QBCHECKONLY set up option, you can use the select field to choose the specific items you want to print on the report.
