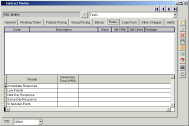
General Information
Default Menu Location Maintain >> Contract Management >> Contract Master
Screen Name CONT1
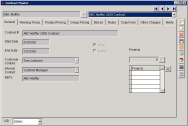 Contract Master Screen |
Function General tab is used to add/edit/delete all contracts with other customers.
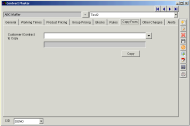
Creating New Contracts
To create a new contract:
1. Type in the Organization associated with the contract into the upper left hand box:
2. Click the 'New' button on the right side of the screen:
3. Enter in the appropriate contract info, then click the save button:
From here, you can then enter in the rest of the contract details in the following tabs.
Fields/Filters
Contract #: The name of the contract
Start Date: The date contract takes effect
End Date: The date contract ends
Customer Contact: The contact person inside the company regarding this particular contract
Internal Contact: The contact person inside your company regarding this particular contract
Bill To: The company being billed for this contract
Active: Check this box to make the contract active (Only active contracts may be selected in the Task Entry Screen in the Contract # field)
Default: Check this box to make it the default contract for the organization (The contract will automatically appear in the Contract # field when filling out the Task Entry Screen.)
Working Times
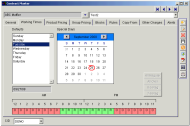 Contract- Working Times Tab |
Working Times tab determines the billing rate for labor on particular days and times of the day.
To change the billing rate:
1) Click the
Edit button
2) Select which day you wish to change the billing rate for (Thursday is selected in the example below). You may select a default day, which applies the new billing rate to that day every time it occurs during the length of the contract, or you may select a particular day in the calendar.
You must double-click the day in order to select it. The default day or specific date will appear in the field directly beneath the Defaults list.3) Change the billing rates for the times of the day by clicking on the boxes at the bottom of the screen. Each click will display a new billing rate (i.e. Regular, Overtime, Double, Triple). In the example below, on all Fridays, 8:00AM--5:00PM is billed as Regular time and all other time is billed as Overtime.
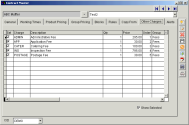
Product Pricing
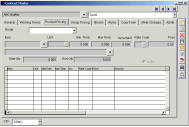 Contract- Pricing Tab |
Product Pricing tab determines the pricing of different types of products used during a contract period.
Fields/Filters
Group: Select the type of product from the drop-down menu
Item: Item that will be used (Items are maintained in Item Master)
Only the items classified under the Product Group you selected above will be available in the drop-down menu.Unit: Unit of measure
- Units of measure are maintained in Rule Maintenance screen by selecting the Units of Measure from drop-down menu
Min Time: Minimum number/amount of time that will be billed
Max Time: Maximum number/amount of time that can be billed
Increment: The increment used for billing (All fractions below this increment will be rounded up to this amount)
Rate Code: Billing rate used for this product (Regular, Overtime, Double)
Price: Price per unit that will be charged
Start Qty: Minimum quantity for the discount/markup
End Qty: Maximum quantity for the discount/markup
Group Pricing
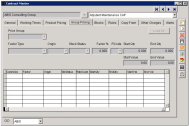 Contract- Group Pricing |
Group Pricing tab is used to setup standard pricing rates for a group of billable items. Price Groups are maintained in
Rule Maintenance screen by selecting Item Price Groups from the drop-down menu.
Adding a Price Group
To add rules for a price group:
Click
NewSelect
Price Group from the drop-down menu
Select
Factor Type from the drop-down menu
Select
Origin from the drop-down menu
Select
Stock Status from the drop-down menu
Enter the
Factor amount (the amount to factor in when calculating the invoice; enter a negative number for a discount)
Enter the
Start and
End Quantity (the minimum and maximum quantity to be applied to this pricing rule)
Enter the
Start and
End Value (the minimum and maximum value to be applied to this pricing rule)
Select the Billing
Rate Code from the drop-down menu (Regular, Overtime, 2x, 3x, etc)
Fields/Filters
Price Group: Price groups are maintained in
Rule Maintenance by selecting Item Price Groups from drop-down menu
Factor Type: This determines what the markup will be based upon (dollars, percentage, or fixed price)
Origin: Factor will be based on the
Cost (the base cost) or
Price (the list/retail price)
Stock Status: Stock status of the item (Stock, Non-Stock, Both)
Factor: Percentage/Amount that will be marked up or discounted
For a discount, enter a negative symbol (-) before the numberStart Qty: Minimum quantity for this pricing rule
End Qty: Maximum quantity for this pricing rule
Start Value: Minimum monetary value for this pricing rule
End Value: Maximum monetary value for this pricing rule
Rate Code: Billing rate used for this item
Blocks
 Contract- Block Tab |
Blocks tab is used to add and view blocks of time/dollars that have been prepaid.
The system will only calculate the usage of Hours OR Dollars, never both at the same time.Add a new block by clicking the
Edit button and entering the hours or dollars that have been purchased. As the time or money is spent by the company, it is updated in this screen and can be calculated by clicking the
Calculate Balance button.
Fields/Filters
Do Not Exceed: Check this box to block the creation of new tasks for a block of time/money that has been exhausted
Rollover %: Add an allowable percentage of rollover
Monthly: Check this box if the block is to be issued on a monthly basis
Output: Click this button to display the Message Control screen in order to generate a report detailing the usage of the block of time/dollars
Billed: The amount of money or hours that have already been billed
Pending: The amount of money or hours that have been entered, but not billed
Over/Under: The amount of money left or over billed, money or hours that are left over will appear in green. (Over billed amounts will appear in red)
Rules
 Contract- Rules Tab |
Rules tab is used to define the rules associated with Trouble Codes and the response times for Task Priorities.
To edit the response time for Task Priorities:
- Enter the response times in the grid
Copy From
 Contract- Copy From Tab |
Copy From tab is used to directly copy all rules from a previously defined contract to a new contract. It provides an easy way to set up new contracts if most of them are similar in nature.
- Select the Customer/Contract you wish to copy from the drop-down menu and click the Copy button
Other Charges
 Contract- Other Changes |
Other Charges tab is used to quickly add and calculate any additional charges that may have been incurred during the course of the contract.
- Click Edit to add a charge (Make sure the Show Selected box is unchecked)
- Select the charges you wish to allow by checking the box located in the first column (You may also enter a default quantity and price)
Alerts
 Contract - Alerts Tab |
Alerts tab is used to alert one or several people when service orders are created using particular standard tasks/trouble codes, or when a particular solution code is used for the first time.
To add a new person for alerts:
- Enter the person's name in the field next to the Add button for the type of alert you want to add, then click Add
- Check the boxes for the Standard Tasks and events you wish to alert the person to
Contract Master Screen with notification drop down list- Assign: When someone assigns a standard task to a particular person, he or she will be notified when a task has been assigned to them
- Billed: The person will be notified when the standard task is billed
- Create: The person will be notified when the standard task is created with this contract
- Due Date: The person will be notified when the standard task's Due Date expires
- Edited: The person will be notified when the standard task is edited
