Default Menu Location Maintain -> Project Management -> Project Control -> Checklist Tab
OverviewThe Project Checklist feature is an Excel style grid, linked to an Adjutant Project record, that allows users to work through a checklist of customizable, predefined steps. The Project Checklist is ideally suited for projects that have a repeatable, standardized process to follow and can help make sure your personnel are following the same procedures every time. The Project Checklist is an ADJ2020 exclusive feature.
The Project Checklist is accessed from the Checklist tab in the Project Control screen. The Project Checklist will only display if a checklist has been set up in the Project Checklist rule that matches the project type of the selected project record.
Some of the built-in features include:
- Flexible setup for multiple project types
- Flexible navigation with collapse/expand controls, page jumps, and footer filters
- Project Phase date integration with start and end dates
- End Date color-coded warnings
- Quick Task feature with time tracking
- Ability to link to web-based resources from each line
- Ability to add custom lines ‘on the fly’
- Ability to create custom templates for variations on the standard checklist
Project Checklist SetupProject Checklists are set up in the Project Checklist (PROJCHECKLIST) rule in Rule Maintenance. Checklists are created in the rule and tied to a specific project type. You can have one set of master checklist items per project type. However, you can create multiple checklists in the rule as long as they are all tied to unique project types.
The layout and grouping of the checklist items is defined by the Node Level value in the rule. The Node Level establishes the indentation level of the line item. Node Levels are -1 for headers, 0 for sub-groups, and then 1 through 3 for increasing levels of indentation for the line items.
Creating a new checklist in the Project Checklist rule is most easily accomplished using the Rule Detail Import from a spreadsheet.
Importing rule details is an advanced user function and should only be performed with the help of a support consultant. There is a high potential for data loss or data damage if the import is not performed correctly.
Details on the setup and field by field definitions for the Project Checklist rule can be found in the
Project Checklist Rule Wiki.
Project Checklist Layout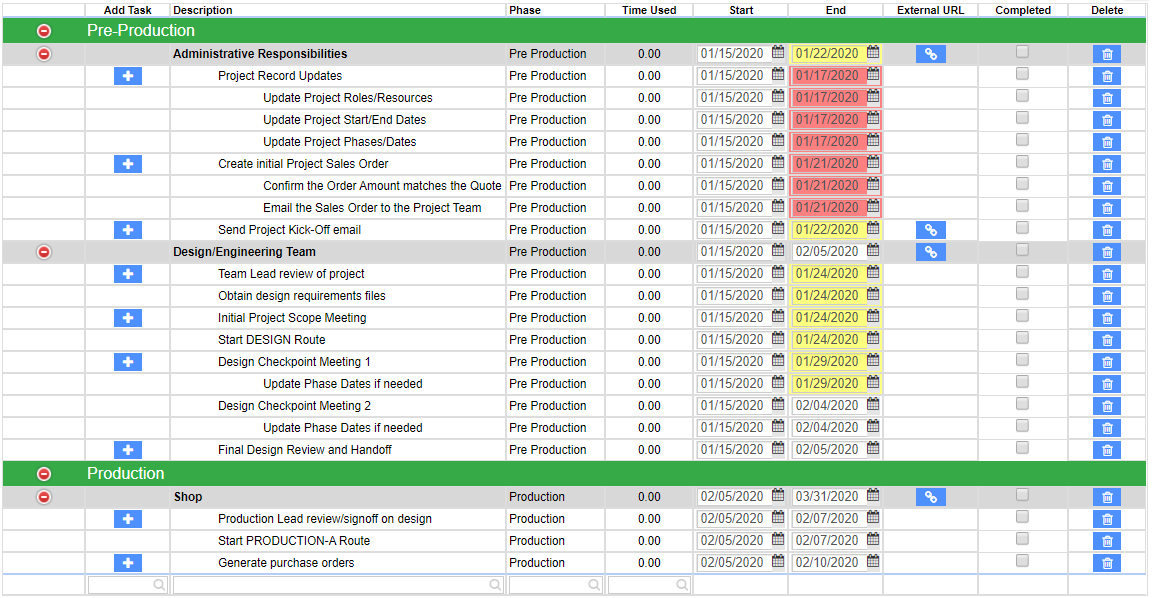 Project Checklist |
The color coding, visual layout, collapse and expand functionality, and the reflexes around time entry totals are all controlled by a setup feature called node level in the Rule Maintenance setup. The hierarchy of node levels is shown and described below. In order for collapse/expand functionality to work correctly, all headers (node level -1) should be followed by sub-groups (node level 0) when building and sorting the layout.
- Group Header (Node Level -1)
- Group Subcategory (Node Level 0)
- Subcategory line item (Node Level 1)
- Subcategory indented line item (Node Level 2)
- Subcategory double indented line item (Node Level 3)
Group Headers (Green lines) – Checklist lines defined as headers in the rule act as a group header for every line item below, until the next header record is reached. Header lines are displayed in green and will show the total time recorded for all lines contained in that group. Collapsing or expanding a header will collapse all lines in that group. Header lines are intended for grouping and display control only and they will not display phase information, URL links, and cannot be completed.
Sub-Groups (Grey lines) – Sub-groups or sub-sections within the group headers are defined by a Node Level of ‘0’. Sub-groups are displayed in grey. Sub-groups will display the total time recorded for all lines contained in the sub-group until either the next sub-group, or the next header is reached. Sub-groups have full functionality and can track phase dates, link to web pages, and can be marked complete.
Line Items (White lines) – Line items are considered the action lines. They can also be used to display additional information or steps for the line above. Line items are displayed according to their Node Level, where a Node Level of 1 is a single indent from Node Level 0, Node Level 2 is two indents from 0, and so on. Line items will display the total time for all tasks started from that line only.
Special Actions (Collapse, Rebuild, Refresh)
Reload Project Checklist – This function performs a refresh of the data and keeps you in the Project Checklist screen. It can be used after adding custom lines, editing line details, or to display the most current totals.
Rebuild Project Checklist – The rebuild function recreates the checklist from the rule setup, updates any phase date changes, and can restore any deleted lines. Manually edited Start and End Dates will not be updated on a Rebuild function. Rebuild will keep any lines with action taken such as tasks added or completions.
The rebuild function also prompts the customizable template screen which allows you to rebuild against a modified template of the setup from the rule. Details on the template functionality are described below.
Collapse All – This will collapse the entire checklist down to only the header lines.
Expand All – This will expand all headers, sub-groups, and detail lines completely.
Edit Row – This pops up an edit window with the selected line details displayed. Custom lines can be fully modified. Lines created from the rule setup only allow limited edits.
Add Row Above – This pops up a line edit window that allows you to quickly add a custom line to the checklist above the selected line. These lines are saved to the displayed checklist only, and do not update the rule setup.
Add Row Below – This pops up a line edit window that allows you to quickly add a custom line to the checklist below the selected line. These lines are saved to the displayed checklist only, and do not update the rule setup.
Adding a TaskChecklist lines with a linked standard task code will display a ‘+’ button in the Add Task column. Task and Time Entry is not required to use Project Checklists, but it is a powerful feature.
Click on the ‘+’ button to launch the Quick Task modal screen. This screen allows users to record all of the essential information needed to create and complete a task in just a few seconds. Simply complete the required fields and click Save to record time tied to the specific checklist line. Clicking Save will complete the task. If additional work is done on the same line, just click the ‘+’ button again to record additional time. The total time recorded will be displayed in the Time Used column and will total into the sub-group and header totals as well.
Displaying Task InformationThe Time Used totals are a clickable link that pops up a window displaying all tasks that make up that time. The task name is a clickable link that will launch the task record if more details are needed. The task name also has a right-click menu that allows you to jump directly to the Time Entry details, Void the task, and other functions.
Date Warnings/Phase Integration
The Start and End Dates can pull directly from the Project Phase record when there is an exact match on the phase name. The dates can be also be manually edited as needed. If the Project Phase Dates are changed in the Project Phases tab, the Rebuild Project Checklist function will update any unedited dates with the new dates.
The End Date value is color coded to display dates within 7 days of being overdue in yellow. Overdue End Dates are displayed in red. A legend is provided below the checklist for reference.
Marking a line complete clears the warning colors.
Completing a Line
When a checklist step is complete, simply check the ‘Complete’ box next to that line. The line will turn blue, any date warnings will clear, and the ability to launch Quick Tasks from that line will be removed.
All task and time entry details are retained and remain accessible.
Deleting a Line
The trashcan icon is a clickable action button and can be used to delete an unwanted line. A pop-up warning will ask if you are sure you want to delete the line.
Adding a Custom Line
Custom lines can be added above or below any selected line. You can even add custom headers and sub-groups to create a new section, if desired.
Click on the Add Row Above or Add Row Below action button to prompt the Edit window. You can set all the details for the new line from this window and click Save. The custom action line will be displayed in purple.
Use the Reload Project Checklist action button to refresh the record after adding any custom lines.
Accessing Web LinksIf the checklist line item has a URL saved in the Project Checklist rule, a clickable link icon will display in the External URL column that loads the website in a new tab. This feature can be used to point users to support or reference material on a web-based Wiki or any valid URL location.
Using the Footer Filters
The boxes directly below the last line of the checklist with magnifying glass icons are footer filters. These can be used to quickly find records in a large checklist when you know a keyword or even a partial string of text. The checklist is filtered as you type so you can quickly condense a large checklist to see only the records you need.
Using Templates
Clicking the Rebuild Project Checklist action button loads the Choose Template screen. To rebuild against the system standard defined in the Project Checklist rule, just click select. To create a custom template that removes lines or sections from the standard, click the Copy button.
Enter a unique name for the custom template.
Uncheck any lines or sections that should be removed and click Save. The saved template will be available for use on any future projects of the same project type.
Export/Import FunctionsThe
Export Checklist and
Import Checklist action buttons offer a backup and restore function for the displayed checklist. Before performing any complicated manual changes, or adding multiple custom rows or sections, or rebuilding the checklist, users should perform the 'Export Checklist' function to create a backup of the project checklist.
'Export Checklist' will save a .ZIP file to the local Downloads folder of all project checklist components, including links to task and time entries, all date settings, and individual line completion status.
If a manual change, customization, or rebuild does not create the results desired, simply run the 'Import Checklist' function, select the .ZIP file of the most recent backup, and the record will be restored to the exact state it was in at the time of the backup/export.
