General Information
Default Menu Location Maintain >> Item Control >> Customer Pricing
Screen Name PRICEGROUP
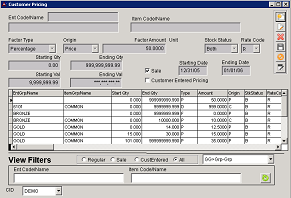 Customer Pricing Screen |
FunctionThe
Maintain Pricing screen is used to create and maintain item pricing rules.
Setting Up a Price for a Specific Customer
To set up a new pricing matrix, follow these steps:
NOTE: For this example we will set up a new pricing rule for a specific customer and item.
STEP 1: In the Filter section on the bottom half of the screen, select which type of pricing matrix you want to create:
•GG>Ent-Grp: Customer and Item Price Group
•EI>Ent-Item: Customer and Item
STEP 2: Enter the Customer's Price Group in the
Ent Code/Name field and the Item code or Item Price Group in the
Item Code/Name field.
STEP 3: Click the
Refresh button to see all current pricing rules set up for your Customer-Item matrix. A blank grid means there are no pricing rules set up yet.
STEP 4: Tab down to
Factor Type field and enter the pricing rules. The remaining fields are described below. Click
Save when finished.
Setting Up a New Customer Group
STEP 1: Set up a new pricing group in the following rule in Rule Maintenance. (If you need help adding rules, please contact your ABIS consultant.)
STEP 2: Link the Sold To record to the new pricing group for the desired customers.
STEP 3:In the Filter section on the bottom half of the screen, select one of the following:
•GG>Grp-Grp: Customer Pricing Code and Item Price Group
•GG>Grp-Item: Customer Pricing Code and Item
STEP 4: Select the Add button to add a new entry. Enter the pricing code you set up in step 1 in the
Ent Code/Name field and the Item code or Item Price Group in the
Item Code/Name field.
STEP 5: Tab down to
Factor Type field and enter the pricing rules. The remaining fields are described below. Fill out the desired entries and save the record. The example image represents a setup where 'Walk In' customers receive a 20% discount on items with the COMMON Item Price Group. Click
Save when finished.
STEP 6: Click the
Refresh button to see all current pricing rules set up for your Customer-Item matrix. A blank grid means there are no pricing rules set up yet.
Fields/Filters
Factor Type: This determines what the markup will be based upon (dollars, percentage, or fixed price).
Origin: Select whether the factor will be based on the
Cost (the base cost) or
Price (the list/retail price).
Factor: Enter the percentage/amount that will be marked up or discounted.
For a discount, enter a negative symbol (-) before the number.Unit: Select the unit of measure that should be used. This is normally going to be the item's sell unit.
Stock Status: Select the stock status of the item (Stock, Non-Stock, Both).
Rate Code: Enter the billing rate used for this item.
Starting Qty: The minimum quantity for this pricing rule.
Ending Qty: The maximum quantity for this pricing rule.
Sale: Check this box if your pricing rule is only a promotion for a valid date range. Sales are looked at first in the pricing program and will override other pricing rules (other than a customer's contract).
Starting/Ending Date: Enter the start and ending date of the promotion/sale.
