General Info
Default Menu Location: Transaction >> Importers/Exporters >> Address Book >> User Import
Screen Name: IMPORTUSER
Function: The Import User screen creates the User in Adjutant attribute record, links it to the Contact ID, and can complete all of the required fields in the User Details tab and the User Password Settings tab. The import program can even establish user security mimics.
- Many of the fields on the Import User Records template are mandatory. Required fields are noted below in the file definitions section.
- The Password Settings fields must be filled in on the import file. CID password setting defaults are not loaded during the import.
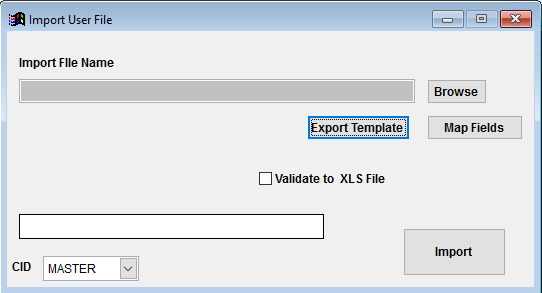 Import User File Screen |
File Name/Browse: Use the Browse button to locate and select the completed user record import template file (in XLS format)
Export Template: Generates a blank User Import template file
Map Fields: Fields must be mapped prior to importing. If no changes have been made to the column headings, the mapping screen should show all green, and you can click OK to continue. If any of the Input Field Name columns on the left are red, single-click on the line on the left column, and then double-click the desired mapped field in the right column to complete the mapping. Repeat for any red lines on the left that should be mapped. If there are additional columns in the source file that should NOT be mapped, they can be left unmapped (displayed in red). Mandatory fields will require that they be mapped before clicking OK.
Validate to XLS File: Selecting this box will create an XLS errors file listing any rows that would create errors such as invalid data, or duplicate records. If no errors are found in the file, the import will still process and no error file will be generated. Checking the validate box only prevents the import process if errors are encountered.
User Record Import File Definitions
Required fields are indicated with *
*f1 - Contid - Contact ID (CONTID (keyno) of contact record)
f2 - Userid - Desired User ID. If left blank, the system will generate a UserID based of the contact name.
f3 - Password - Desired Password
f4 - Admin - Should the user be an Admin in Desktop (Y/N)
f5 - Defprinter - User's Default Printer ID
f6 - Termid - Scanner terminal ID
f7 - Freq - Scanner frequency setting
*f8 - Defloctid - Default Warehouse name. Enter the Warehouse name, not the LOCTID value.
*f9 - Defcid - Default CID name
f10 - DefLaser - Default Laser Printer name
f11 - DefLaserNo - Default Laser Printer ID
*f12 - Lang - User's default language. Use ENG for English.
*f13 - Active - Sets the Active field in the USERID datatable. Should be Y for all new user imports.
f14 - Ext - Phone extension
f15 - DefScreen - Blank will default to 'CID Pulldown for Menu'. In order to set a different screen default, it must be entered in the format 'do form sogrid' where you would replace the 'sogrid' part with the desired screen name.
f16 - FaxUser - Fax UserID value
f17 - FaxPass - Fax Password value
f18 - FaxPress - Fax Press Name value
*f19 - DMenu - Default menu name. Must match exactly to a valid saved menu. 'Default' is the most common entry.
f20 - SMTPserver - SMTP server name
*f21 - ReqLet - Require letters in password. Enter Y or N.
*f22 - ReqNum - Require numbers in password. Enter Y or N.
*f23 - ReqOth - Require special characters in password. Enter Y or N.
*f24 - MaxLen - Maximum length for password. If left blank, it will import zero and prevent any password entry over 0 characters.
*f25 - MinLen - Minimum length for password. For best practices, enter a value of 8 or higher.
f26 - Expin - Number of days for password to expire
*f27 - NeverExp - Enter Y to check the 'Never Expire' box. Enter N to expire password according to the 'Expire In' days.
f28 - ReuseIn - Allow the same password to be reused in
XX days
f29 - LoAfter - Lock the user out after
XX unsuccessful login attempts
f30 - LoFor - If the user is locked out, lock them out for
XX minutes
f31 - PasswordExpDate - Sets the manual password expiration date in the USERID datatable
*f32 - ActiveUser - Enter Y to set the 'Active User' flag. Enter N to leave the 'Active User' field blank.
*f33 - NoChange - Enter Y to set the 'User Cannot Change Password' flag. Enter N to leave it blank and allow password changes.
*f34 - ForceChange - Enter Y to set the 'Change Password at Next Login' flag. Enter N to leave it blank.
f35 - SMTPuser - SMTP User ID
f36 - SMTPpassword - SMTP password
f37 - SMTPdomain - SMTP domain
*f38 - ESMTP - Enter Y to set the ESMTP flag. Enter N to leave it blank.
*f39 - DNUFlag - Enter Y to set the Desktop Named User flag. Enter N to leave it blank.
*f40 - WNUFlag - Enter Y to set the Web Named User flag. Enter N to leave it blank.
*f41 - TNUFlag - Enter Y to set the Terminal Named User flag. Enter N to leave it blank.
f42 - MimicID - Enter the CONTID value for the UserID that this record should mimic
f43 - SMTPPort - SMTP port number
f44 - TUserID - Terminal UserID for scanners
f45 - TuPassword - Desired password for scanners
f46 - DST - Enter Y to set the DST (Daylight Savings Time) flag. Enter N to leave it blank.
f47 - GMTOff - Enter the number of hours to offset the user's system time based on GMT. Negative hours are allowed.
*f48 - SMTPTLS - Enter Y to set the SMTP TLS flag. Enter N to leave it blank.
*f49 - SMTPSSL - Enter Y to set the SMTP SSL flag. Enter N to leave it blank.
f50 - SMTPAuth - Sets the SMTP Authorization type. Entry must exactly match one of the system-defined types. Most common entry is 'Default'. Other possible entries are 'None', 'Login', and 'Plain'.
General Import Template File Notes
- Template files are typically generated from their respective Import screen using an 'Export Template' button.
- Using the 'Export Template' button from an updated system will help ensure that you are using the most up-to-date import file, and will help avoid errors.
- Templates generally (but not in all cases) contain 3 rows of header information.
- The first row is generally labelled with f1 through f## and is used to give a consistent column id to each data column. Do not remove this row unless instructed.
- The second row is labelled with the column data/field name. The values in this row are used for the file mapping screen. Editing these values is generally not needed and may make the field mapping process difficult.
- The third row (if present) is labelled either with the same values from row 2, or with more detailed field descriptions. The third row is available to create a customer-friendly name for the associated data column.
- The third row should be removed from the source file prior to importing. It will cause errors since it will be treated as the first import record on the file.
- Import files MUST always be saved as 'Microsoft Excel 5.0/95 Workbook (*.xls)' format until further notice. The import screens will generate errors if the file type is not correct.
- It is a good idea to perform a Mapping Table Import using a current source list before beginning on any imports. Without a current mapping table, the quality of imports can be compromised. The Mapping Table Import only needs to be run once on a newly set up Adjutant system. It does not need to be run before each import.
- Export a current list from the Mapping Table Import screen from an updated system (or contact your Implementation Consultant for an updated file).
- Perform a Mapping Table Import on the target system with the XLS file from the step above.
