General Information
Default Menu Location Transaction >> Importers/Exporters >> Accounting >> AP Invoice Import
Screen Name IMPORTAPINV
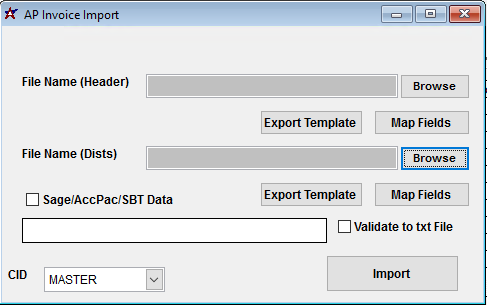
Function The AP Invoice Import screen allows users to import external Account Payable invoices into Adjutant.
 AP Invoice Import Screen |
File Name(Header)/Browse: Use the Browse button to locate and select the completed AP Invoice Header import template file (in XLS format). Note - both the Header and Distributions files are required and must be imported at the same time.
File Name(Dists)/Browse: Use the Browse button to locate and select the completed AP Invoice Distributions import template file (in XLS format). Note - both the Header and Distributions files are required and must be imported at the same time.
Export Template: Generates a blank AP Invoice Header or Distributions template file
Map Fields: Fields must be mapped prior to importing. If no changes have been made to the column headings, the mapping screen should show all green, and you can click OK to continue. If any of the Input Field Name columns on the left are red, single-click on the line on the left column, and then double-click the desired mapped field in the right column to complete the mapping. Repeat for any red lines on the left that should be mapped. If there are additional columns in the source file that should NOT be mapped, they can be left unmapped (displayed in red). Mandatory fields will require that they be mapped before clicking OK.
Sage/AccPac/SBT Data: This checkbox is no longer used
Validate to TXT file: Selecting this box will create an TXT errors file listing any rows that would create errors such as invalid data, or duplicate records. If no errors are found in the file, the import will still process and no error file will be generated. Checking the validate box only prevents the import process if errors are encountered.
AP Invoice Import Header File Definitions
f1 - Invno - AP invoice number
f2 - Vendno - Vendor number in Adjutant
f3 - PPriority - Payment priority value. '2' is the most common entry.
f4 - PTerms - Payment terms for the selected invoice. Valid terms from the TERMS rule should be used. If an entry is found during import that doesn't match an existing TERMS rule record, that entry will be added to the TERMS rule with no other rule details. This allows the import to complete, but could add unwanted records to the TERMS rule.
f5 - PurAmt - Original AP invoice amount
f6 - PaidAmt - Cumulative amount paid toward this invoice. If also importing an AP Check file, this amount should match the total of all non-void checks linked to the invoice.
f7 - Balance - AP invoice open balance
f8 - UDRef - AP invoice reference #
f9 - APAcc - AP payable GL account stored in the APMAST table. This is used for selecting AP invoice records by payable account on some reports. This value should match the account flagged as the control account in the AP Invoice Distribution import.
f10 - PurDate - AP Invoice Date value. Generally the date marked on the invoice. (MM/DD/YYYY)
f11 - TranDte - AP invoice Post Date value, or the date that the invoice was posted. (MM/DD/YYYY)
f12 - DueDate - AP invoice Due Date value. Due Date should be manually set for all imported records, it will not calculate from the terms during import. (MM/DD/YYYY)
f13 - DisDate - AP invoice Discount Date value. This is the last date an invoice can be paid and still qualify for a discount. (MM/DD/YYYY)
f14 - PDisc - Field not in use
f15 - PDays - Field not in use
f16 - PNet - Field not in use
f17 - Discount - Field not in use
f18 - DisAmt - AP invoice discount dollar amount. This value gets saved in the APMAST table as an approved discount amount. Any value imported will load into the Approve AP Invoice screen as a pre-set discount value.
f19 - AdjAmt - AP invoice adjustment dollar amount. This value gets saved in the APMAST table as an approved adjustment amount. Any value imported will load into the Approve AP Invoice screen as a pre-set adjustment value.
f20 - AprPay - Approved payable amount. Any entry here will set the approved to pay flag. Leave this blank to process approvals through the Approve to Pay process. This amount should match the balance value, or if using discounts and adjustments, it should match the remaining balance.
f21 - AprAdj - Marks the adjustment amount as approved
f22 - Amt1099 - AP invoice 1099 Amt value. The Remit To 1099 Type is used to set the 1099 Type on the invoice record.
f23 - Buyer - Field not in use
f24 - CheckNo - AP Check number for last check paid on this invoice. Check details imported on this file will only update the APMAST table, and will not create any records in the Payment tab. The AP Check Import must be used to create details in the AP Invoice Payment tab.
f25 - CheckDate - AP Check date for last check paid on this invoice. Check details imported on this file will only update the APMAST table, and will not create any records in the Payment tab. The AP Check Import must be used to create details in the AP Invoice Payment tab.
f26 - ChkAcc - AP Checking GL Account associated with this invoice
f27 - Typ1099 - This field is not used to set the 1099 Type. In order to import 1099 amounts with AP Invoices, the vendor's Remit To record must be set up with the default 1099 Type, which will be used for any imported 1099 amounts on AP invoices.
f28 - Descrip - AP Invoice Notes value
f29 - Template - Enter 'Y' to mark the associated line as a template record
f30 - Voucher - AP invoice Voucher field value
f31 - VRemitTo - Remit To organization number
AP Invoice Import Distribution File Definitions
Each AP Invoice should have at least two lines per invoice in this file - one line for the control account total amount, and additional distribution lines that total up to the original invoice balance.
f1 - Invno - AP invoice number that links to the invoice number in the header file
f2 - Vendno - Vendor number in Adjutant
f3 - UDRef - Field not in use
f4 - GLAcnt - GL Account associated with each line of distribution detail
f5 - Amount - Distribution amount for the associated detail. The control account distribution amount should equal the original invoice amount (puramt) and the balancing distribution details should add up the offsetting balance for the original invoice amount. Credit amounts (generally for the CtrlAcct amount) should be entered with the credit sign in the format -999.99. These amounts are imported as already posted to the general ledger, and they will not create accounting entries.
f6 - CtrlAcct - Enter 'Y' to code the line as the payable control account distribution entry. This sets the GL Account and the Amount as the Control Account entries in the GL Distribution tab. Leaving the CtrlAcct field empty sets the associated line as a balancing distribution entry. Each imported invoice should have a Ctrl Acct amount that matches the total of all distribution lines linked to the same invoice.
f7 - Descrip - Distribution note entry for non-control account lines
General Import Template File Notes
- Template files are typically generated from their respective Import screen using an 'Export Template' button.
- Using the 'Export Template' button from an updated system will help ensure that you are using the most up-to-date import file, and will help avoid errors.
- Templates generally (but not in all cases) contain 3 rows of header information.
- The first row is generally labelled with f1 through f## and is used to give a consistent column id to each data column. Do not remove this row unless instructed.
- The second row is labelled with the column data/field name. The values in this row are used for the file mapping screen. Editing these values is generally not needed and may make the field mapping process difficult.
- The third row (if present) is labelled either with the same values from row 2, or with more detailed field descriptions. The third row is available to create a customer-friendly name for the associated data column.
- The third row should be removed from the source file prior to importing. It will cause errors since it will be treated as the first import record on the file.
- Import files MUST always be saved as 'Microsoft Excel 5.0/95 Workbook (*.xls)' format until further notice. The import screens will generate errors if the file type is not correct.
- It is a good idea to perform a Mapping Table Import using a current source list before beginning on any imports. Without a current mapping table, the quality of imports can be compromised. The Mapping Table Import only needs to be run once on a newly set up Adjutant system. It does not need to be run before each import.
- Export a current list from the Mapping Table Import screen from an updated system (or contact your Implementation Consultant for an updated file).
- Perform a Mapping Table Import on the target system with the XLS file from the step above.
