Standard Tasks
From Adjutant Wiki
General Information
Default Menu Location: Maintain >> Task Management >> Standard Task Maintenance
Screen Name: STANDTASK
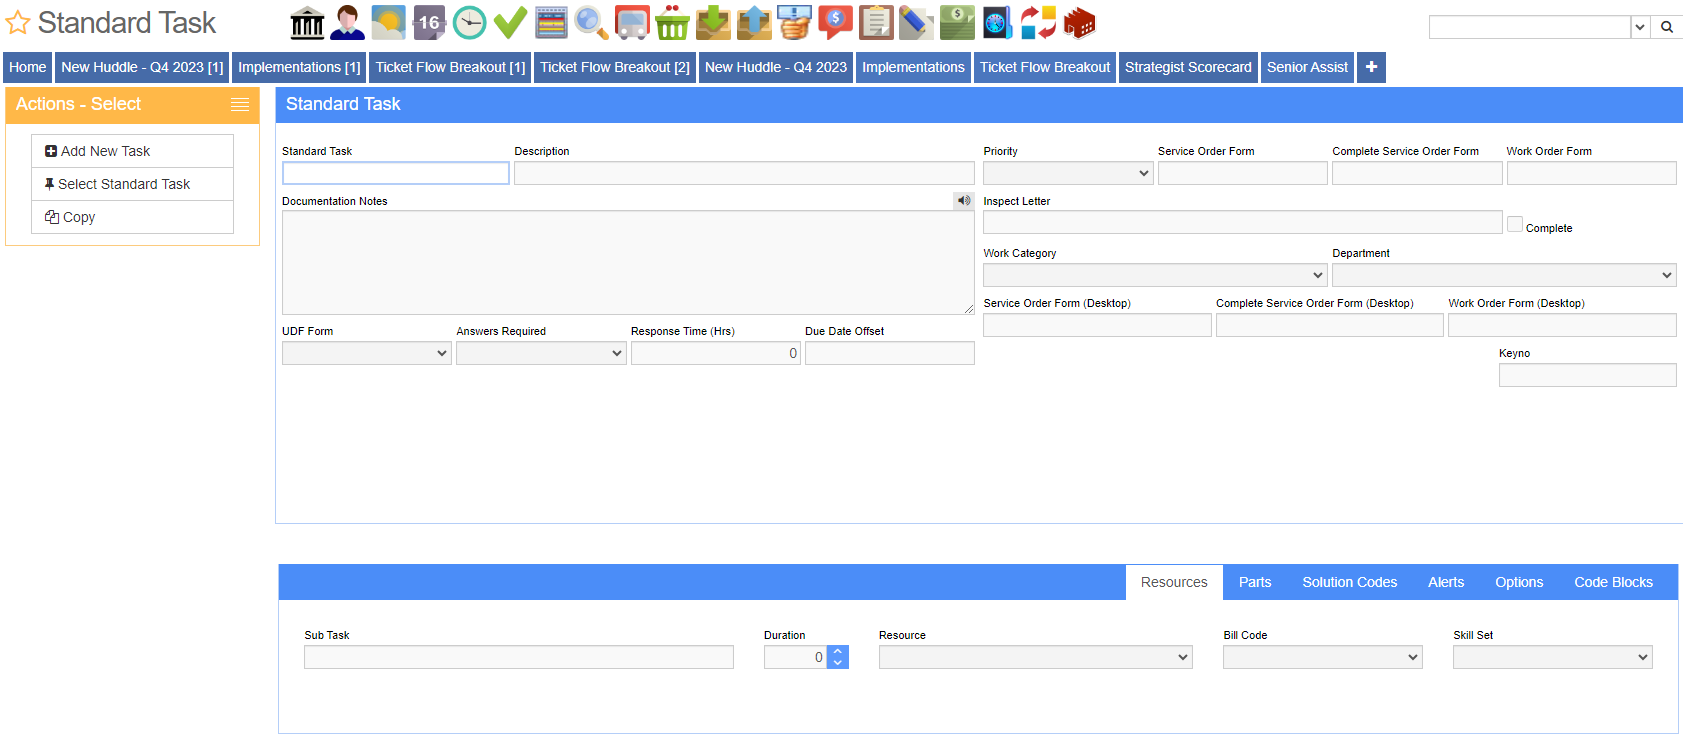
Function: Create/Edit Standard Tasks (aka Trouble Codes).
Main Fields
Standard Task: The name/code of the task. The first field below this is for a short description of the task. The second field is for a full description of the task.
Priority: The default priority of the task. Task Priorities are maintained in Rule Maintenance of Adjutant by selecting Task Priority Codes from the drop-down menu.
SvrOrd Form: If there is a default service order form for the task, enter it here.
CSvrOrd Form:
WrkOrd Form: If there is a default work order form for the task, enter it here.
Inspect Letter: If there is an inspection letter formatted for this task, enter it here.
Work Cat: The category of work for the task. Work Categories are used to sort invoices. Work Categories may be added/edited/deleted in the Rules area of Adjutant by selecting Task Work Type Categories from the drop-down menu.
Department: The department assigned to the task. Departments are maintained in the Rules area of Adjutant by selecting Departments from the drop-down menu.
UDF Form: The UDF form that is linked to the task.
Answers Req'd: This will determine when the answers to the UDF need to be completed.
Response Time:
Due Date Offset:
Options Tab
Summ Type: The option selected in this dropdown will change how the tasks get grouped/totaled on the PrintBS5 Billing Statement. Full will count the number of tasks and use solution code billing from contract setup, Full-Hours will count the number of tasks and total the amount of hours by billcode that were spent on that type of task, Address will count the number of tasks while also displaying each address the work was done for, Address-Count will do the same as Address, but it will total the amount of hours by billcode.
Inspection Required: Check this box if there is an inspection required to complete the task.
Check for Duplicates: Check this box if you want the system to check and see if this standard task has ever been used before when creating a new service order for a specific location.
External Auth Required: Check this box if an external authorization is required to perform the task.
Internal Auth Required: Check this box if an internal authorization is required to perform the task.
RouteID: This is the route tied to the task. See [^ROUTEMAINT|Route Maintenance] for more route details.
Run On Complete: This will fire the route selected above on completion of the task.
Require Labor Note: This will require a timesheet note to be entered before a labor line can be saved.
Svr Grp: Select the service group for this task (if applicable). Service groups are used to sort standard tasks in the Work Order Generator.
ETemplate: This is the email template associated with the standard task.
Admin: This option is used if the task should default as an administrative task.
Non-Billable: This can be used if the task is to be set to default as a non-billable task.
In-House: Setting this option will cancel out any associated drive/travel time of the billto/customer.
Alert Stand-In: This option will automatically alert the stand in of the resource if they are out of office/unavailable.
Exclude from Grid: This will exclude this type of task from the Task Grid.
Req Sol Cod: This will make the task require a solution code.
Milestone: This will make the task auto complete as soon as it is created.
Lock DueDate: This will lock the due date of the task.
Wrk Auto Print: This will automatically print the Working Service Order form when this type of task is created.
Comp Auto Print: This will automatically print the Completed Service Order form when this type of task is created.
Quick Bill: This will enable the Quick Bill button on the Time Entry screen of a task. If the task is completed and locked, the Quick Bill button will load the Approve Edit billing screen with the records to be billed for that task.
Require Signature: This will require the Capture Signature button from Adjutant 2.0 to be used before the task can be completed.
Resources Tab
Bill Code: The bill code to be used for this task. Billing codes may be added/edited/deleted in the Rules area of Adjutant by selecting Billing Codes from the drop-down menu.
Skill Set: The skill set for the task.
Resource: Only the resources assigned with this skill set in the Resource Screen under the attribute list may be assigned to the task.
Duration: The default average duration this task will take (in hours).
Parts Tab
Item: A default item used for this task. Items may be added/edited/deleted in the Inventory Item Master. To add an item click the button.
Desc: A description of the item used for this task. This will be automatically populated once the item name is entered if the item is already entered in the Inventory Item Master.
Qty: The quantity of the item used.
Price: The price of each item used. This will be automatically populated once the item name is entered if the item is already entered in the Inventory Item Master.
Unit: The unit of the item used.
Lock Price: This will lock the price of the item.
Owner: Owner of the item.
HeldFor: HeldFor of the item.
Force To Timesheet:
Solution Codes Tab
Solution Code: The Solution Code as set up in the Solution Codes Screen.
Description: The description of the solution code.
Alerts Tab
Contact: On the right side of the screen, select the contact associated to this task alert and click add. Once this is completed, the alert can be created/edited/modified.
Event: This is the action within the task which triggers the alert. Examples include Assign, Build, Create, Create2Assign, Due Date, Due Date Change, Edited, and First Assignment.
Method: This is the method of alert that will be used. Examples include Email, Appointment, Text Message, Fax, etc.
Template Name: This is the template (previously created) or type of alert that will be sent out.
Time Offset: This is the time offset which the alert will be sent. Example: If the offset is set for 30s, the alert will be sent out 30 seconds after the alert event has taken place.
Proj Whse This will tie a specific warehouse to the alert.

