Suspect Import Guide
From Adjutant Wiki
Contents
General Data Import Notes
Refer to the Data Import General Information page for information and guidance on general import timeline, formatting import templates, as well as how to ensure you are using the most current template information for data imports.
Suspect Import Notes
Timing and Preparation
The Suspect Import should occur after all Address Book setup items have been completed, and after the Rule Maintenance records associated with Prospect/Suspect and Project Opportunity tracking have been established. The Address Book Setup Guide covers all of the Rule Maintenance records that should be completed prior to importing customer records.
General Notes
Suspect Attribute - The suspect import process can create the necessary Suspect attribute during the import process, or it can update details for existing Suspect attributes. The Suspect Import requires that the Suspect attribute exists in the Organization Attributes (ATT_ENT) rule with the Attribute (text1) set to 'SUSPECT' and the Form Name (text3) set to "SUSPECT'.
Rule Maintenance Records - Below are the Rule Maintenance details that should be set in order to track the most data for imported suspects:
- Suspect Lead Sources (SOURCE_ENT)
- Suspect Market Segment (MKTSEGMENT)
- Suspect Customer Type (CUSTTYPE)
- Suspect Business Division (BUSDIV)
- Suspect Current Status (SUSPECTSTATUS)
- Suspect NAICS Codes (NAICS)
- Suspect Credit Limit (SUSPECTCL)
Suspect Import File Data Scrubbing
Every customer's data will have different issues that need addressing. Some of the issues will not make themselves visible until after the data has been imported and is in use during parallel testing. This is why it is critically important to perform an early import, and keep accurate notes on issues that need to be addressed on a supplemental import, or for a complete re-import. Some common things that need attention during suspect data scrubbing include:
- Invalid Rule-Based Data - Nearly every field in the suspect import is validated against a rule. Any import entry that does not exactly match a corresponding rule detail entry will be ignored and no error will be generated. Verify that all rule-based file details match an existing rule detail entry before importing.
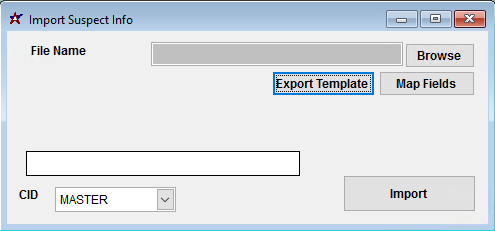
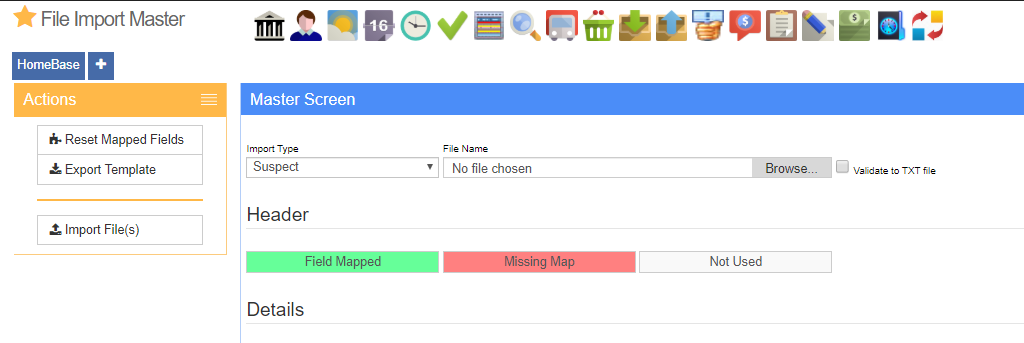
Suspect Import Screen (IMPORTSUSPECT)
Desktop Menu Location: Transaction>>Importers/Exporters>>Address Book>>Suspect Import
ADJ20/20 Menu Location: Transaction>>Importers>>File Import Master (importmaster_s.HTM)
File Name/Browse: Use the Browse button to locate and select the completed suspect import template file (in XLS format)
Export Template: Generates a blank Suspect Import template file
Map Fields: Fields must be mapped prior to importing. If no changes have been made to the column headings, the mapping screen should show all green, and you can click OK to continue. If any of the Input Field Name columns on the left are red, single-click on the line on the left column, and then double-click the desired mapped field in the right column to complete the mapping. Repeat for any red lines on the left that should be mapped. If there are additional columns in the source file that should NOT be mapped, they can be left unmapped (displayed in red). Mandatory fields will require that they be mapped before clicking OK.
Suspect Import File Definitions
f1 - Custno - Customer Number (Organization ID), Customer number must exist or the import will skip that record.
f2 - LeadSource - Suspect Lead Source. This must match the text1 (name) value of an entry in the SOURCE_ENT rule.
f3 - upDLeadSource - Enter 'y' to replace the existing Suspect Attribute details for this field.
f4 - MarkSeg - Suspect Market Segment. This must match the text1 (name) value of an entry in the MKTSEGMENT rule.
f5 - upDMarkSeg - Enter 'y' to replace the existing Suspect Attribute details for this field.
f6 - CustType - Suspect Customer Type. This must match the text1 (name) value of an entry in the CUSTTYPE rule.
f7 - upCustType - Enter 'y' to replace the existing Suspect Attribute details for this field.
f8 - BusDiv - Suspect Business Division. This must match the text1 (name) value of an entry in the BUSDIV rule.
f9 - upBusDiv - Enter 'y' to replace the existing Suspect Attribute details for this field.
f10 - CurStat - Suspect Current Status. This must match the text1 (name) value of an entry in the SUSPECTSTATUS rule.
f11 - upCurStat - Enter 'y' to replace the existing Suspect Attribute details for this field.
f12 - NAICS1 - North American Industry Classification System Level 1 Code. This is generally a two-digit value.
f13 - upDNAICS1 - Enter 'y' to replace the existing Suspect Attribute details for this field.
f14 - NAICS2 - North American Industry Classification System Level 2 Code. This is generally a three-digit value.
f15 - upDNAICS2 - Enter 'y' to replace the existing Suspect Attribute details for this field.
f16 - NAICS3 - North American Industry Classification System Level 3 Code. This is generally a four-digit value.
f17 - upDNAICS2 - Enter 'y' to replace the existing Suspect Attribute details for this field.
f18 - NAICS4 - North American Industry Classification System Level 4 Code. This is generally a five-digit value.
f19 - upDNAICS4 - Enter 'y' to replace the existing Suspect Attribute details for this field.
f20 - NAICS5 - North American Industry Classification System Level 5 Code. This is generally a six-digit value.
f21 - upDNAICS5 - Enter 'y' to replace the existing Suspect Attribute details for this field.
f22 - Climit - Suspect Credit Limit. This must match the text1 (name) value of an entry in the SUSPECTCL rule.
f23 - upDClimit - Enter 'y' to replace the existing Suspect Attribute details for this field.
f24 - DUNS - Dun & Bradstreet unique 9-digit number (numeric, 9 digits)
f25 - upDDUNS - Enter 'y' to replace the existing Suspect Attribute details for this field.
f26 - TOTEMP - Total employee count, updates the Total Emp# field (numeric, up to 6 digits)
f27 - upDTOTEMP - Enter 'y' to replace the existing Suspect Attribute details for this field.
f28 - EMPSITE - Number of employees at the site, update the Emp at this Site field (numeric, up to 6 digits)
f29 - upDEMPSITE - Enter 'y' to replace the existing Suspect Attribute details for this field.
f30 - TOTALSALES - Total annual sales estimate, updates the Total Est. Sales field (numeric, up to 10 digits)
f31 - upDTOTALSALES - Enter 'y' to replace the existing Suspect Attribute details for this field.
Suspect Import Reconciliation
Reconciling imported data should begin with spot-checking several records field-by-field for complete data import. Pick records from the source file that have the most data columns filled in. Verify that all source file data fields imported correctly and display as expected.
Verify that all rule-based fields import and display correctly in the Suspect attribute:
- Suspect Lead Sources (SOURCE_ENT)
- Suspect Market Segment (MKTSEGMENT)
- Suspect Customer Type (CUSTTYPE)
- Suspect Business Division (BUSDIV)
- Suspect Current Status (SUSPECTSTATUS)
- Suspect NAICS Codes (NAICS)
- Suspect Credit Limit (SUSPECTCL)
Suspect Import Additional Steps
There are no additional steps required for the suspect import.
Suspect Import Database Tables
Importing suspect records can affect the following databases:
ENT - Each imported suspect is tied to an existing customer number with a unique ENTID value. This is the keyno for the associated Org. The ENTID value is used to link to other attribute records. However, the ENTID value may be labeled as CUSTID or VENDID in other tables.
PCXREF - Each attribute record will also create an entry in this table. The PTABLE value for all of these should be ENT, and the TYPE value should be SUSPECT. The PARENTID and CHILDID values will correspond to ENTIDs from the ENT table.
SUSPECTS - All of the Suspect attribute details are stored in this table. Suspect records will have a KEYNO created and linked to the CUSTID (which is the ENTID from the ENT table)


