Connection Import/Match Guide
From Adjutant Wiki
Contents
- 1 General Data Import Notes
- 2 Connection Import/Match Notes
- 3 Connection Import/Match File Data Scrubbing
- 4 Connection Import/Match Screen (WATERMATCH2)
- 5 Connection Import/Match File Definitions
- 6 Connection Import/Match Reconciliation
- 7 Connection Import/Match Additional Steps
- 8 Connection Import/Match Database Tables
General Data Import Notes
Refer to the Data Import General Information page for information and guidance on general import timeline, formatting import templates, as well as how to ensure you are using the most current template information for data imports.
Connection Import/Match Notes
Timing and Preparation
The Connection Import can occur after the District Organization records have been added. If the customer will be tracking Builder and/or Subdivision information, Organization records for builders and subdivisions will need to be added prior to importing connection records.
The following Organization Attributes need to exist in the Organization Attributes (ATT_ENT) rule before creating Districts, Builders, Subdivisions, and Connections:
- Standard Customer attributes (BILLTO, SOLDTO, SHIPTO) - The SOLDTO attribute description is commonly relabeled as 'Dsitrict'
- Builder attribute (with BUILDERDEP form name)
- Subdivision attribute
- Connection attribute (with CONNECTION form name)
If the customer will be using the Tapping application, the Tap Sizes (TAPS) rule must be set up prior to importing connection records.
General Notes
There are multiple versions of Connection Import programs in Adjutant. This guide covers the Connection Import/Match (WATERMATCH2) screen, which is the most current and full-featured connection import program. Unless specifically directed to use on of the older connection import programs, the WATERMATCH2 version should always be used.
The obsolete connection import programs are listed below:
- Connection Import/Match (Old) - WATERMATCH
- Water District Update - WATERUPDATE
- District Meter Import - WATERIMPORT
Connection Import/Match File Data Scrubbing
Every customer's data will have different issues that need addressing. Some of the issues will not make themselves visible until after the data has been imported and is in use during parallel testing. This is why it is critically important to perform an early import, and keep accurate notes on issues that need to be addressed on a supplemental import, or for a complete re-import. Some common things that need attention during Sales Order data scrubbing include:
- DCustNo - The district customer number is how the imported service connections are linked to the water district. It can also be used to establish the connection customer number. Review the data in this column carefully to ensure that connection addresses are linked to the correct district.
- Account - The account column is the customer number associated with the service connection record. The connections can be manually numbered, or if the account column is left blank, the system can assign a sequential number for each imported connection. The system will use the district customer number followed by a dash and then a sequential number starting with 1 (or from the highest number already used in that district) using the spreadsheet order to set the sequence. For example, if your district customer number is 71, the system will generate the connection numbers as 71-1, 71-2, 71-3, and so on.
Keep in mind that the customer number field only allows for 10 characters max. So, if you district number is long, or you have thousands of connections to import, you may run into auto-numbering issues since the system can't create a customer number over 10 digits.
- Address Info - Standardize address details as much as possible. Review for misspellings, extra spaces, and anything that could affect the quality of the data. Review any issues with the customer before altering the source data. If time allows, standardize capitalization.
Connection Import/Match Screen (WATERMATCH2)
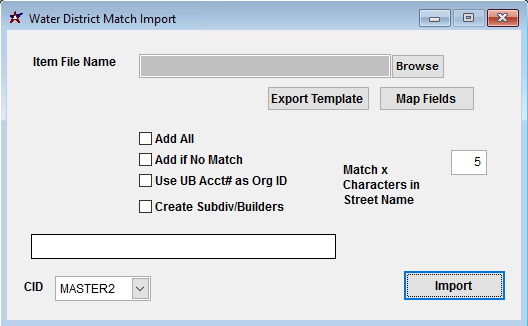
Menu Location: Transaction>>Importers/Exporters>>Task and Time Billing>>Connection Import/Match
File Name/Browse: Use the Browse button to locate and select the completed Connection Import template file (in XLS format).
Export Template: Generates a blank Connection Import template file
Map Fields: Fields must be mapped prior to importing. If no changes have been made to the column headings, the mapping screen should show all green, and you can click OK to continue. If any of the Input Field Name columns on the left are red, single-click on the line on the left column, and then double-click the desired mapped field in the right column to complete the mapping. Repeat for any red lines on the left that should be mapped. If there are additional columns in the source file that should NOT be mapped, they can be left unmapped (displayed in red). Mandatory fields will require that they be mapped before clicking OK.
Add All: Select the Add All box to bypass the matching logic and add all connections as new organizations
Add if No Match: Select Add if No Match to use the 'Match X Characters in the Street Name' value to update matched records, and add unmatched records
Use UB Acct# as Org ID: If checked, and the Account column is empty, the import will use the UB/AVR Acct# value in the file as the connection customer number
Create Subdiv/Builders: If checked, the import process will assign the SUBDIV and BUILDER attributes to the organization records, and create the required parent links to the associated Districts
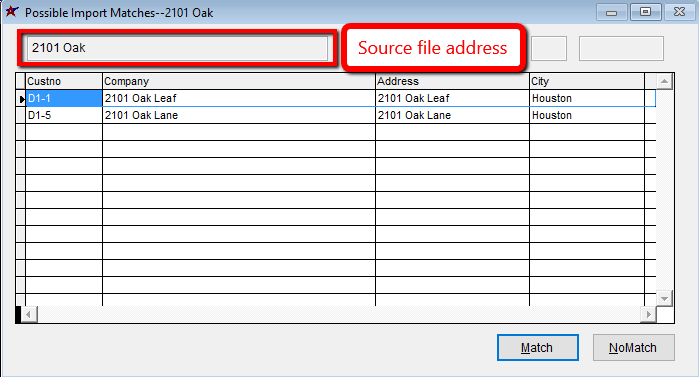
Match X Characters in Street Name: Set the number of characters the matching logic should use to scan for matches in the street address value. Exact matches are automatically processed as a match. Otherwise, the system will scan X characters to present a grid of possible matches, where you can select the appropriate matched record, or choose No Match.
Connection Import/Match File Definitions
Required fields are indicated with an *
*f1 - DCustNo - District customer number. Must be a valid Adjutant Organization ID up with the SOLDTO attribute (usually relabeled as District)
f2 - Account - Connection customer number. Can be filled in with a 10 digit number, or the system can autonumber each connection in the format DDDD-###, where DDDD is the district number and ### is a sequential number.
f3 - Name - Contact name associated with the service connection. A Contact record is also created for this name, associated with the connection Organization.
f4 - Phone - Primary phone number associated with the service connection
f5 - Tract - Tract number in the Connections jump screen (numeric, 7 characters max)
f6 - Meter SN - Current meter serial number (alphanumeric, 20 characters max, some special characters allowed)
f7 - Builder - Home builder Organization ID. Must be a valid Organization in Adjutant. The 'Create Subdiv/Builders' checkbox on the import screen can assign the Builder attribute and automatically create the parent link to the district record.
f8 - Tap Size - Tap size for the service connection in the Connections jump screen. Must match the text1 value from the Tap Sizes (TAPS) rule exactly.
f9 - HSCode - This field is not in use at this time
f10 - Install Date - Install date in the Connections jump screen (MM/DD/YY format)
f11 - Sewer Date Pass - Sewer inspection date in the Connections jump screen (MM/DD/YY format)
f12 - CSI Date Pass - Customer Service Inspection date in the Connections jump screen (MM/DD/YY format)
f13 - Subdivision - Subdivision name Organization ID. Must be a valid Organization in Adjutant. The 'Create Subdiv/Builders' checkbox on the import screen can assign the Subdiv attribute and automatically create the parent link to the district record.
f14 - Section - Section number in the Connections jump screen (alphanumeric, 50 characters max)
f15 - Block - Block number in the Connections jump screen (alphanumeric, 50 characters max)
f16 - Lot - Lot number in the Connections jump screen (alphanumeric, 50 characters max)
*f17 - Service Address - Service connection street address. This value is set as the Organization company name as well as the Address value.
f18 - Email - Primary email address associated with the service connection
f19 - Address2 - Address 2 information for the service connection address
f20 - Address3 - Address 3 information for the service connection address
f21 - City - City for the service connection address
f22 - State - State for the service connection address
f23 - ZipCode - Zip Code for the service connection address
f24 - MAddress1 - Mailing Address information for the service connection address
f25 - MAddress2 - Mailing Address 2 information for the service connection address
f26 - MCity - Mailing City for the service connection address
f27 - MState - Mailing State for the service connection address
f28 - MZipCode - Mailing Zip Code for the service connection address
f29 - AVR Acct# - AVR Acct # or UB Acct# (depending on field label) in the Connections jump screen (alphanumeric, 20 characters max, some special characters allowed)
f30 - Key Map Pg# - Key Map # in the SHIPTO screen for the service connection address (alphanumeric, 20 characters max)
f31 - Cross Street - Cross Street in the SHIPTO screen for the service connection address
f32 - Latitude - Latitude value in the SHIPTO screen for the service connection address (numeric, up to 5 decimals, allows '-' sign)
f33 - Longitude - Longitude value in the SHIPTO screen for the service connection address (numeric, up to 5 decimals, allows '-' sign)
Connection Import/Match Reconciliation
Reconciling imported data should begin with spot-checking several records field-by-field for complete data import. Pick records from the source file that have the most data columns filled in. Verify that all source file data fields imported correctly and display as expected.
Run the Organization report for the imported records. The Org. Attributes 'Choose from the list' option can be used to select only Organizations with the Connection attribute (remember to save your selection). Review the report for basic details and look for any missing or incorrect records.
Connection Import/Match Additional Steps
Run the Update Blank County Records utility to fill in the county information for imported records.
Connection Import/Match Database Tables
ENT - Each imported connection creates a new ENTID in this table
CONNINFO - Each imported connection creates a unique KEYNO in this table tied to the ENTID value which is the link to the ENTID in the ENT table.
SHIPTO - Each imported connection creates a unique KEYNO in this table tied to the CUSTID which is the link to the ENTID in the ENT table.
VCONTACT - Contact details will create a unique CONTID in this table tied to the CUSTID which is the link to the ENTID in the ENT table.
PCXREF - Attributes from the connection import (CONNECTION, SHIPTO, BUILDER, SUBDIV) create KEYNOs in this table, where the TYPE is the attribute name. The PARENTID link is the ENTID from the ENT table for the associated Organization.


