Resource Import Guide
From Adjutant Wiki
Contents
General Data Import Notes
Refer to the Data Import General Information page for information and guidance on general import timeline, formatting import templates, as well as how to ensure you are using the most current template information for data imports.
Resource Import Notes
Timing and Preparation
The Resource Import should occur as soon as the required Task Management Rule Maintenance records have been completely set up. Follow the Task Management Setup Guide for details on the required setup procedures.
General Notes
The Resource Import will create the Resource attribute on the Contact record.
The Resource Import is only used to add records. It will not update existing records.
Resource Import File Data Scrubbing
Every customer's data will have different issues that need addressing. Some of the issues will not make themselves visible until after the data has been imported and is in use during parallel testing. This is why it is critically important to perform an early import, and keep accurate notes on issues that need to be addressed on a supplemental import, or for a complete re-import. Some common things that need attention during Sales Order data scrubbing include:
- First Name / Last Name - The import attaches the Resource record to the Contact record using the First Name, Last Name, and Custno fields on the import file. Pay close attention to any duplicate names in the file. The import will assign the resource record to the first matching name under the indicated Custno. The ContID (Contact ID) value is not used on the import. Verify that all resource First Name and Last Name entries match the spelling from the names in the Contact record EXACTLY. Best practice is to use an exported list of contact records, or to use the same source data from the contact import (as long as none of the contact names have been changed since the contact import).
- SHour / EHour - Carefully review the formatting and the data in the SHour/EHour columns, if importing. To avoid issues, best practice is to format both columns as 'Text' in Excel, and enter all times as either HH:MMAM or HH:MMPM. If the columns are left as 'General' format, Excel may display the entries as entered, but will format the entries as time entries which will not match the import standard format. For example, to enter an 8 to 5 schedule, enter 08:00AM in the SHour column, and 05:00PM in the EHour column. These entries will import correctly and will not require any additional editing.
- SCodes - A single column allows for importing multiple Skill Code selections on the Resource record. To assign multiple codes, enter the codes separated by a comma. For example, to assign the Operator (OP), Senior Tech (ST), and Tech (TE) skills, you would enter OP,ST,TE in the SCodes column.
- BCodes - A single column allows for importing multiple Billing Code selections on the Resource record. To assign multiple codes, enter the codes separated by a comma. For example, to assign Admin (AD), Holiday (HO), and Jury Duty (JD) bill codes, you would enter AD,HO,JD in the BCodes column.
- Attributes - A single column allows for importing multiple attributes on the Resource record. To assign multiple attributes, enter each complete attribute name from the Resource Attributes (ATT_RES) rule (not the codes) separated by a comma.
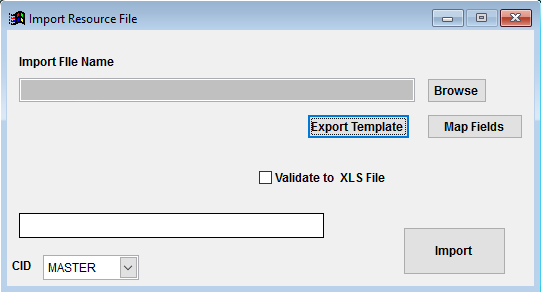
Resource Import Screen (IMPORTRES)
Menu Location: Transaction>>Importers/Exporters>>Task and Time Billing>>Resource Import
Import File Name/Browse: Use the Browse button to locate and select the completed Resource Import template file (in XLS format).
Export Template: Generates a blank Resource Import template file
Map Fields: Fields must be mapped prior to importing. If no changes have been made to the column headings, the mapping screen should show all green, and you can click OK to continue. If any of the Input Field Name columns on the left are red, single-click on the line on the left column, and then double-click the desired mapped field in the right column to complete the mapping. Repeat for any red lines on the left that should be mapped. If there are additional columns in the source file that should NOT be mapped, they can be left unmapped (displayed in red). Mandatory fields will require that they be mapped before clicking OK.
Validate to XLS File: Generates an XLS file of errors that will prevent the import from completing. The file will only be created if there are errors.
Resource Import File Definitions
Required fields are indicated with an *
*f1 - Custno - Organization customer number for the target contact record
f2 - ContID - Contact ID from the VCONTACT table. This field is no longer used.
*f3 - FirstName - First name for the target contact record. This must exactly match the first name of an existing contact record in Adjutant.
*f4 - LastName - Last name for the target contact record. This must exactly match the last name of an existing contact record in Adjutant.
*f5 - TabCode - Schedule Tab code from the Schedule Tab Names (TABS) rule to populate the Schedule Tab.
*f6 - RName - Resource full name
f7 - DefSkill - Default Skill Code from the Resource Skill Codes (SKILL) rule
f8 - ShowSch - Enter a 'Y' to check the Show on Schedule box. Leave blank or enter 'N' to leave the box unchecked.
f9 - IsSuper - Enter a 'Y' to check the Supervisor box. This defines the resource record as an available Supervisor in the Supervisor drop-down list. Leave blank or enter 'N' to leave the box unchecked.
f10 - WOForm - Enter the complete form name and .FRX extension to default a specific work order form for the resource.
f11 - EquipID - Enter a valid Asset Tag ID to associate a default piece of equipment for the resource. The Asset Tag ID must exist in Adjutant.
f12 - ResNo - Resource ID (RID) number for the resource (max 10 characters, alphanumeric)
f13 - EmplID - Accounting system employee ID used for third party integrations. (max 9 characters, alphanumeric)
*f14 - DefWHSE - Default Warehouse name
f15 - DefBCode - Default Billing Code from the Billing Codes (BILLCODE) rule
f16 - GLGroup - GL Group name associated with the resource. The GL Group must exist in Adjutant.
*f17 - DCode - Department Code from the Departments (DEPT) rule
f18 - SHour - Schedule start hour. Must be entered in HH:MMAM or HH:MMPM format, and the Excel column should be formatted as text
f19 - EHour - Schedule end hour. Must be entered in HH:MMAM or HH:MMPM format, and the Excel column should be formatted as text
f20 - Email - Resource email address
f21 - CostFact - Resource cost factor, or labor rate per hour, in 999.99 format. This field is only used with certain setup options, and it can adversely affect accounting balances if not set up correctly. Do not import this value unless you are absolutely clear on the reflexes.
*f22 - StartTab - Schedule Tab code from the Schedule Tab Names (TABS) rule to populate the Start on Tab.
f23 - AssHour - Number of hours for the Default Hours per Day field
f24 - ResHour - Number of hours for the Daily Schedule Load (Hrs) field
f25 - AllOver - Enter a 'Y' to allow overscheduling.
f26 - ParentOnly - Enter a 'Y' to check the Assign to Parent Company Only box. Leave blank or enter 'N' to leave the box unchecked.
f27 - GMTOff - Schedule offset from Greenwich Mean Time in whole hours (valid entries are -## to ##)
f28 - DST - Enter a 'Y' to check the DST (Daylight Savings Time) box. Leave blank or enter 'N' to leave the box unchecked.
f29 - HireDate - Resource hire date in MM/DD/YY format
f30 - TermDate - Resource termination date in MM/DD/YY format
f31 - SCodes - Enter Skill Code(s) from the Resource Skill Codes (SKILL) rule. To enter multiple skills for a resource, separate each code by a comma.
f32 - BCodes - Enter Billing Code(s) from the Billing Codes (BILLCODE) rule. To enter multiple billing codes for a resource, separate each code by a comma.
f33 - Attributes - Enter Resource Attribute name(s) from the Resource Attributes (ATT_RES) rule (not the codes). To assign multiple attributes for a resource, separate each attribute name by a comma.
Resource Import Reconciliation
Reconciling imported data should begin with spot-checking several records field-by-field for complete data import. Pick records from the source file that have the most data columns filled in. Verify that all source file data fields imported correctly and display as expected.
Run the Resource List report for the imported records. Review the report for basic details and look for any missing or incorrect records.
Resource Import Additional Steps
There are no additional steps required for the Resource Import.
Resource Import Database Tables
RTRESOURCE - Each imported standard task creates a new KEYNO in the this table, linked to the CONTID of the associated contact.
PCXREF - Skill Codes and Resource Attributes (added from the SCodes and Attributes columns) create KEYNOs in this table, where the TYPE is the skill or attribute name. The PARENTID link is the CONTID from the VCONTACT table. The CHILDID is the KEYNO from the RTRESOURCE table.
RESXBC - Resource bill codes are added to this table with a unique KEYNO for each billcode, linked to to resource KEYNO from the RTRESOURCE table.

