Profile Import Guide
From Adjutant Wiki
Contents
General Import Template File Notes
- Template files are typically generated from their respective Import screen using an 'Export Template' button.
- Using the 'Export Template' button from an updated system will help ensure that you are using the most up-to-date import file, and will help avoid errors.
- Templates generally (but not in all cases) contain 3 rows of header information.
- The first row is generally labelled with f1 through f## and is used to give a consistent column id to each data column. Do not remove this row unless instructed.
- The second row is labelled with the column data/field name. The values in this row are used for the file mapping screen. Editing these values is generally not needed and may make the field mapping process difficult.
- The third row (if present) is labelled either with the same values from row 2, or with more detailed field descriptions. The third row is available to create a customer-friendly name for the associated data column.
- The third row should be removed from the source file prior to importing. It will cause errors since it will be treated as the first import record on the file.
- Import files MUST always be saved as 'Microsoft Excel 5.0/95 Workbook (*.xls)' format until further notice. The import screens will generate errors if the file type is not correct.
- It is a good idea to perform a Mapping Table Import using a current source list before beginning on any imports. Without a current mapping table, the quality of imports can be compromised. The Mapping Table Import only needs to be run once on a newly set up Adjutant system. It does not need to be run before each import.
- Export a current list from the Mapping Table Import screen from an updated system (or contact your Implementation Consultant for an updated file).
- Perform a Mapping Table Import on the target system with the XLS file from the step above.
Profile Import Notes
Timing and Preparation
The Profile Import should occur soon after the Item Master records have been imported and reviewed.
General Notes
The Profile Import will add profile records if they do not exist, but can also be used to update/replace existing records. The update function will replace all matched profile record details with the data in the latest import file.
The Profile Import creates profile data in a profile database linked to the item number. The profile data is displayed in Item Master through a department item attribute with the 'PROFILE' form tied to the attribute. The profile import process will not create the item department attribute. You must assign the department attribute in order for the imported profile details to display.
Profile Rules Special Reflexes
Profile Rule Maintenance records with number designations in the rule name have special reflexes designed to handle custom lists per item type. The reflexes use specific keywords in the associated item description to match item types to certain rule numbers. The item description names and their associated rule numbers are listed below.
- ONE: All profile rules with ONE in the rule name are coded to match against the following keywords in the item description
- PANEL
- TRIM
- SSR (SSR uses the PWIDTHTHREE rule for width, but uses ONE for all others)
- TWO: All profile rules with TWO in the rule name are coded to match against the following keywords in the item description
- CEE
- ZEE
- EAVE STRUT
- PRESS BRAKE
- CHANNEL
- THREE: The only profile rule with THREE in the rule name is Profile Width Three (PWIDTHTHREE) and is matched against SSR in the item description.
If the associated item description has text that exactly matches any of the bulleted items above, the profile screen drop-down list will be limited to only rule entries from the corresponding numbered rule. For example, if editing the profile color details for an item with 'PRESS BRAKE' in the item description, only items from PCOLORTWO will show up in the drop-down as valid for 'PRESS BRAKE' items.
If the associated item description does not have any text that matches any of the bulleted items above, the drop-down list will include ALL of the entries from ONE and TWO (and THREE for the Width drop-down). For example, if editing the profile color details for an item with the description 'Generic Item', the drop-down for profile color will include ALL of the entries from PCOLORONE and PCOLORTWO.
This can mean that items with descriptions that do not fall exclusively into the keywords above can end up displaying duplicate values in the drop-downs if the same profile names appear in both the ONE and TWO versions of the rule. Selecting either of the duplicated displayed profile detail options is generally fine, since they are both valid options. It will not matter if the option is selected from the ONE or TWO rule record.
The special reflexes need to be understood when building the profile rules. They also need to be understood when importing profile details. Imported details may import to the database, but may not show up in the profile screen if the combination of item description and numbered profile rule details prevent the imported profile information from showing up in the profile drop-down selection.
Profile Import File Data Scrubbing
Every customer's data will have different issues that need addressing. Some of the issues will not make themselves visible until after the data has been imported and is in use during parallel testing. This is why it is critically important to perform an early import, and keep accurate notes on issues that need to be addressed on a supplemental import, or for a complete re-import.
For consistency, and to avoid issues with conflicting details, you should always use ALL CAPS for the profile text1 values. There are several layers of coding to match the profile details and profile keys to various machine interfaces. Many of the third-party interfaces will generate errors or fail to validate details if they are not passed in ALL CAPS. To avoid errors and possible data mismatch issues, you should always use ALL CAPS for the imported profile details, which should match the ALL CAPS profile rule details. The following data fields should be updated to ALL CAPS before importing:
- Gauge (generally a number, but can include text)
- Profile
- Color
- Material
- Machine
- Width (generally a number, but can include text)
The fields above are all tied to profile rules, and the rules must contain the corresponding data in order to import. Review amd standardize spelling, capitalization, etc, before attempting to import. The import will not add rule details.
Width and Gauge: Review these columns carefully prior to import. If Width is entered as a fraction (8 15/16, for example), the Excel column data may display the fraction as entered, however, Excel will automatically store the value as a decimal number (8.9375). If the customer's data should be imported as as a fraction value, the Excel column must be formatted as text in order to store the value correctly.
Girth: The girth column should be imported as a numeric field with decimals. It will not handle fraction values. For example, if '8 15/16' is entered on the import file, and the column is formatted as text, it will ignore everything after the first digit, and will import as 8.0000. If the customer data is in fractions, you can use the same Excel logic described above with the Width and Gauge fields to your advantage. If the Girth column is formatted as General, Excel will automatically convert the fraction values to decimal equivalents and store the value as a decimal. The import process will import and save the decimal value in this case. Review the data carefully and understand how it will import. Girth is not a rule-based field (even though a rule exists), it imports as a number.
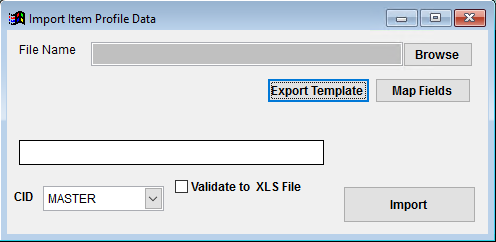
Profile Import Screen (IMPORTPROFILE)
Menu Location: Transaction>>Importers/Exporters>>Item Control>>Profile Import
Item File Name/Browse: Use the Browse button to locate and select the completed Profile import template file (in XLS format).
Export Template: Generates a blank Profile Import template file
Map Fields: Fields must be mapped prior to importing. If no changes have been made to the column headings, the mapping screen should show all green, and you can click OK to continue. If any of the Input Field Name columns on the left are red, single-click on the line on the left column, and then double-click the desired mapped field in the right column to complete the mapping. Repeat for any red lines on the left that should be mapped. If there are additional columns in the source file that should NOT be mapped, they can be left unmapped (displayed in red). Mandatory fields will require that they be mapped before clicking OK.
Validate to XLS File: Generates a XLS file of errors that will prevent the import from completing.
Profile Import File Definitions
Required fields are indicated with an *
*f1 - Item - Item number in Adjutant that the profile is attached to
f2 - Gauge - Gauge value (ALL CAPS) for the item profile. The value must exist in the PGAUGEONE or PGAUGETWO rule.
*f3 - Profile - Profile name (ALL CAPS) for the item profile. The value must exist in the PROFILE rule.
f4 - Color - Color value (ALL CAPS) for the item profile. The value must exist in the PCOLORONE or PCOLORTWO rule.
f5 - Girth - Numerical girth (up to 4 decimals) for the item profile
f6 - Material - Material value (ALL CAPS) for the item profile. The value must exist in the PMATONE or PMATTWO rule.
f7 - Machine - Production machine name (ALL CAPS) for the item profile. The value must exist in the PMACHINE rule.
f8 - Width - Width value (ALL CAPS) for the item profile. The value must exist in the PWIDTHONE, PWIDTHTWO, or PWIDTHREE rule.
f9 - ExcTrimGen - Enter 'Y' to check the 'Exclude from TrimGenius' box for the item profile
*f10 - ShortDesc - Short description (up to 50 characters) for the item profile
f11 - TypeDesc - Longer description (up to 100 characters) for the item profile
Profile Import Reconciliation
Reconciling imported data should begin with spot-checking several records field-by-field for complete data import. Pick records from the source file that have the most data columns filled in. Verify that all source file data fields imported correctly and display as expected.
Review profile data throughout production testing for accuracy.
Profile Import Additional Steps
There are no additional steps required for the BOM Import.
Profile Import Database Tables
PROFILEXRF - Profile details are stored in the PROFILEXRF table, linked to the item IKEY. Each imported record will have a unique PROFKEY value tied to the IKEY. There should no be duplicate IKET records. Only one profile record should exist per item.
PCXREF - Profile details are displayed in Item Master through the linked PROFILE form on the department item attribute. The Profile Import doesn't actually update the PCXREF table, but it may be helpful to find the associated department attribute records. The PCXREF TYPE field will be the name from the department item attribute rule. It should be the two character department code. The PARENTID and CHILID values should be the item's IKEY value.

