CID Name Change Guide
From Adjutant Wiki
Contents
Overview
This guide covers the 'Change CID Name' utility available in the Delete/Change CID program. The Delete/Change CID program is an ABIS-ONLY screen and should NEVER be accessed or operated by customers. Improper uses of the Delete/Change CID program can result in complete and unrecoverable loss of all data and extreme caution should be used when attempting any operation with this program.
Changing the CID name should be a very rare occurrence, and should only be attempted by ABIS personnel after consulting with a supervisor and senior development. Every customer's Adjutant installation is unique and there can be unforeseen issues when running the 'Change CID Name' tool. This guide is designed to cover the process, but may not cover every potential situation.
The 'Change CID Name' utility is designed to update all database instances of the previous CID name to the desired new CID name. The utility does not change the Adjutant folder structure for the Adjutant installation. If the CID change requires that the folder structure be updated, the development team will have to be involved to coordinate all of the required database moves. Changing the Adjutant folder structure may require system down-time, and may be a billable service. Consult your supervisor for guidance.
Preparation for CID Name Change
Review SQL Data
- In SQL, clear any IKEY data in the SOCANSWER table. The SOCANSWER table no longer uses the IKEY to link to the other SOC-related tables. If the 'Change CID Name' utility finds an IKEY in SOCANSWER linked to an inactive item, it will just delete the SOCANSWER record, which may cause issues.
- In SQL, review the ITEMDET table for any records with a blank CID entry. Address any blank CID records before running the 'Change CID Name' utility.
- In the Delete/Change CID screen, use the 'Check for Blank CID Records' utility to perform a system-wide SQL check for any empty CID fields. Noe that this utility will find ALL SQL tables with an empty CID field, even though it may be valid for certain SQL tables to have an empty CID field.
- As the utility processes, it will display the SQL table name and the total number of records in that table that contain a blank CID value.
- Review each displayed table and determine if action is needed to address the blank CID names in each table.
- The utility can be re-run as many times as needed after addressing any issues.
Coordinate with Customer
- Communicate clearly that the CID name change process will require every user to be logged out of the system during the process. The actual name change process is generally very fast and may only take a minute or more. However, the post-change validations may take longer. The process should occur after-hours, and proper expectations for system down-time should be set.
- Coordinate with an on-site resource to update the CID name text inside of the CString.TXT file inside of all AjTermC folders on PCs tat are running scanner base stations.
- Before processing the utility, use the 'Clear User Logins' screen to log all users out of Adjutant.
Changing the CID Name
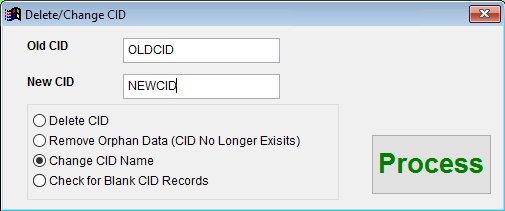
Switch to the target CID and access the Delete/Change CID screen
Select the 'Change CID Name' radio button
Enter the current CID name in the Old CID field Enter the desired new CID name in the New CID field
After triple-checking all entries, click the Process button
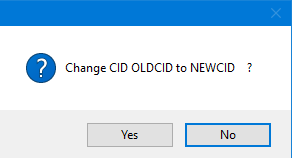
You will get a confirmation prompt. Click OK to proceed.
A warning will display with the change details. Click on Change CIDs if you are absolutely sure.
A series of messages will display as the utility processes through database records. If there are no errors encountered, a Processing Complete window will display as soon as it completes.
Post-Change Steps
Once the process completes, exit Adjutant and log back in with an ABIS Administrator password.
Upon logging in, you may see several messages indicating blank rules are being added.
The following steps assume the CID name change is being performed in a single-CID system. For a multi-CID environment, some of these steps will not be needed, or the steps require may be different. For each step, consider the system environment and adjust accordingly.
- Update the file name (should be OLDCID.BMP) for the CID Desktop background file.
- Update the Default CID value inside of the User in Adjutant attribute for the ABIS ADMIN USERID record.
- Update the CID name inside of the CSTRING.txt file.
- Update the Default CID for all user records with the following query in SQL:
- update userid set defcid = 'NEWCID' where defcid = 'OLDCID' (where NEWCID and OLDCID are replaced with the actual CID names)
- All custom form filenames for the old CID will need to be updated with the new CID name. Use Windows PowerShell to replace the old CID value on all file names.
- Launch Windows PowerShell from the RDP Start menu.
- Type 'X:' (where X is the root drive letter of the Adjutant folder on the RDP server) and hit Enter to access the root folder. Or you can use 'CD\' and hit Enter.
- Change to the desired CID's Adjutant directory, one folder at a time with the 'CD XXXX' command. If PowerShell lets you change directly to a subfolder, I can't figure it out.
- Type 'CD CID' then Enter (Replace CID with your customer's CID folder name, or first-level folder name)
- Type 'CD ADJUTANT' then Enter (If they are using something other than 'ADJUTANT' as their main folder, replace with their main folder name)
- For example, to access the live Adjutant folder in 'X:\Resource\Apps\LiveAdj\', you would do that in 3 steps - 'CD RESOURCE', then 'CD APPS', then 'CD LIVEADJ'.
- The 'DIR' command will list all folders and files in the selected directory.
- Copy the expression below and paste into the PowerShell cursor to rename all FRX files. IMPORTANT - replace the text 'oldcid' with the previous CID name, and replace 'newcid' with the new CID name
- Get-ChildItem -Filter "*oldcid.frx" | Rename-Item -NewName {$_.name -replace 'oldcid.frx', 'newcid.frx'}
- Copy the expression below and paste into the PowerShell cursor to rename all FRT files. IMPORTANT - replace the text 'oldcid' with the previous CID name, and replace 'newcid' with the new CID name
- Get-ChildItem -Filter "*oldcid.frt" | Rename-Item -NewName {$_.name -replace 'oldcid.frt', 'newcid.frt'}
- Type 'EXIT' and then Enter to close PowerShell.
- Update the CID name inside of the INBOXTEXT.txt and POPTEXT.txt files.
- Update the CID for items in the MASTERSCH table in SQL with the following query:
- update mastersch set cid = 'NEWCID' where cid = 'OLDCID' (where NEWCID and OLDCID are replaced with the actual CID names)
- Restart all services from the Server Tools screen
- For customers using AMS integration:
- Update Stock Table View
- Update the CID name inside of the AMSDATA.txt file
- (Optional) Update the OrgID associated with the Master ENT to the new CID, if the current OrigID is the same as the old CID. This can reduce confusion later.
- Update the Master ENT field in CID Maintenance after the Org record has been updated.


