Difference between revisions of "Work Order Generator"
From Adjutant Wiki
| Line 17: | Line 17: | ||
'''Step 3:''' Select the Problem Code you wish to create a work order for by checking the box located in the Selected column. | '''Step 3:''' Select the Problem Code you wish to create a work order for by checking the box located in the Selected column. | ||
| − | |||
| − | |||
| − | |||
| − | |||
| − | |||
| − | |||
'''Step 4:''' Select the Area/Supervisor to assign the work orders to from the Area drop-down menu. | '''Step 4:''' Select the Area/Supervisor to assign the work orders to from the Area drop-down menu. | ||
| Line 31: | Line 25: | ||
'''Step 7:''' Select which addresses to create the work order for by checking the boxes in the Selected column. | '''Step 7:''' Select which addresses to create the work order for by checking the boxes in the Selected column. | ||
| − | |||
| − | |||
'''Step 8:''' Click the '''Generate''' button to create the work order in the system and print them out. | '''Step 8:''' Click the '''Generate''' button to create the work order in the system and print them out. | ||
| + | [[Category: Task Management]] | ||
Revision as of 13:00, 2 October 2024
General Description
Default Menu Location Transaction >> Tapping >> Item Work Order Generator
Screen Name WOGEN
Function The Work Order Generator allows a user to generate multiple service orders (of different types if needed) for multiple addresses, all at once.
How To Generate Orders
Step 1: Enter the specified District in the District field.
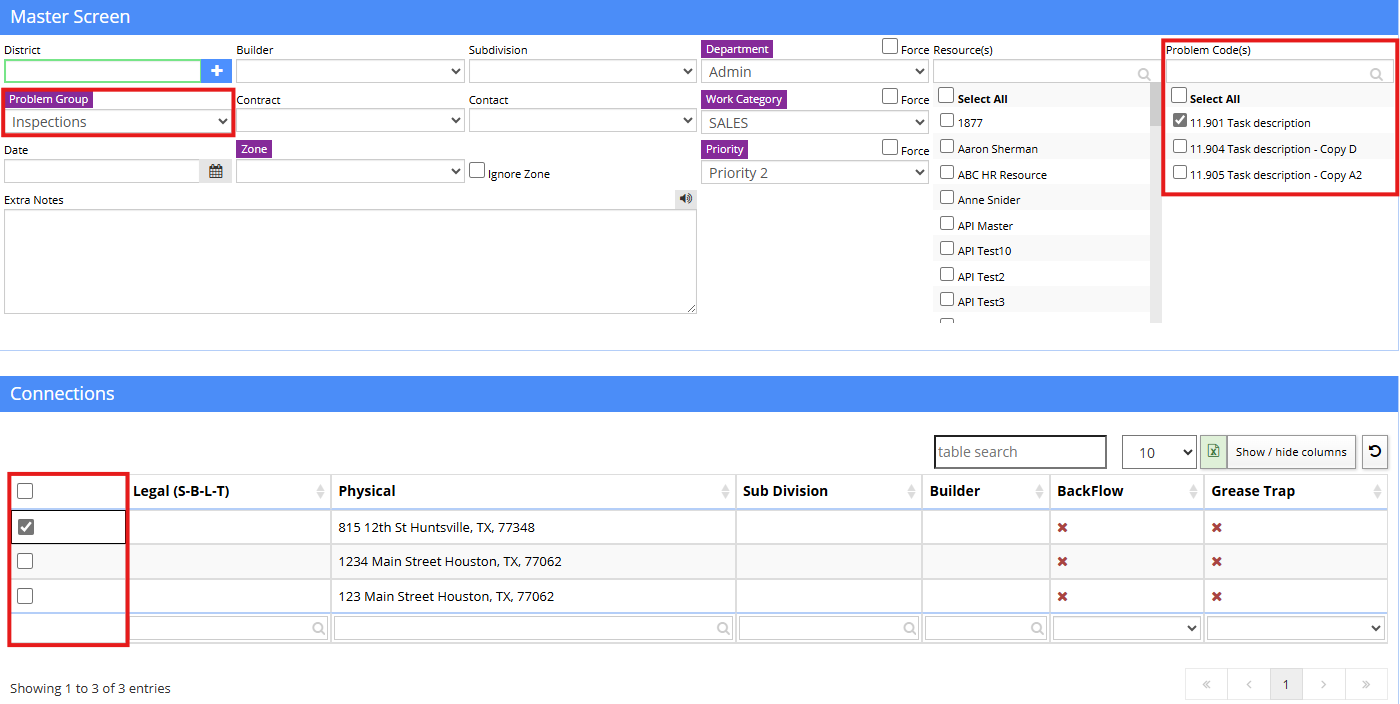
Step 2: Select the Problem Group from the drop-down menu. This filters the Problem Codes seen below.
Step 3: Select the Problem Code you wish to create a work order for by checking the box located in the Selected column.
Step 4: Select the Area/Supervisor to assign the work orders to from the Area drop-down menu.
Step 5: Select the person to assign the work orders to from the Resource drop-down menu. Leave this field blank to make the work order unassigned.
Step 6: Enter the date and time to schedule the work order in the Date and Time fields. Leave these fields blank to make the work orders unscheduled.
Step 7: Select which addresses to create the work order for by checking the boxes in the Selected column.
Step 8: Click the Generate button to create the work order in the system and print them out.

