Difference between revisions of "How to Set Up a Service"
From Adjutant Wiki
(Created page with "__NOTOC__ ==Overview== This guide will walk through how to set up backend Adjutant Programs to run as a service. ==How To== 1. Open the Service+ program on the computer you...") |
|||
| Line 9: | Line 9: | ||
[[File:Service1.png]] | [[File:Service1.png]] | ||
| − | 2. Fill out the "Service Name", "Display Name", and "Description fields". The values here correlate to how the service will be displayed in the Service+ program. | + | 2. Fill out the "Service Name", "Display Name", and "Description fields". The values here correlate to how the service will be displayed in the Service+ program. Click the "Next" button when these fields are filled out. |
[[File:service2.1.png]] | [[File:service2.1.png]] | ||
| − | + | 3. Select the browse button next to the Program field, then find and select the program that needs to be set up as a service. | |
| − | + | * The service must be set up to run the program from a physical drive on the computer, not a mapped drive. | |
| − | + | [[File:service3.png]] | |
| − | + | [[File:service3.1.png]] | |
| − | |||
| − | |||
| − | |||
| − | |||
| − | |||
| − | |||
| − | |||
| − | |||
| − | |||
| − | |||
| − | [[ | ||
Revision as of 10:02, 2 September 2020
Overview
This guide will walk through how to set up backend Adjutant Programs to run as a service.
How To
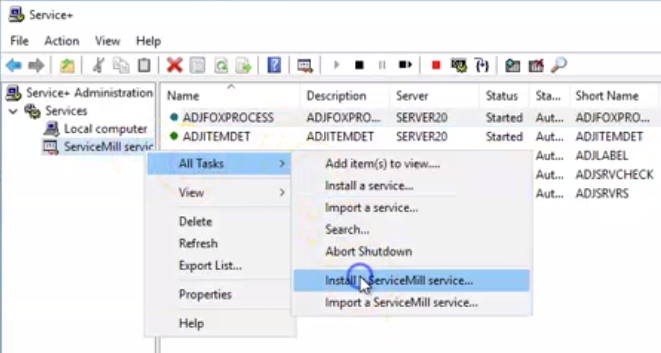
1. Open the Service+ program on the computer you want to install the service on. Expand the Services section in the column on the left. Right click the "ServiceMill services" option, hover over "All Tasks", then select the "Install a ServiceMill service..." option.
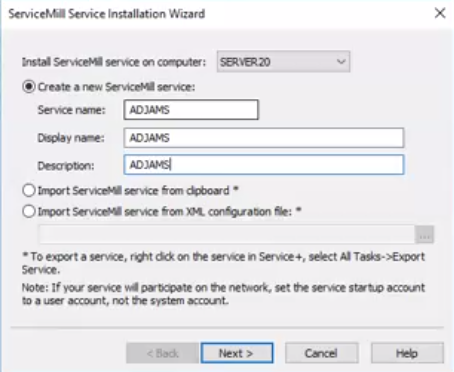
2. Fill out the "Service Name", "Display Name", and "Description fields". The values here correlate to how the service will be displayed in the Service+ program. Click the "Next" button when these fields are filled out.
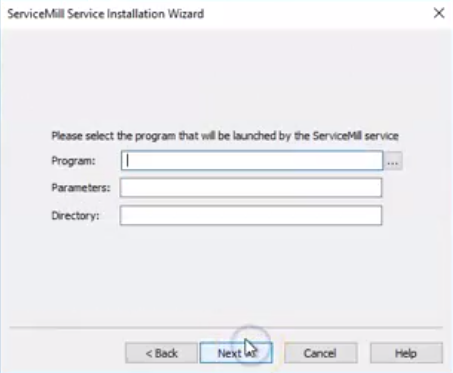
3. Select the browse button next to the Program field, then find and select the program that needs to be set up as a service.
- The service must be set up to run the program from a physical drive on the computer, not a mapped drive.


