Difference between revisions of "Schedule"

From Adjutant Wiki

 
(2 intermediate revisions by the same user not shown)
Line 12: Line 12:
  
 
[[File:menu1.png]]
 
[[File:menu1.png]]
[[File:menu2.png]]
+
[[File:menu3.png]]
==How-To Topic Part Two==
 
Consider whether or not an additional note is required to give an overview or additional information about this step. For example, if this is an optional step, or a step that maybe some customers will not need to complete - that information could be entered here.
 
  
Delete this section if the process only requires a single section.
 
  
# If the process involves multiple screens or multiple, distinct steps, break it up into sections using the headers.
+
# Go to Maintain > Task Management > UDFs/Forms/Decision Trees and add a new UDF question.
# Continue using the same format for additional steps.
 
#* You can link to another page in this wiki using the exact page name [[Contact Import Guide]] or you can override the link name [[Contact Import Guide|like this]]
 
#** Or you can use a full URL link [http://www.abiscorp.com/faq/index.php?title=Contact_Import_Guide like this]
 
#* You can link to a category page in this wiki and override the link name [[:Category:Best Practices|like this]] or just do this [[:Category:Best Practices]]
 
#* You can link to an external URL with the following format just by pasting the link - http://www.abiscorp.com/adjwiki/rule-itemcat.ashx
 
#** Or you can override the link name [http://www.abiscorp.com/adjwiki/rule-itemcat.ashx like this]
 
  
 +
[[File:udf1.png]]
  
==Additional Information==
+
# While still at Maintain > Task Management > UDFs/Forms/Decision Trees, go to the Forms tab and create a new form. Once you've created the new form, link the UDF you created in the previous step.
This section is an optional place to document any follow-up steps, further considerations, or links to other pages that may be helpful. Delete this section if it is not needed.  
 
  
Just for reference, below is an example of an indented bullet list, along with guidance for when to use bold formatting.  
+
[[File:udf2.png]]
  
* '''Menu Paths''' should be bold for easy reference
+
# Go to Maintain > Task Management > Standard Task Maintenance and link the UDF form to the desired standard task. 
** '''Screen Names''' should be bold
+
 
*** '''Tab Names''' inside of screen should also be bold
+
[[File:stask.png]]
**** '''Field Names''' should generally be bold. There may be cases where using single quotes for a 'field name' is appropriate.
+
 
***** 'Sections' in a screen such as the 'Customer' section label in the '''Order Entry''' screen should use single quotes
+
# To get the icons to display, go to the Questions section of any task you created using the standard task above and select the icons you want to display.

***** 'Column labels' in a grid should generally use single quotes
+
 
***** 'OK' or 'Cancel' buttons (or any other buttons on a pop-up message) should have single quotes
+
[[File:quest.png]]
* I have used italics for things like ''Report Names'' when I am referring to the report and not the screen name for the report, and for ''filenames.xlsx''
 
  
<code>Updating the Category tags is critical to helping customers find content. Review the Categories list and tag all categories below</code>


[[Category: Help]]
 
[[Category: Help]]
 
[[Category: Internal]]
 
[[Category: Internal]]

Latest revision as of 14:40, 27 April 2022

Adding icons to a scheduled task

This guide outlines how to add icons to a scheduled task.

Icon example.png


Setup

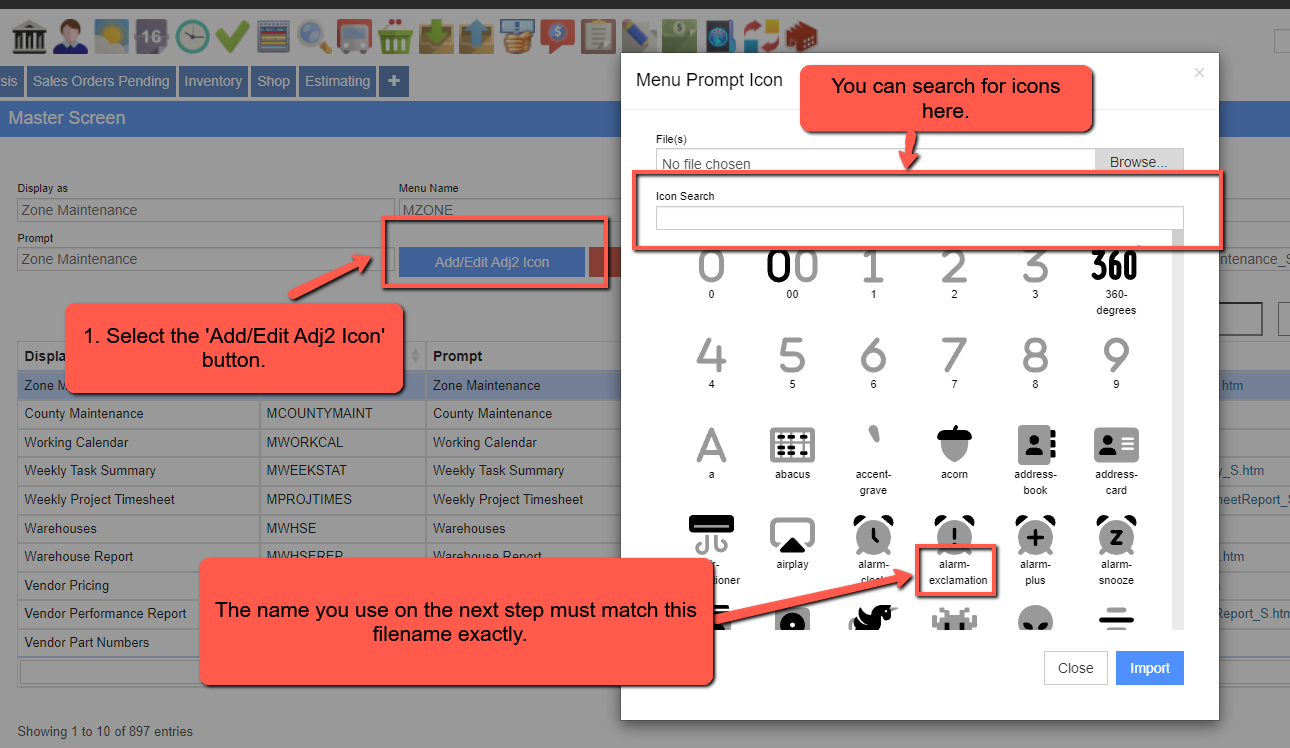
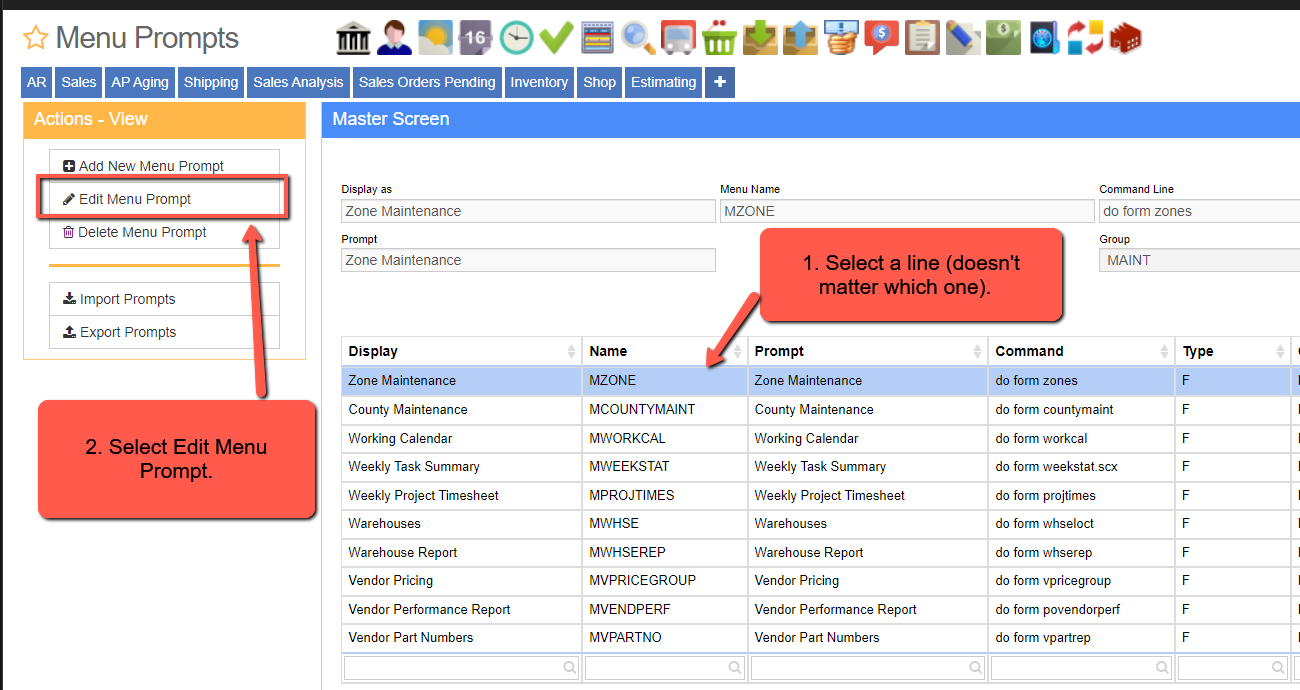
  1. Go to Maintain > System > Menu Prompts and search for an image that you want to use.

Menu1.png Menu3.png


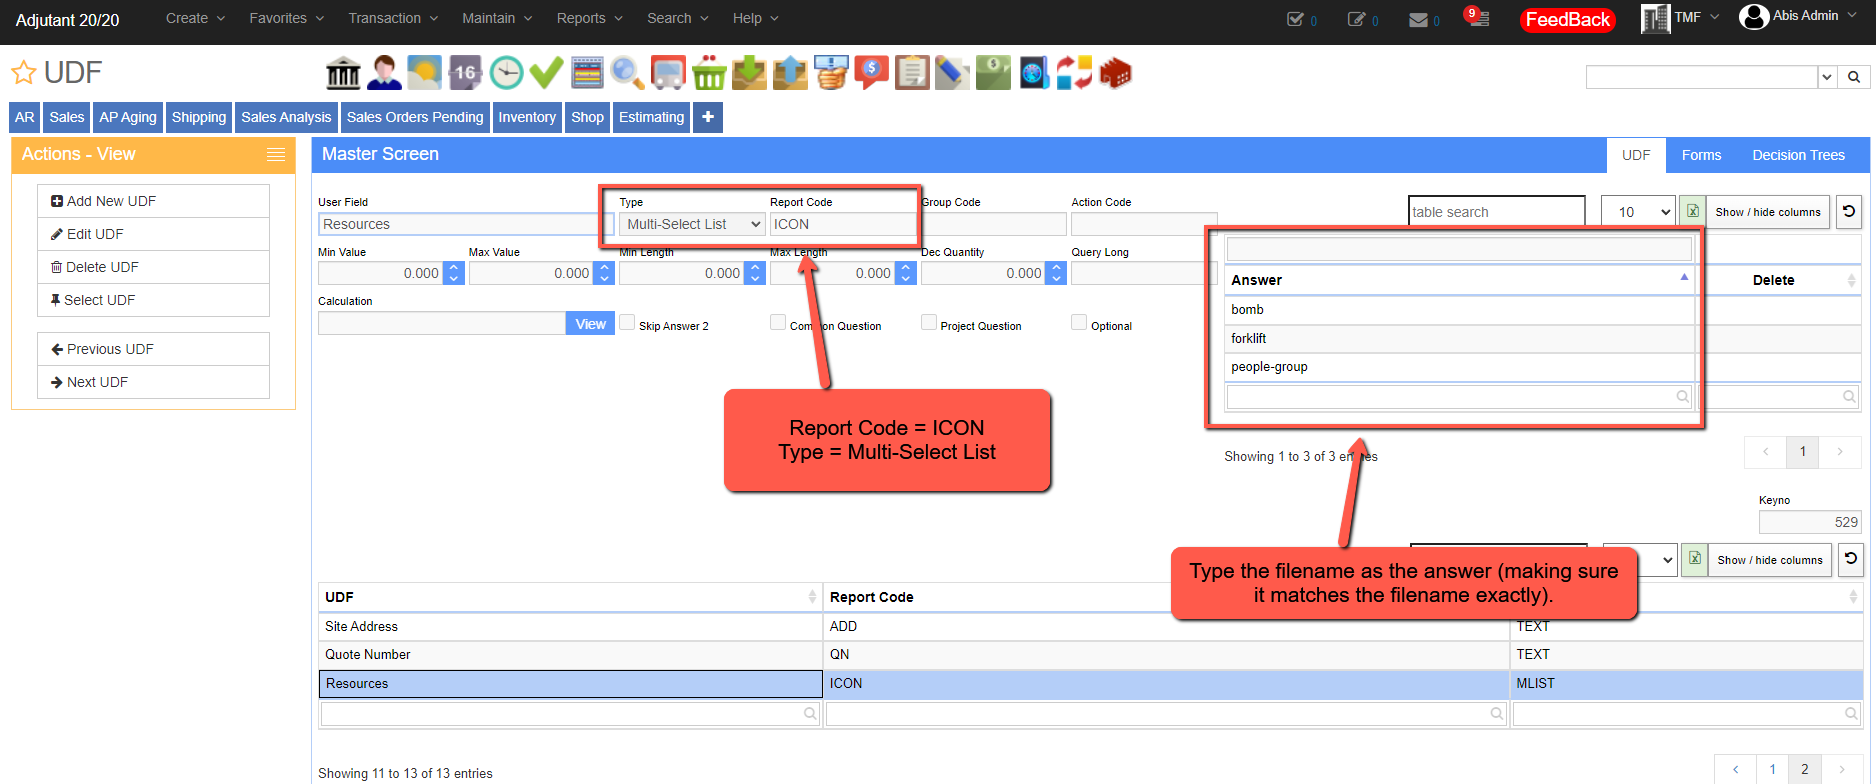
  1. Go to Maintain > Task Management > UDFs/Forms/Decision Trees and add a new UDF question.

Udf1.png

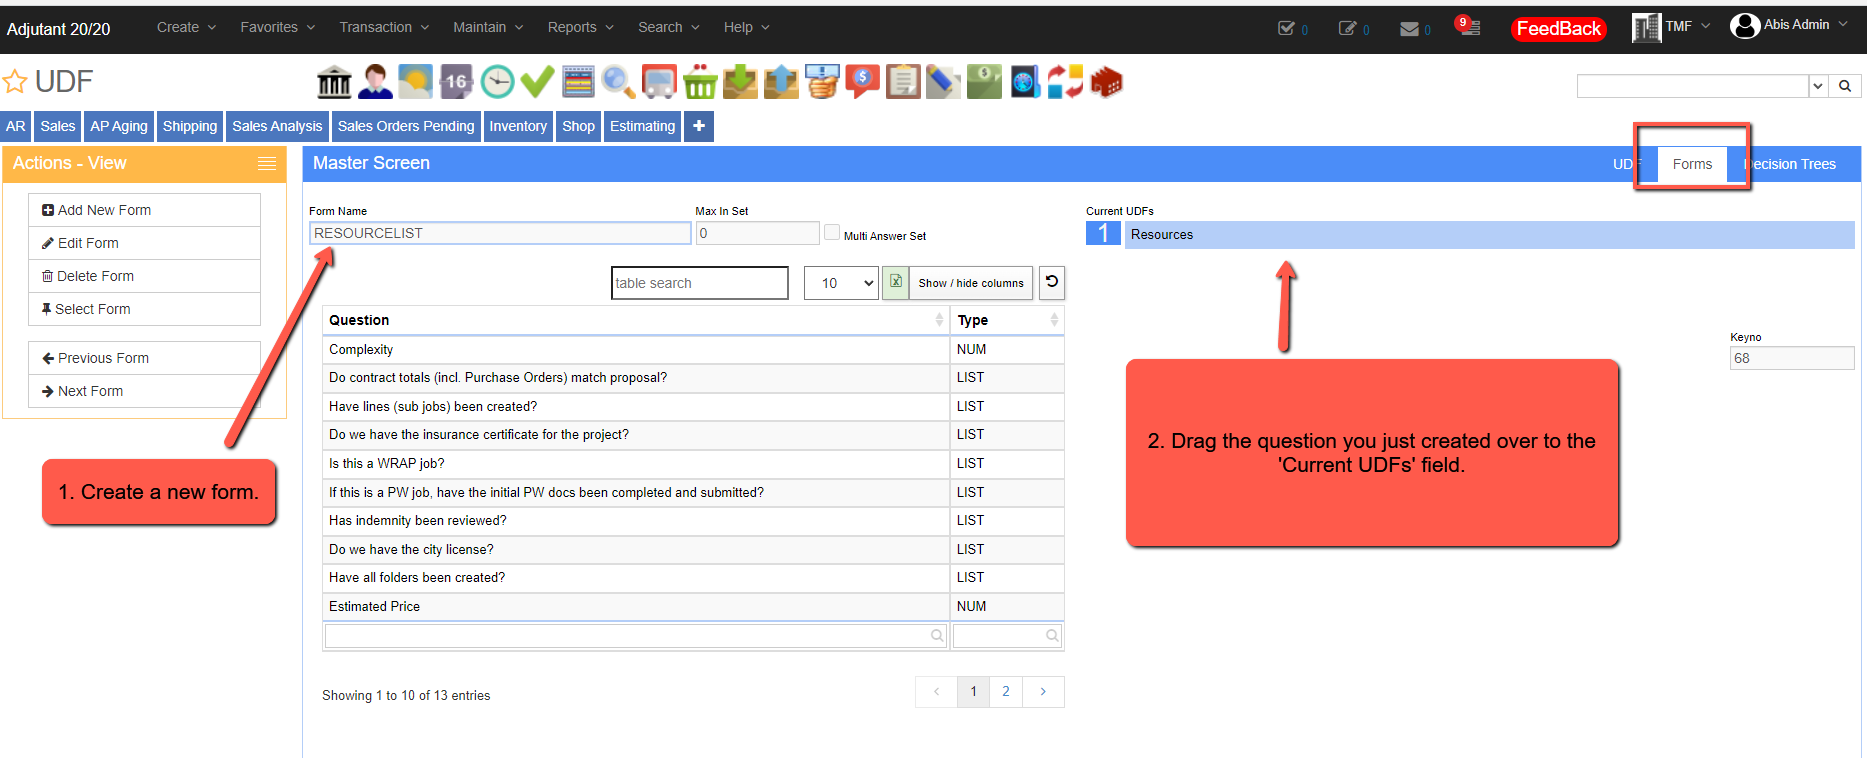
  1. While still at Maintain > Task Management > UDFs/Forms/Decision Trees, go to the Forms tab and create a new form. Once you've created the new form, link the UDF you created in the previous step.

Udf2.png

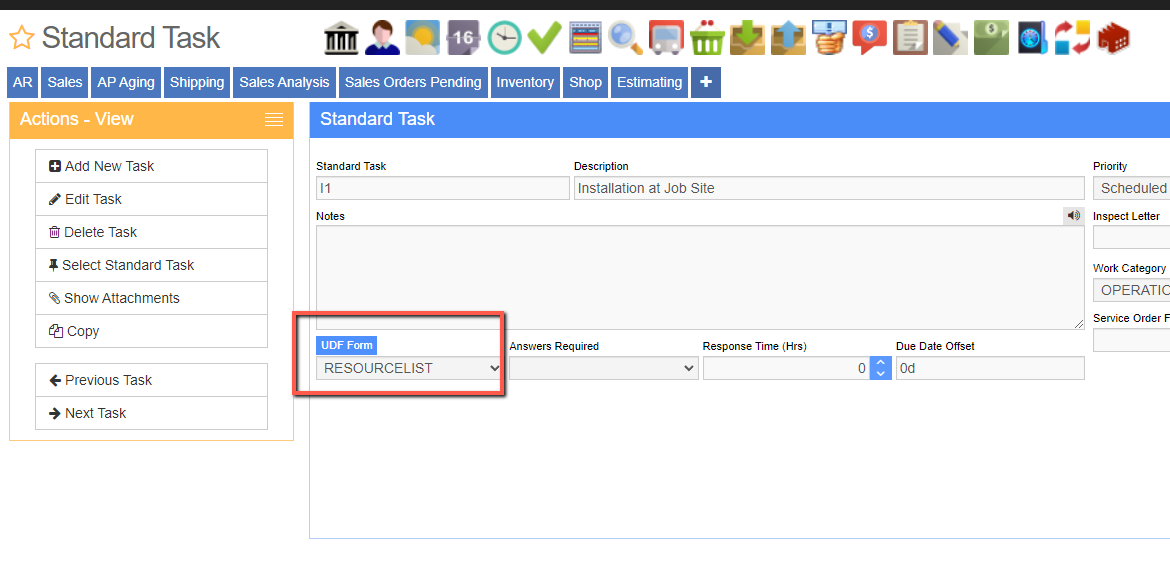
  1. Go to Maintain > Task Management > Standard Task Maintenance and link the UDF form to the desired standard task.

Stask.png

  1. To get the icons to display, go to the Questions section of any task you created using the standard task above and select the icons you want to display.

Quest.png