Difference between revisions of "Sales Tax and Zip Code Setup Guide"
From Adjutant Wiki
(→Locate the Most Current Complete+ Tax File) |
|||
| (16 intermediate revisions by the same user not shown) | |||
| Line 1: | Line 1: | ||
| − | ==Sales Tax and Zip Code Setup | + | ==Sales Tax and Zip Code Setup Guide== |
===Helpful Terms=== | ===Helpful Terms=== | ||
| + | |||
Below are a few sales tax terms that are important to understand. Keep in mind that ABIS should never act as tax experts or tax consultants for our customers. If the customer is unsure of how to answer questions or make decisions on how their sales taxes should be calculated or collected, ABIS should ALWAYS refer them to their tax advisor or CPA. | Below are a few sales tax terms that are important to understand. Keep in mind that ABIS should never act as tax experts or tax consultants for our customers. If the customer is unsure of how to answer questions or make decisions on how their sales taxes should be calculated or collected, ABIS should ALWAYS refer them to their tax advisor or CPA. | ||
| Line 18: | Line 19: | ||
===Sales Tax Subscription Policy=== | ===Sales Tax Subscription Policy=== | ||
| + | |||
*Customers with multiple state tax responsibilities should be encouraged to subscribe to our tax update service. | *Customers with multiple state tax responsibilities should be encouraged to subscribe to our tax update service. | ||
| Line 35: | Line 37: | ||
*First, locate a current copy of the ‘ZIP IMPORT MASTER.XLS’ file and save it somewhere in the RDP folder structure where Adjutant can find it. The current file can be found in the Implementation Files folder on the FTP site. | *First, locate a current copy of the ‘ZIP IMPORT MASTER.XLS’ file and save it somewhere in the RDP folder structure where Adjutant can find it. The current file can be found in the Implementation Files folder on the FTP site. | ||
| − | |||
===Process the Zip Code Data Import=== | ===Process the Zip Code Data Import=== | ||
| + | |||
| + | |||
| + | *From the County/Zip Code Maintenance (COUNTYMAINT) screen, click the ‘Imp’ort button and follow the prompts. The import is a complete delete and replace process, so make sure you have the latest, correct data before proceeding. | ||
| + | |||
| + | [[File:ZIPIMPORT.png]] | ||
*You will be prompted to locate and select the ZIP IMPORT MASTER.XLS source file. Once you have verified the correct file, select ‘Yes’ to proceed with deleting the previous data (if any) and importing the new data. | *You will be prompted to locate and select the ZIP IMPORT MASTER.XLS source file. Once you have verified the correct file, select ‘Yes’ to proceed with deleting the previous data (if any) and importing the new data. | ||
| + | |||
| + | [[File:ZIPIMPORT2.png]] | ||
*The process can take several minutes, depending on the server resources. Adjutant will display the zip codes being imported in the top right corner. If you click out of Adjutant, or interrupt the process, this status display may not update. | *The process can take several minutes, depending on the server resources. Adjutant will display the zip codes being imported in the top right corner. If you click out of Adjutant, or interrupt the process, this status display may not update. | ||
*If something interferes with the status display, wait for 5 minutes and confirm whether it completes normally. You should see the following message when it completes normally. | *If something interferes with the status display, wait for 5 minutes and confirm whether it completes normally. You should see the following message when it completes normally. | ||
| + | |||
| + | [[File:ZIPIMPORT3.png]] | ||
*If there are any issues, it is generally safe to retry the same process again. | *If there are any issues, it is generally safe to retry the same process again. | ||
| Line 50: | Line 60: | ||
*Once the process is complete, you will be able to see county and zip code details in the lower grid area of the screen. | *Once the process is complete, you will be able to see county and zip code details in the lower grid area of the screen. | ||
| + | |||
| + | ---- | ||
Note – The imported data is stored in the ZIPMBMA table. | Note – The imported data is stored in the ZIPMBMA table. | ||
| + | |||
| + | ---- | ||
===County/Zip Maintenance Final Steps=== | ===County/Zip Maintenance Final Steps=== | ||
| + | |||
*If Organization records were added prior to the county/zip code data import, you should run the ‘Update Blank County Records’ (UPDATECOUNTY) which will update any empty County values in the ENT table. There is no screen, it just launches a process, shown below. | *If Organization records were added prior to the county/zip code data import, you should run the ‘Update Blank County Records’ (UPDATECOUNTY) which will update any empty County values in the ENT table. There is no screen, it just launches a process, shown below. | ||
| + | [[File:BLANKCOUNTIES.png]] | ||
| Line 63: | Line 79: | ||
===Sales Tax Setup – Rule Maintenance=== | ===Sales Tax Setup – Rule Maintenance=== | ||
| + | |||
*Review and update the Tax Table Import Path (TAXPATH) rule. | *Review and update the Tax Table Import Path (TAXPATH) rule. | ||
**This rule controls the default path in the Tax File Import (TAXIMPORT) screen. The default file location can be overridden when performing the import. Set this rule to the ‘taxfiles’ folder in the customer’s Adjutant folder. This is the correct default location for customers that subscribe to tax updates. | **This rule controls the default path in the Tax File Import (TAXIMPORT) screen. The default file location can be overridden when performing the import. Set this rule to the ‘taxfiles’ folder in the customer’s Adjutant folder. This is the correct default location for customers that subscribe to tax updates. | ||
| + | |||
*Review and update the States – Sales Tax (STATE) rule. | *Review and update the States – Sales Tax (STATE) rule. | ||
**The NEXUS flag should be checked for all states where the CID company needs to calculate and collect sales tax. The NEXUS flag should be cleared for all other states. | **The NEXUS flag should be checked for all states where the CID company needs to calculate and collect sales tax. The NEXUS flag should be cleared for all other states. | ||
***States with NEXUS=N can be skipped during the Tax File Import process, which can greatly speed up the process, as well as save database space. | ***States with NEXUS=N can be skipped during the Tax File Import process, which can greatly speed up the process, as well as save database space. | ||
| − | ***States with NEXUS=N will | + | ***States with NEXUS=N will limit the Tax Table options on Ship To records in that state to either EXEMPT-ST or NONEXUS-ST (where ST is the state code). |
**The Tax Freight flag works with the TAXFREIGHTSTATE Setup Option to control which states calculate sales tax on freight-type items. | **The Tax Freight flag works with the TAXFREIGHTSTATE Setup Option to control which states calculate sales tax on freight-type items. | ||
| − | **The GL Account field can be used to specify the sales tax account by state for customers that want to route accounting to separate accounts per state. | + | **The GL Account field can be used to specify the sales tax account by state for customers that want to route accounting to separate accounts per state. |
| + | ===Locate the Most Current Complete+ Tax File=== | ||
| − | |||
*All customers should be using the ‘AS_Complete+’ file format. The tax files for the current year can be found on the FTP site in the Tax Files folder. Each current year tax file will have a folder named ‘AS-completeplus_YYMM’. Look inside the folder for the most current month and copy the ‘AS_Complete+_YYMM.TXT’ file to the RDP you are setting up. | *All customers should be using the ‘AS_Complete+’ file format. The tax files for the current year can be found on the FTP site in the Tax Files folder. Each current year tax file will have a folder named ‘AS-completeplus_YYMM’. Look inside the folder for the most current month and copy the ‘AS_Complete+_YYMM.TXT’ file to the RDP you are setting up. | ||
**Tax files for the upcoming month are generally available after the 25th of the previous month. If you are setting up a new customer toward the end of the month, try to use the next month’s file. | **Tax files for the upcoming month are generally available after the 25th of the previous month. If you are setting up a new customer toward the end of the month, try to use the next month’s file. | ||
| + | |||
===Process the Complete+ File=== | ===Process the Complete+ File=== | ||
| + | |||
*Open the Tax File Import (TAXIMPORT) screen and confirm that the desired Complete+ file is in the target directory. | *Open the Tax File Import (TAXIMPORT) screen and confirm that the desired Complete+ file is in the target directory. | ||
| Line 89: | Line 109: | ||
**New customer installations should ALWAYS process a full file (not a Diff File). | **New customer installations should ALWAYS process a full file (not a Diff File). | ||
| − | *The ‘Skip No-NEXUS States checkbox will skip processing data from the file for any state that does not have the NEXUS box checked in the STATE rule. | + | *The ‘Skip No-NEXUS States' checkbox will skip processing data from the file for any state that does not have the NEXUS box checked in the STATE rule. |
*Once you have confirmed that all settings are correct, and the correct file(s) is in place, click Import. | *Once you have confirmed that all settings are correct, and the correct file(s) is in place, click Import. | ||
| + | |||
| + | [[File:TAXIMPORT1.png]] | ||
*For a complete file (first-time) update, the process can take anywhere from half an hour to well over an hour depending on server resources. Be prepared to let the process run to completion. Your session will be unavailable while the process runs. You will see progress bars update as it processes. | *For a complete file (first-time) update, the process can take anywhere from half an hour to well over an hour depending on server resources. Be prepared to let the process run to completion. Your session will be unavailable while the process runs. You will see progress bars update as it processes. | ||
| + | [[File:TAXIMPORT2.png]] | ||
*As soon as the import completes, you should see an ‘Import Complete’ pop-up message. Hit OK. | *As soon as the import completes, you should see an ‘Import Complete’ pop-up message. Hit OK. | ||
| + | |||
| + | [[File:TAXIMPORT3.png]] | ||
*You will be asked if you want to print the ‘Tax Table Import Report’. This does not need to be printed, but can be saved as a PDF for documentation. | *You will be asked if you want to print the ‘Tax Table Import Report’. This does not need to be printed, but can be saved as a PDF for documentation. | ||
| + | |||
| + | [[File:TAXIMPORT4.png]] | ||
*As soon as you answer this pop-up, another screen should pop up to process the tax table swap process. This process takes the imported data and makes it the live tax file. Hit Update. This process usually only takes a second or two. | *As soon as you answer this pop-up, another screen should pop up to process the tax table swap process. This process takes the imported data and makes it the live tax file. Hit Update. This process usually only takes a second or two. | ||
| + | |||
| + | [[File:TAXIMPORT5.png]] | ||
*Once the file has been swapped, close that screen and the New/Omitted Tax Tables Report should be displayed if you asked to print the Tax Table Import Report. Print or save this report if needed. | *Once the file has been swapped, close that screen and the New/Omitted Tax Tables Report should be displayed if you asked to print the Tax Table Import Report. Print or save this report if needed. | ||
| + | [[File:TAXIMPORT6.png]] | ||
| + | |||
| + | |||
| + | ---- | ||
| + | |||
| + | Note – The imported data is stored in the STAXTABLE (for tax table codes) and STAXRATE (for individual tax rates) tables. | ||
| + | |||
| + | ---- | ||
| + | |||
===Sales Tax Process Final Steps=== | ===Sales Tax Process Final Steps=== | ||
| + | |||
| + | |||
| + | ===Update Tax Table Master and Ship To displayed rates=== | ||
| + | |||
| + | *Tax Table Master lookups show the last calculated rate for each table. In order to display the latest rate for all tables, run the Ship To/Tax Table Update program to recalculate the displayed total rates. | ||
| + | **Selecting 'All' can take a significant amount of time (over an hour). | ||
| + | |||
| + | [[File:TAXIMPORT7.png]] | ||
| + | |||
====Update Blank Ship To Tax Tables==== | ====Update Blank Ship To Tax Tables==== | ||
| Line 112: | Line 159: | ||
*This program can be run at any time to catch partially set up Ship To records. | *This program can be run at any time to catch partially set up Ship To records. | ||
| + | |||
====Locate any remaining Ship To records with empty tax tables==== | ====Locate any remaining Ship To records with empty tax tables==== | ||
*Perform the SQL QRY below and export the results to share with the customer. This QRY will surface any SHIP TO records that could not automatically determine a correct tax table. This could be due to incorrect or incomplete address data, or the Ship To tax table may need to be manually set. | *Perform the SQL QRY below and export the results to share with the customer. This QRY will surface any SHIP TO records that could not automatically determine a correct tax table. This could be due to incorrect or incomplete address data, or the Ship To tax table may need to be manually set. | ||
| − | **select ent.custno, ent.company, ent.address1, ent.city, ent.state, ent.zipcode, shipto.taxtable, shipto.taxrate from ent, shipto where ent.entid = shipto.custid and shipto.taxtable = '' | + | **select ent.custno, ent.company, ent.address1, ent.city, ent.state, ent.zipcode, shipto.taxtable, shipto.taxrate from ent, shipto where ent.entid = shipto.custid and shipto.taxtable = <nowiki>''</nowiki> |
| + | |||
| + | |||
| + | == | ||
| + | [[Category:Setup Guides]] | ||
| + | |||
| + | [[Category:Sales Tax]] | ||
Latest revision as of 13:34, 17 April 2018
Contents
- 1 Sales Tax and Zip Code Setup Guide
- 2 County/Zip Code Data Setup Process
- 3 Sales Tax Data Setup Process
Sales Tax and Zip Code Setup Guide
Helpful Terms
Below are a few sales tax terms that are important to understand. Keep in mind that ABIS should never act as tax experts or tax consultants for our customers. If the customer is unsure of how to answer questions or make decisions on how their sales taxes should be calculated or collected, ABIS should ALWAYS refer them to their tax advisor or CPA.
NEXUS – This term generally refers to the physical presence of a business entity in another state. When a company has an office, employee(s), warehouse(s), or even offers drop shipments from a 3rd party provider in another state, they can be considered to have nexus in the other state(s). Having nexus in another state means the company is liable to calculate and collect taxes for sales in that state.
ORIGIN-BASED – Origin-based states calculate and collect sales tax based on where the seller is located. The 11 origin-based states are: Arizona, California*, Illinois, Mississippi, Missouri, New Mexico, Ohio, Pennsylvania, Tennessee, Texas, Utah and Virginia. California is mixed: City, county and state sales taxes are origin-based, while district sales taxes (supplementary local taxes) are destination-based.
DESTINATION-BASED – Destination-based states calculate and collect sales tax based on the local tax rates where the goods are being shipped. Origin-based states
USE TAX – This generically refers to taxes that are liable on a purchase where the appropriate taxes were not collected as part of the original sale. It is commonly used to refer to sales taxes liable from remote sellers in origin-based states shipping to destination-based states where the seller may have nexus, but is not based in that state.
Sales Tax Subscription Policy
- Customers with multiple state tax responsibilities should be encouraged to subscribe to our tax update service.
- The service requires a contract agreement, and there are two subscription levels
- Per State Subscription – A monthly flat dollar amount charged per state requested
- All States Subscription – An all-inclusive monthly charge that covers updates for all states
- See your manager for current pricing
County/Zip Code Data Setup Process
Locate the Current Zip Code Data File
- First, locate a current copy of the ‘ZIP IMPORT MASTER.XLS’ file and save it somewhere in the RDP folder structure where Adjutant can find it. The current file can be found in the Implementation Files folder on the FTP site.
Process the Zip Code Data Import
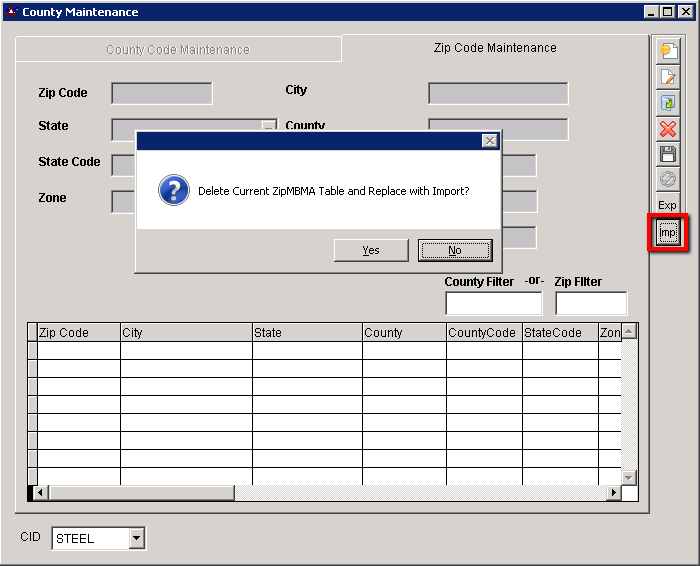
- From the County/Zip Code Maintenance (COUNTYMAINT) screen, click the ‘Imp’ort button and follow the prompts. The import is a complete delete and replace process, so make sure you have the latest, correct data before proceeding.
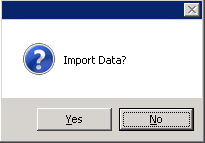
- You will be prompted to locate and select the ZIP IMPORT MASTER.XLS source file. Once you have verified the correct file, select ‘Yes’ to proceed with deleting the previous data (if any) and importing the new data.
- The process can take several minutes, depending on the server resources. Adjutant will display the zip codes being imported in the top right corner. If you click out of Adjutant, or interrupt the process, this status display may not update.
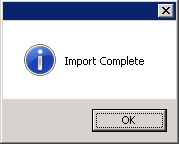
- If something interferes with the status display, wait for 5 minutes and confirm whether it completes normally. You should see the following message when it completes normally.
- If there are any issues, it is generally safe to retry the same process again.
- Once the process is complete, you will be able to see county and zip code details in the lower grid area of the screen.
Note – The imported data is stored in the ZIPMBMA table.
County/Zip Maintenance Final Steps
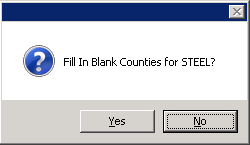
- If Organization records were added prior to the county/zip code data import, you should run the ‘Update Blank County Records’ (UPDATECOUNTY) which will update any empty County values in the ENT table. There is no screen, it just launches a process, shown below.
Sales Tax Data Setup Process
Sales Tax Setup – Rule Maintenance
- Review and update the Tax Table Import Path (TAXPATH) rule.
- This rule controls the default path in the Tax File Import (TAXIMPORT) screen. The default file location can be overridden when performing the import. Set this rule to the ‘taxfiles’ folder in the customer’s Adjutant folder. This is the correct default location for customers that subscribe to tax updates.
- Review and update the States – Sales Tax (STATE) rule.
- The NEXUS flag should be checked for all states where the CID company needs to calculate and collect sales tax. The NEXUS flag should be cleared for all other states.
- States with NEXUS=N can be skipped during the Tax File Import process, which can greatly speed up the process, as well as save database space.
- States with NEXUS=N will limit the Tax Table options on Ship To records in that state to either EXEMPT-ST or NONEXUS-ST (where ST is the state code).
- The Tax Freight flag works with the TAXFREIGHTSTATE Setup Option to control which states calculate sales tax on freight-type items.
- The GL Account field can be used to specify the sales tax account by state for customers that want to route accounting to separate accounts per state.
- The NEXUS flag should be checked for all states where the CID company needs to calculate and collect sales tax. The NEXUS flag should be cleared for all other states.
Locate the Most Current Complete+ Tax File
- All customers should be using the ‘AS_Complete+’ file format. The tax files for the current year can be found on the FTP site in the Tax Files folder. Each current year tax file will have a folder named ‘AS-completeplus_YYMM’. Look inside the folder for the most current month and copy the ‘AS_Complete+_YYMM.TXT’ file to the RDP you are setting up.
- Tax files for the upcoming month are generally available after the 25th of the previous month. If you are setting up a new customer toward the end of the month, try to use the next month’s file.
Process the Complete+ File
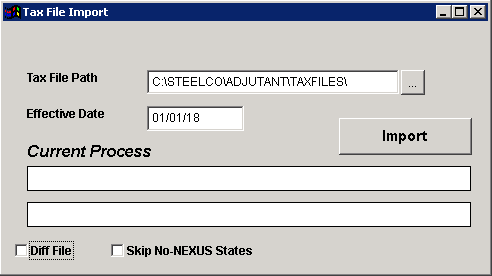
- Open the Tax File Import (TAXIMPORT) screen and confirm that the desired Complete+ file is in the target directory.
- Set the Effective Date to an appropriate date (generally the first of the month for the month you are performing setup).
- The ‘Diff File’ checkbox will process the target file as a difference update to just the tables that have changed (rather than a complete tax file update).
- New customer installations should ALWAYS process a full file (not a Diff File).
- The ‘Skip No-NEXUS States' checkbox will skip processing data from the file for any state that does not have the NEXUS box checked in the STATE rule.
- Once you have confirmed that all settings are correct, and the correct file(s) is in place, click Import.
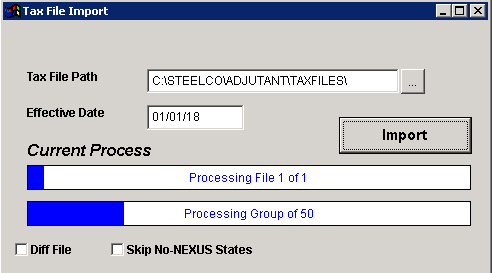
- For a complete file (first-time) update, the process can take anywhere from half an hour to well over an hour depending on server resources. Be prepared to let the process run to completion. Your session will be unavailable while the process runs. You will see progress bars update as it processes.
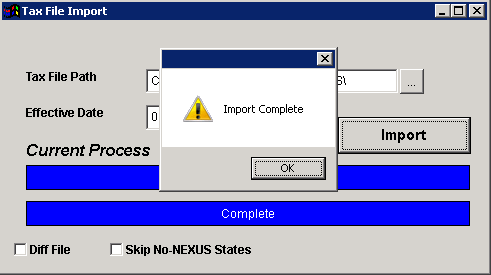
- As soon as the import completes, you should see an ‘Import Complete’ pop-up message. Hit OK.
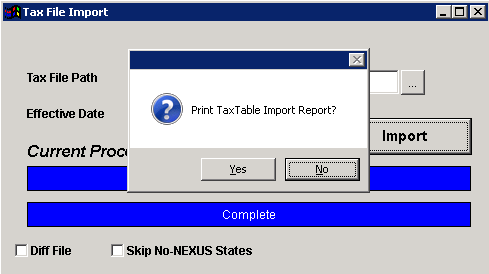
- You will be asked if you want to print the ‘Tax Table Import Report’. This does not need to be printed, but can be saved as a PDF for documentation.
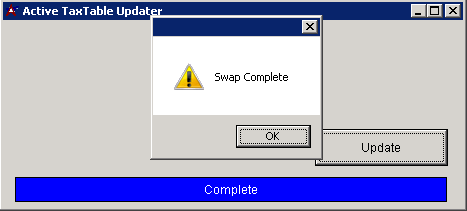
- As soon as you answer this pop-up, another screen should pop up to process the tax table swap process. This process takes the imported data and makes it the live tax file. Hit Update. This process usually only takes a second or two.
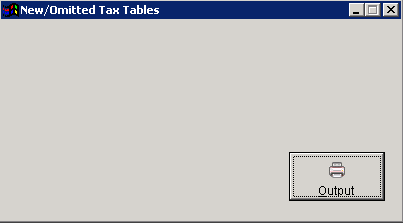
- Once the file has been swapped, close that screen and the New/Omitted Tax Tables Report should be displayed if you asked to print the Tax Table Import Report. Print or save this report if needed.
Note – The imported data is stored in the STAXTABLE (for tax table codes) and STAXRATE (for individual tax rates) tables.
Sales Tax Process Final Steps
Update Tax Table Master and Ship To displayed rates
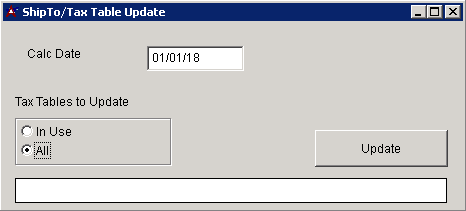
- Tax Table Master lookups show the last calculated rate for each table. In order to display the latest rate for all tables, run the Ship To/Tax Table Update program to recalculate the displayed total rates.
- Selecting 'All' can take a significant amount of time (over an hour).
Update Blank Ship To Tax Tables
- Run the Update Blank Ship To Tax Tables program to update any missing tax table fields in Ship To records with the latest complete tax table information.
- This program can be run at any time to catch partially set up Ship To records.
Locate any remaining Ship To records with empty tax tables
- Perform the SQL QRY below and export the results to share with the customer. This QRY will surface any SHIP TO records that could not automatically determine a correct tax table. This could be due to incorrect or incomplete address data, or the Ship To tax table may need to be manually set.
- select ent.custno, ent.company, ent.address1, ent.city, ent.state, ent.zipcode, shipto.taxtable, shipto.taxrate from ent, shipto where ent.entid = shipto.custid and shipto.taxtable = ''
==
