Difference between revisions of "General Ledger Setup Guide"
From Adjutant Wiki
| Line 8: | Line 8: | ||
| − | ==Initial Setup | + | ==Initial Setup== |
| − | ===Set the CID GL Mask | + | ===Set the CID GL Mask=== |
| − | |||
| − | |||
*If the GL Mask field in the CID Maintenance – Accounts tab is open for editing, set the GL Mask value to match the customer’s GL account structure, using X and - characters. | *If the GL Mask field in the CID Maintenance – Accounts tab is open for editing, set the GL Mask value to match the customer’s GL account structure, using X and - characters. | ||
| Line 19: | Line 17: | ||
**Update CID set GLMASK = 'X-XXXX-XX' where CID = 'AAAA' (Set the GL Mask to the desired format using X and – characters. Replace ‘AAAA’ with actual CID) | **Update CID set GLMASK = 'X-XXXX-XX' where CID = 'AAAA' (Set the GL Mask to the desired format using X and – characters. Replace ‘AAAA’ with actual CID) | ||
| − | |||
| − | + | ===Import the GL Chart of Accounts=== | |
| − | |||
| − | |||
*The GL Chart of Accounts import template can be found in the \Data Files\Accounting folder of the Adjutant directory (if copied from MASTER), or a copy can be found in the Implementation Files folder on the FTP. | *The GL Chart of Accounts import template can be found in the \Data Files\Accounting folder of the Adjutant directory (if copied from MASTER), or a copy can be found in the Implementation Files folder on the FTP. | ||
| Line 30: | Line 25: | ||
*Verify that the imported GL Accounts exist and are correct in the ‘GL Accounts’ screen. | *Verify that the imported GL Accounts exist and are correct in the ‘GL Accounts’ screen. | ||
| + | |||
| + | *Request the 'GL Chart of Accounts Report' and compare against the source data to verify that all records imported successfully. | ||
| − | === Set Up the Default Warehouse / Held For Records | + | === Set Up the Default Warehouse / Held For Records=== |
| − | + | This step may have been completed as part of the System Manager initial CID setup. If the Warehouse and Item Holder records have already been set up, review the GL accounts in the Warehouses - Accounts tab, and confirm that they are correct. | |
| − | |||
*The default Warehouse name should match the CID name. In most cases, the ‘Default Location’, ‘Active’, and ‘Production Plant’ checkboxes should be checked. | *The default Warehouse name should match the CID name. In most cases, the ‘Default Location’, ‘Active’, and ‘Production Plant’ checkboxes should be checked. | ||
| Line 46: | Line 42: | ||
*Update the ‘Item Held For Codes’ (HOLDER) Rule Maintenance record with the new customer name and vendor number. | *Update the ‘Item Held For Codes’ (HOLDER) Rule Maintenance record with the new customer name and vendor number. | ||
| + | |||
| + | |||
| + | |||
== | == | ||
[[Category:Setup Guides]] | [[Category:Setup Guides]] | ||
[[Category:General Ledger]] | [[Category:General Ledger]] | ||
Revision as of 12:04, 27 February 2018
Contents
Overview
This guide covers the setup of the General Ledger application areas. The setup of the General Ledger application should be coordinated with the initial CID setup. There are several overlapping screens and steps between CID Maintenance and General Ledger setup.
Refer to the System Manager Setup Guide for a complete list of the setup items to complete in CID Maintenance.
Initial Setup
Set the CID GL Mask
- If the GL Mask field in the CID Maintenance – Accounts tab is open for editing, set the GL Mask value to match the customer’s GL account structure, using X and - characters.
- Generally, the GL Mask in the ‘Accounts’ tab must be updated via SQL with the following query
- Update CID set GLMASK = 'X-XXXX-XX' where CID = 'AAAA' (Set the GL Mask to the desired format using X and – characters. Replace ‘AAAA’ with actual CID)
Import the GL Chart of Accounts
- The GL Chart of Accounts import template can be found in the \Data Files\Accounting folder of the Adjutant directory (if copied from MASTER), or a copy can be found in the Implementation Files folder on the FTP.
- Import the customer’s complete chart of accounts using the ‘Chart of Accounts Import’ screen.
- Verify that the imported GL Accounts exist and are correct in the ‘GL Accounts’ screen.
- Request the 'GL Chart of Accounts Report' and compare against the source data to verify that all records imported successfully.
Set Up the Default Warehouse / Held For Records
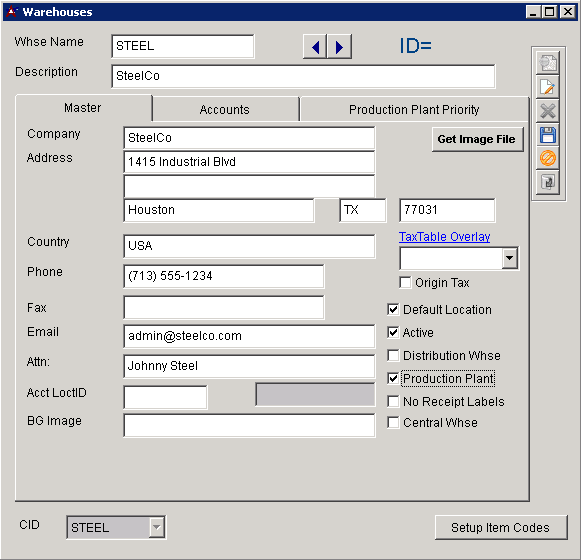
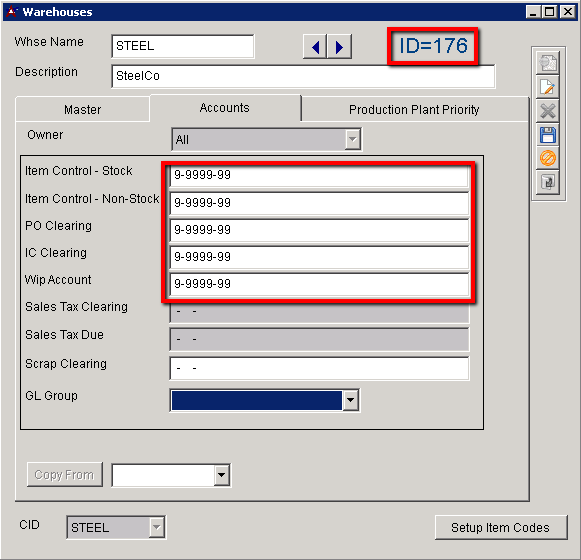
This step may have been completed as part of the System Manager initial CID setup. If the Warehouse and Item Holder records have already been set up, review the GL accounts in the Warehouses - Accounts tab, and confirm that they are correct.
- The default Warehouse name should match the CID name. In most cases, the ‘Default Location’, ‘Active’, and ‘Production Plant’ checkboxes should be checked.
- The add process will create a new Organization with a ‘Warehouse Location’ attribute.
- You must complete the blank GL accounts in the ‘Account’ tab in order to save the record.
- Update the ‘Item Held For Codes’ (HOLDER) Rule Maintenance record with the new customer name and vendor number.
==


