Difference between revisions of "Save RS Options"
From Adjutant Wiki
| Line 29: | Line 29: | ||
[[File:Screenshot_2025-01-16_133443.png]] | [[File:Screenshot_2025-01-16_133443.png]] | ||
| − | • As Entered – The dates that will be used when running the report will be the dates that were | + | • As Entered – The dates that will be used when running the report will be the dates that were filled out when the SaveRS button was clicked. |
| − | filled out when the SaveRS button was clicked. | + | |
| − | • Blank – This will make the report run without a date range. | + | • Blank – This will make the report run without a date range. |
| − | • Today – This will make the report run for today’s date. | + | |
| − | • Offset – This is used in conjunction with the Offset field. Dynamic values can be entered here. A -1d offset will set it for the day before today, a 1d offset will set it for the day after today. | + | • Today – This will make the report run for today’s date. |
| − | • From RunRS – This will use whatever date range is entered on the Run Report Set screen when | + | |
| − | manually running a report set. | + | • Offset – This is used in conjunction with the Offset field. Dynamic values can be entered here. A -1d offset will set it for the day before today, a 1d offset will set it for the day after today. |
| + | |||
| + | • From RunRS – This will use whatever date range is entered on the Run Report Set screen when manually running a report set. | ||
When desired information is filled out, click the "Save" button. | When desired information is filled out, click the "Save" button. | ||
Revision as of 13:37, 16 January 2025
General Information
Default Menu Location: Reports >> Any Report >> Save RS Options
Screen Name: Save Report Options
Function: This screen is used to create and edit report sets.
How to Save Report Set Options
STEP 1: Fill out report filters that should be used when running report (Eg. Ap Invoice Report):
When filters have been selected, click the "Save RS Options" button
Note: To run the report with a static date range, enter the start and end date on the filters.
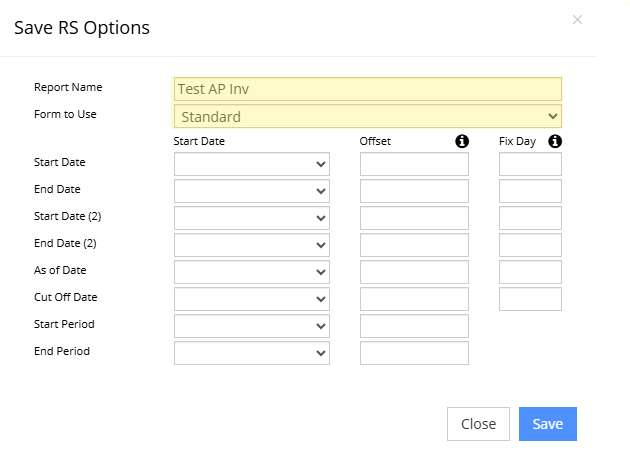
STEP 2: Enter a name for your report in the "Report Name" field, and select a form from the "Form to Use" dropdown:
Note: Naming your report a non-duplicate name will make it more easily identifiable when creating report sets in the future.
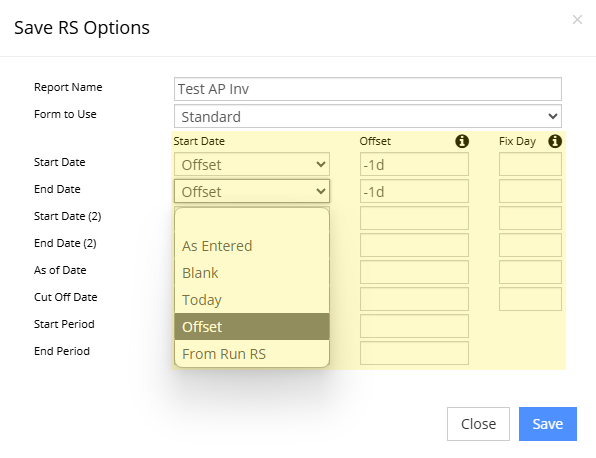
STEP 3: The following options can be used to run dynamic dates:
• As Entered – The dates that will be used when running the report will be the dates that were filled out when the SaveRS button was clicked.
• Blank – This will make the report run without a date range.
• Today – This will make the report run for today’s date.
• Offset – This is used in conjunction with the Offset field. Dynamic values can be entered here. A -1d offset will set it for the day before today, a 1d offset will set it for the day after today.
• From RunRS – This will use whatever date range is entered on the Run Report Set screen when manually running a report set.
When desired information is filled out, click the "Save" button.


