Difference between revisions of "Auto Process Schedule"
From Adjutant Wiki
(→Viewing/Editing Schedule) |
|||
| (9 intermediate revisions by the same user not shown) | |||
| Line 1: | Line 1: | ||
__NOTOC__ | __NOTOC__ | ||
| − | |||
===General Information=== | ===General Information=== | ||
| − | |||
'''Default Menu Location''': Maintain >> System >> Auto Process Schedule | '''Default Menu Location''': Maintain >> System >> Auto Process Schedule | ||
| Line 10: | Line 8: | ||
[[File:Auto_Process_Schedule_-_Schedule.jpeg]] | [[File:Auto_Process_Schedule_-_Schedule.jpeg]] | ||
| + | |||
===Schedule=== | ===Schedule=== | ||
| + | |||
The Schedule shows a daily view of each report set and batch that is scheduled to run. | The Schedule shows a daily view of each report set and batch that is scheduled to run. | ||
| − | You can scroll through each week by using the corresponding | + | You can scroll through each week by using the corresponding Previous Week and Next Week. |
| − | |||
| − | |||
Double-click on any Report Set record on the screen to view more details about it. | Double-click on any Report Set record on the screen to view more details about it. | ||
| − | Right-click on any Report Set or | + | Right-click on any Report Set or Auto Batch to delete it. You are also presented with the option to delete all future events. |
===Add Auto Batch=== | ===Add Auto Batch=== | ||
| + | |||
To schedule an Auto Batch, select the Events tab, and then choose Auto Batch from the Priority drop-down menu. Next, enter the Start and End Dates, as well as the Time you want the batch to run. | To schedule an Auto Batch, select the Events tab, and then choose Auto Batch from the Priority drop-down menu. Next, enter the Start and End Dates, as well as the Time you want the batch to run. | ||
| Line 35: | Line 34: | ||
[[File:Auto_Process_Schedule_-_Events_Auto_Batch.jpeg]] | [[File:Auto_Process_Schedule_-_Events_Auto_Batch.jpeg]] | ||
| + | |||
===Add Report Set=== | ===Add Report Set=== | ||
| + | |||
| + | |||
To schedule a Report Set, select the Events tab, and then choose Report Set from the Priority drop-down menu. Next, enter the Start and End Dates, as well as the Time you want the report set to be scheduled. Next, select the frequency (Weekly, Monthly, or Yearly) in which the report set should be posted. Lastly, select the specific report set(s) and CID(s) from the corresponding lists: Report Sets and CIDs. | To schedule a Report Set, select the Events tab, and then choose Report Set from the Priority drop-down menu. Next, enter the Start and End Dates, as well as the Time you want the report set to be scheduled. Next, select the frequency (Weekly, Monthly, or Yearly) in which the report set should be posted. Lastly, select the specific report set(s) and CID(s) from the corresponding lists: Report Sets and CIDs. | ||
[[File:Auto_Process_Schedule_-_Events_Report_Set.jpeg]] | [[File:Auto_Process_Schedule_-_Events_Report_Set.jpeg]] | ||
| + | |||
===Viewing/Editing Schedule=== | ===Viewing/Editing Schedule=== | ||
| + | |||
* '''Double-click a Report Set to view the details of the reports, who they're sent to, where they're saved, etc.''' | * '''Double-click a Report Set to view the details of the reports, who they're sent to, where they're saved, etc.''' | ||
| Line 63: | Line 67: | ||
[[File:Auto_Process_Schedule_-_Delete_Event.jpeg]] | [[File:Auto_Process_Schedule_-_Delete_Event.jpeg]] | ||
| − | + | [[Category:Workflow Routing]][[Category:System Admin]][[Category:Time and Materials]] | |
| − | |||
| − | |||
| − | |||
| − | [ | ||
| − | |||
| − | |||
| − | |||
| − | [ | ||
| − | |||
| − | |||
| − | |||
| − | |||
| − | |||
| − | |||
| − | |||
| − | |||
| − | |||
| − | |||
| − | |||
Revision as of 14:27, 5 August 2024
General Information
Default Menu Location: Maintain >> System >> Auto Process Schedule
Screen Name: AUTOSCHVIEW
Function: The Auto Process Schedule screen is used to set up automatic batches and report sets.
Schedule
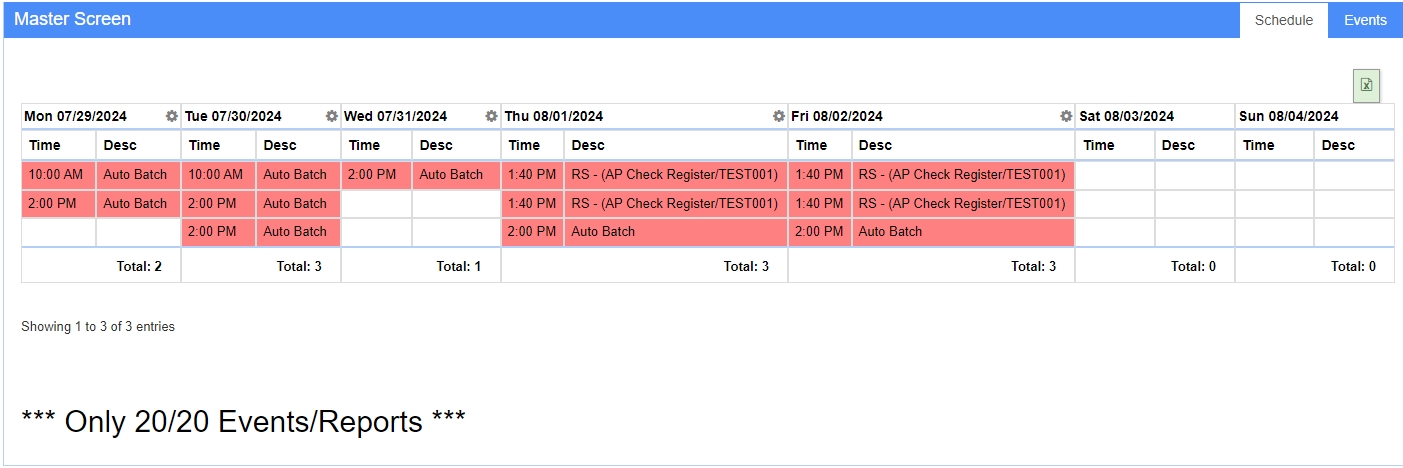
The Schedule shows a daily view of each report set and batch that is scheduled to run.
You can scroll through each week by using the corresponding Previous Week and Next Week.
Double-click on any Report Set record on the screen to view more details about it.
Right-click on any Report Set or Auto Batch to delete it. You are also presented with the option to delete all future events.
Add Auto Batch
To schedule an Auto Batch, select the Events tab, and then choose Auto Batch from the Priority drop-down menu. Next, enter the Start and End Dates, as well as the Time you want the batch to run.
You should schedule the batch to run according to your report sets.
For example, if a Balance Sheet is in your report sets, then you want the batch to run before the Balance Sheet report set so that everything has been batched and posted.
There is no CID filter for the Auto Batches. Each CID must be configured to run an auto batch. Please see the Auto Batch Options - AUTOBATCH Rule for more information. Also, the AUTOBATCH setup option must be enabled for the batch to run.
Add Report Set
To schedule a Report Set, select the Events tab, and then choose Report Set from the Priority drop-down menu. Next, enter the Start and End Dates, as well as the Time you want the report set to be scheduled. Next, select the frequency (Weekly, Monthly, or Yearly) in which the report set should be posted. Lastly, select the specific report set(s) and CID(s) from the corresponding lists: Report Sets and CIDs.
Viewing/Editing Schedule
- Double-click a Report Set to view the details of the reports, who they're sent to, where they're saved, etc.
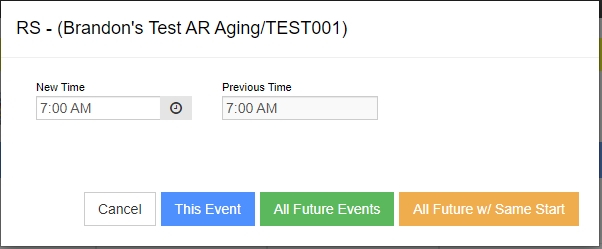
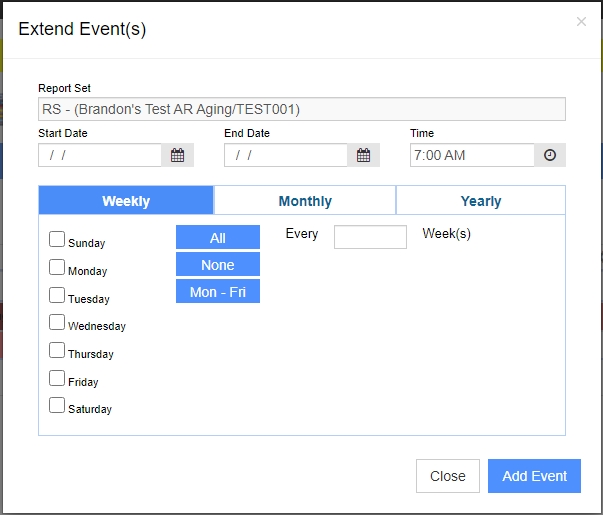
- Right-Click a Report Set or Batch, then select Change Time, Change Schedule (Extend Event(s)), or Delete Event to modify it. You can reschedule and delete future events as well.
- Change Time
- Change Schedule (Extend Event(s))
- Delete Event


