Difference between revisions of "MASTER CID Copy Guide"
From Adjutant Wiki
m (Freddy moved page MASTER CID Copy to MASTER CID Copy Guide) |
|
(No difference)
| |
Revision as of 08:27, 24 January 2018
Contents
- 1 Master CID Copy Guide
- 1.1 Submit request to Development
- 1.2 Create the new CID
- 1.3 Update CID Maintenance (Round 1)
- 1.4 CSTRING.TXT File
- 1.5 DROPFOLDERS Rule Updates
- 1.6 GL Accounts / Warehouse / Held For Setup
- 1.7 Fixing the ABIS _ADMIN record
- 1.8 Email Templates
- 1.9 Forms/Reports
- 1.10 Deleting the MASTER CID records
- 1.11 Next Steps
Master CID Copy Guide
Submit request to Development
- Open a ticket (Install Adjutant Desktop) to Development to copy the MASTER CID database to the new customer server location. Include all necessary details and instructions for any special circumstances. Send an email with additional information (and copy all team members) if it is too much to fit into the ticket comments.
- Once the ticket is complete, there should be a folder on the server named for the new customer*, with an RDP Desktop shortcut to the new installation. If there is no shortcut available, navigate to the customers folder in the RDP C:\ drive. From the Adjutant sub-folder in the customer’s folder, create a shortcut to the ‘AdjLoaderV9.exe’ file. Copy that shortcut to the RDP Desktop and rename it accordingly.
- * For Non-Hosted installations, the Adjutant folder will generally be under an ‘Apps’ folder on one of the server resources. There should still be a C:\ drive location. Confirm with Development which network location the Adjutant software is installed under.
- * If you create the shortcut from the C:\ drive location, you don’t get the security warnings that you get if the shortcut points to the network drive location.
Create the new CID
- From CID Maintenance, Add the CID details for the new customer. The ‘CID’ value sets the CID name. Saving the record will prompt a ‘Copy Settings From’ screen.
- You will not be able to fill in the MASTER ENT value until after you create the new CID and the new MASTER ENT record.
- Select the following records in the ‘Copy Settings from’ screen and press ‘Copy’. A series of processes will run to create the new CID. Do not interrupt these processes. It usually only takes a minute for hosted customers.
- Fiscal Calendar
- System Rules
- CID Defaults and Setup Options
- User Security Tokens
- Exit Adjutant and log back in to access the newly created CID.
- Set the CID drop-down to the new customer, and create an Organization for the new company. Match the Organization ID to the CID. Assign the following attributes:
- Bill To / Ship To / Sold To
- Inventory Owner
- Remit To / Sold From
Update CID Maintenance (Round 1)
- Review and update the following In CID Maintenance
- Update the MASTER ENT value to the newly created Org ID.
- Review ‘Paths/Remote Transfer’ tab and update file paths as needed.
- Update the background screen color in the ‘Defaults’ tab (Requires log out/log in to refresh).
- The GL Mask in the ‘Accounts’ tab must be updated via SQL with the following
- Update CID set GLMASK = 'X-XXXX-XX' where CID = 'AAAA' (Set the GL Mask to the desired format using X and – characters. Replace ‘AAAA’ with actual CID)
- Set the Current Year and Current Period in the ‘Fiscal Calendar’ tab.
- To set the background image for the CID, place a .BMP or .JPG file of the customer logo in the main Adjutant folder with the filename matching the CID name. For example, if the new CID is 'STEEL', the file should be named STEEL.BMP (or JPG). Exit Adjutant and log back in to display the image.
CSTRING.TXT File
- Locate the CSTRING.TXT file in the Adjutant folder and edit the CID name to match your new CID. This file determines which security method (New vs. Old) is used, among other things.
DROPFOLDERS Rule Updates
- Update the DROPFOLDERS rule with the correct file path. Follow the procedure outlined below (or perform 30 individual edits to paste the right path prefix into each rule detail)
- In SQL, find the rule header keyno for the DROPFOLDER rule in the new CID (replace CID value)
- select keyno from rh where name = 'dropfolders' and cid = 'AAAA'
- In SQL, run the following QRY and export the results (replace rhkeyno value)
- Select text1, text2 from rd where rhkeyno = ‘####’
- In Excel, highlight column B and do a Find/Replace to update the file path details in front of the ‘\dropfolders\ . . .’ section (Be sure you have the correct path, including the Adjutant folder)
- Paste the following concatenate formula in cell C2 and copy down the sheet (replace rhkeyno value)
- =CONCATENATE("Update rd set text2 = '", B2, "' where Text1 = '", A2, "' and rhkeyno = '####' ")
- Copy column C into a SQL QRY and hit Run. Confirm that the paths are correct in the rule.
- In SQL, find the rule header keyno for the DROPFOLDER rule in the new CID (replace CID value)
GL Accounts / Warehouse / Held For Setup
- In order to proceed with the next steps, you must add at least one GL account and a default Warehouse. Ideally, you should import the full chart of accounts at this step. However, If the complete chart of accounts is not available at this point, you can use a temporary GL account that will have to be replaced later.
- Once you have a chart of accounts, or at least one active GL account, add the default Warehouse record.
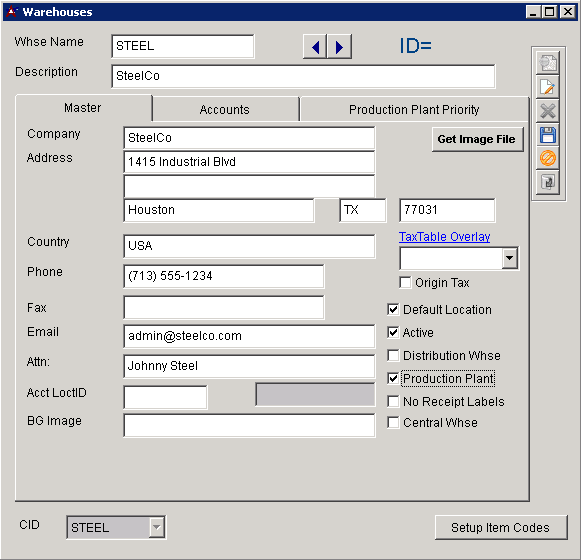
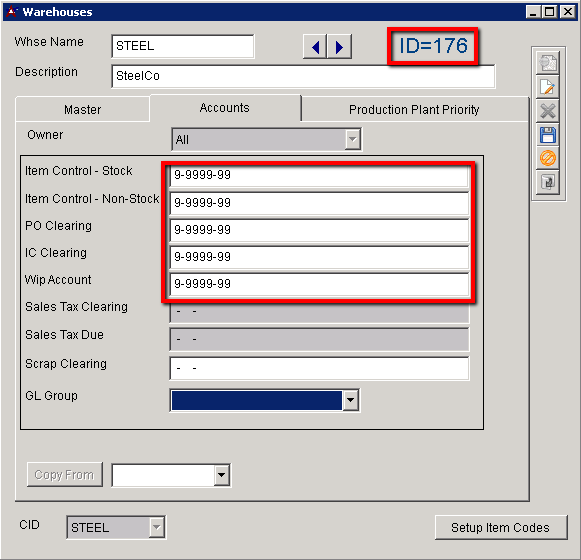
- The default Warehouse name should match the CID name. In most cases, the ‘Default Location’, ‘Active’, and ‘Production Plant’ checkboxes should be checked. You must complete the blank GL accounts in the ‘Account’ tab in order to save the record. The add process will create a new Organization with a ‘Warehouse Location’ attribute.
- Update the ‘Item Held For Codes (HOLDER) Rule Maintenance record to replace the entry for MASTER with the new customer name and vendor number.
Fixing the ABIS _ADMIN record
- Option 1 – Point the MASTER ‘_ADMIN’ record to a new contact (retains all security overrides from MASTER)
- Add an ‘Abis Admin’ contact record in the new CID and add the ‘User in Adjutant’ attribute, but click on the X to close the User in Adjutant screen without saving it.
- In SQL, make a note of the contid for the Abis Admin record in VCONTACT table.
- In SQL, find the keyno value for the existing _ADMIN Userid (it should be 115)
- In SQL, run the QRY below and replace the CONTID value for the _ADMIN record, and replace the keyno with the keyno from previous step:
- update userid set contid = ##### where keyno = ###
- Exit Adjutant and log back in, and clicking on the Contact button should display your Abis Admin contact.
- Edit the User in Adjutant record to set the Default CID and Default WHSE values.
- Option 2 – Delete the ‘_ADMIN’ UserID and recreate it
- In SQL, delete the entire USERID table (it should only contain _ADMIN and any test records from the MASTER CID)
- Add an ‘Abis Admin’ contact record and assign the ‘User in Adjutant’ attribute.
- Set the UserID to ‘_ADMIN’ and set the Password to ‘XXXX’ (the password doesn’t matter, it is set elsewhere).
- Clear the ‘Active User’ flag and any other ‘Named User’ flags. Set the default fields appropriately.
- Exit Adjutant and log back in, and clicking on the Contact button should display your Abis Admin contact.
Email Templates
- Email Templates are currently not copied in the CID Copy process. Run the following SQL QRY to ‘move’ the MASTER Email Templates to the new CID:
- update emailsetting set CID = 'AAAA'
Forms/Reports
- The MASTER forms and Reports should all exist under the Adjutant folder with ‘MASTER’ in the form name.
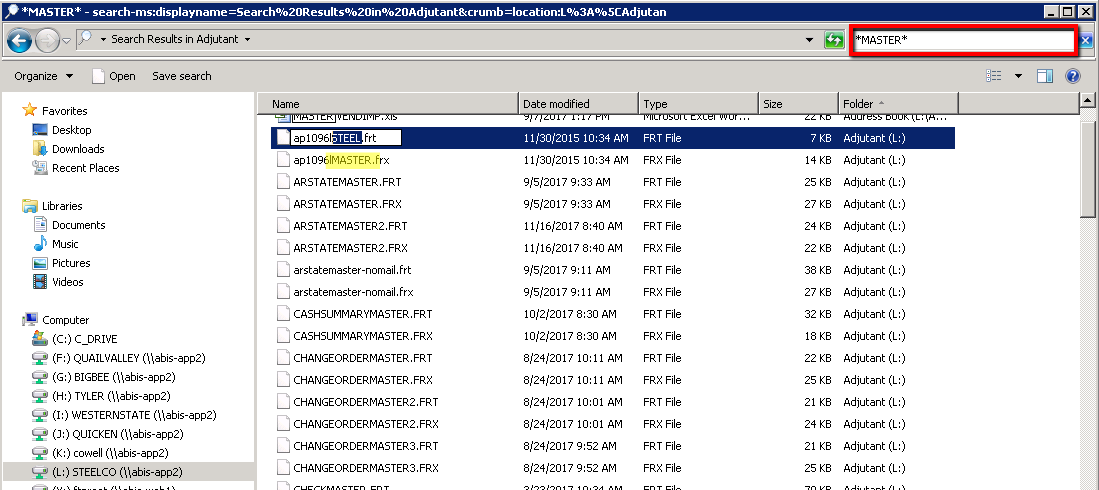
- The FRT/FRX filenames can be renamed in File Explorer to replace ‘MASTER’ with the new CID name.
- Use the folder search tool and search for *MASTER* to return a list of all files with MASTER in the file name. There may be more than just form files here.
- Highlight each file, then single-click on the file name to edit the file name. Replace MASTER with the new CID. Do not change any other file name details. TIP – the arrow keys and TAB key will navigate you through each file and keep you in edit mode.
- These do not all have to be changed at this time. They can be updated as setup proceeds in each module.
- Replace the default logo files with customer logo files.
- Save the customer logo in the Adjutant folder as three files:
- LOGO_SM.BMP (small logo that should not be scaled up)
- LOGO_MD.BMP (default logo, average size/quality that should scale well on most forms)
- LOGO_LG.BMP (large logo, only used for custom forms with large logo)
- The existing files with these names can be deleted or renamed.
- After changing the logo files, you will need to exit and log back in to see any updates.
- Save the customer logo in the Adjutant folder as three files:
Deleting the MASTER CID records
- The MASTER CID can be deleted at any time after these steps are complete, but MUST be deleted before customers begin accessing the system.
- MAKE ABSOLUTELY SURE you are in the right RDP and Environment before proceeding.
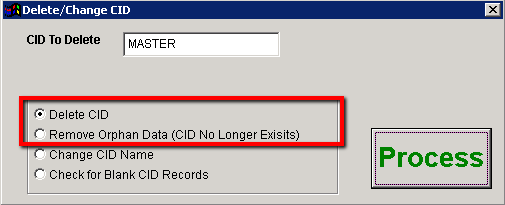
- From the new CID, run Delete/Change CID, set the CID to MASTER and select ‘Delete CID’ then Process.
- You will see a series of warnings. If you are in the correct environment, proceed.
- Once that completes, run the ‘Remove Orphan Data’ option and Process.
Next Steps
- It is a good idea to complete the Sales Tax setup process and County/Zip Code Maintenance process at this point before any further setup is completed.
