Difference between revisions of "AR Invoice Master"
From Adjutant Wiki
(Created page with "===General Description=== '''Default Menu Location:''' Transaction >> Accounts Receivable >> AR Invoice Master '''Screen Name:''' ArInvMaster '''Function:''' This screen is...") |
|||
| Line 1: | Line 1: | ||
===General Description=== | ===General Description=== | ||
| + | |||
| + | ---- | ||
'''Default Menu Location:''' Transaction >> Accounts Receivable >> AR Invoice Master | '''Default Menu Location:''' Transaction >> Accounts Receivable >> AR Invoice Master | ||
Revision as of 08:50, 7 July 2022
General Description
Default Menu Location: Transaction >> Accounts Receivable >> AR Invoice Master
Screen Name: ArInvMaster
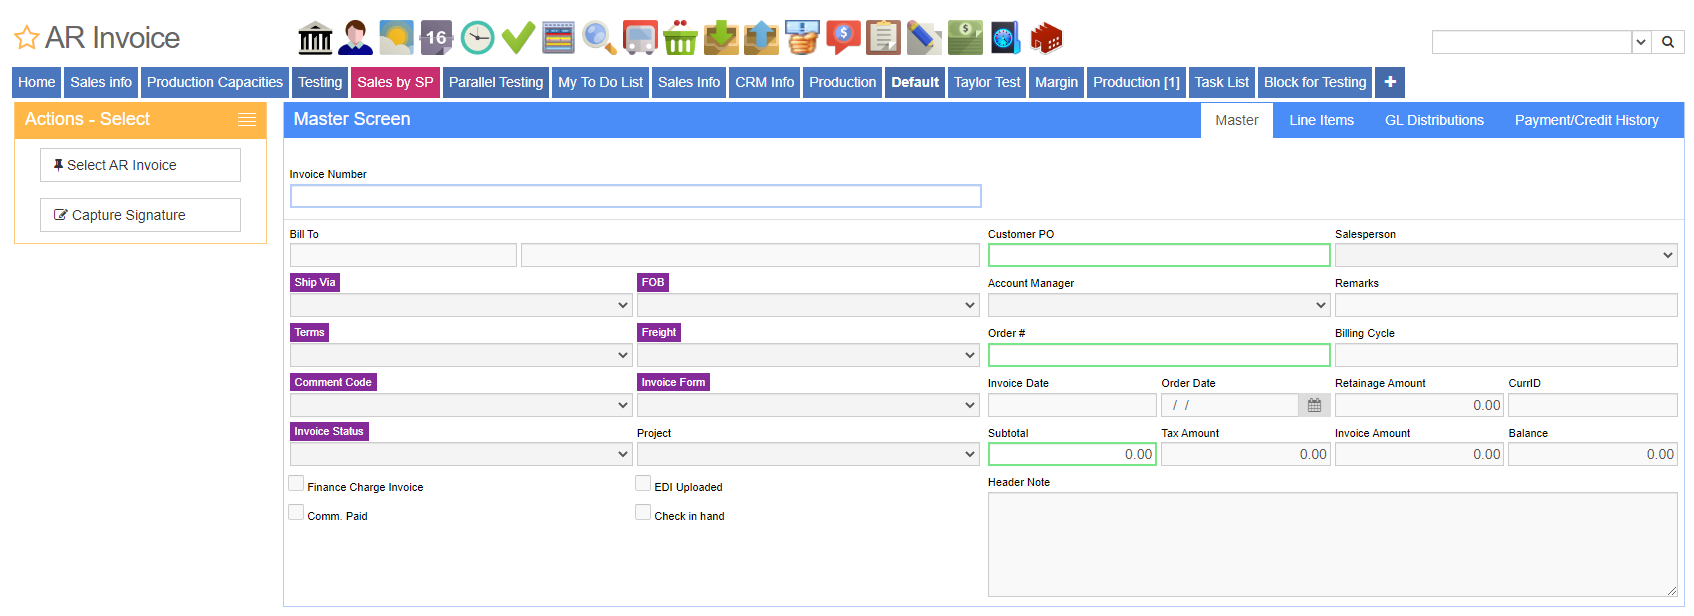
Function: This screen is used to view a customer invoice. You can also edit Header information, credit unpaid invoices, issue tax credits, issue refunds, pay by credit card, and print the invoice.
Enter the invoice number and click Edit AR Invoice button to change a field on the header.
Click the Select AR Invoice button to also enable searching by Customer PO, Sales Order#, or Invoice Amount.
Fields/Filters/Buttons
Edit AR Invoice: Click to edit the AR Invoice.
Issue Credit for Invoice: Click to issue a credit for an unpaid invoice.
Show Notes: Click to open the notes vault for the selected invoice.
Linked Documents: Click to open the documents vault for the selected invoice.
Select AR Invoice: Click to selects a different AR Invoice.
Pay With Credit Card: Click the Credit Card icon to process a credit card transaction for the invoice. An integrated credit card processing software package is required. This screen can also be used to pay with Cash, Check, Other source of money, or mark NSF (insufficient funds).
Create Tax Credit: Click this icon to issue a sales tax credit for this invoice.
- NOTE: The Taxable Sales Amount that is reported on the Sales Tax Due report will not be changed by a Tax Credit. Credit the entire invoice and reissue it with the correct tax rate in order to change the taxable sales amount.
Capture Signature: This will open a screen to capture a signature using Topaz signature pads. Once the signature is captured it can be printed on the invoice form. Proper Topaz drivers must be installed to use this functionality.
Invoice Number: The number on the invoice (You cannot edit this field!)
Bill To: The customer being billed for this invoice (You cannot edit this field!)
Ship Via: Shipping Method
FOB: FOB terms
Terms: Payment Terms
Freight: Freight terms
Comment Code: Customer Comment
Invoice Form: Select the form for the invoice.
Invoice Status: Select the status for the invoice.
Project: Linked Project. Field is populated from linked Project on Sales Order or service order.
Customer PO: Customer purchase order number
Salesperson: Salesperson from the SO.
Account Manager: Account Manager from the SO.
Remarks: Remarks field (free text). Carried over from the SO that was invoiced.
Order #: Sales/Service Order number
Billing Cycle: Billing cycle that was entered when creating the invoice (Time Billing only).
Invoice Date: Invoice Date.
Order Date: Entry date of the Sales Order
Subtotal: The amount on the invoice before tax.
Tax Amount: The tax amount for the invoice.
Invoice Amount: The total amount on the invoice.
Balance: The unpaid amount on the invoice.
Header Note: A note that appears on the invoice (Click Edit to change)
Issue a Credit for an Invoice
An AR Invoice may be credited if a payment has not been applied to it.
Enter the invoice number and press Enter.
Click the Issue Credit for Invoice button.
Click Yes when asked if you want to Issue Credit and Unship/Bill.
Enter a Credit Memo Date and press Approve. It will default to today's date.
Click Yes if you want to Reopen the Sales Order on the voided invoice.
Click Yes to Apply the Credit to the Original Invoice.
- NOTE: If you click no to the above step, you'll have to manually apply the credit to the original invoice in order to set the balance to zero. You almost always want to click Yes to this question.
If you want to edit the original sales order on the invoice, you can navigate to that sales order in the Line Items tab by clicking the SO#. The SO will be open and unshipped, and you can edit anything you like.
FAQ
Q: How do I issue a credit for part of an invoice?
A: Enter a new Sales Order (using the appropriate SO Type and line item(s)) and then ship/invoice the credit amount.
Q: Can you search by Customer PO?
A: Yes, click the Select button to enable the Customer PO field for search. You can also search by Sales Order number and Invoice Amount.
Q: I created an Invoice, but the GL Distributions tab is blank. What's wrong?
A: You need to generate a batch in order for the invoice to create the GL Distributions.
Q: There are line items on the invoice, but nothing prints. What's wrong?
A: Most likely, the line items on the invoice are hidden. Click the "Print All Lines" button or check the "Show Hidden Lines" box when printing.

