Difference between revisions of "AMS Setup"
From Adjutant Wiki
(→Initial Set Up) |
(→Rule Setup) |
||
| Line 50: | Line 50: | ||
[[File:AMS Wiki Rule AMS Process.png]] | [[File:AMS Wiki Rule AMS Process.png]] | ||
| + | |||
| + | |||
| + | '''AMS Printer Rule (AMSPRINTER) - Optional - ''' | ||
| + | |||
| + | This rule will allows you to set the printers per machine per location to print bundle and carton tags. There are certain set up options (see below) that are needed to print labels from the machine based on bundling done during the S2P process. | ||
| + | |||
| + | The machine name (Text 1) should match the profile machine rule exactly for it to work. The UNC Name for the printer (Text 2) should match the UNC name for the printer in Printer Control exactly. This will be paired with the Loctid (num 1) to allow you to print to machines in multiple warehouses. | ||
| + | |||
| + | [[File:AMS Wiki Rule AMS Printer.png]] | ||
==Setup Options== | ==Setup Options== | ||
Revision as of 08:01, 2 September 2020
Overview
This is a guide for consultants to use to set up an AMS connection from start to finish. Setup typically takes a few hours and involves making connections from the Eclipse software to the Adjutant database.
The goal is to establish an ODBC connection from Eclipse to Adjutant reading a specific set of data tables. The function of the integration is for Adjutant to pass order and bundle information into Eclipse/AMS and to receive back production and material usage information.
In the past, AMS Integration involved sending flat files across the servers back and forth with the necessary data. As of today, the most efficient way to pass data back and forth is by a direct SQL data transfer.
This set up assumes a hosted connection, though non-hosted connections have a similar and at times identical setup.
Initial Set Up
Eclipse uses what is called "On Demand" coil verification. This means when a user scans a coil, they call back a special database table that has all the right information in place. This means that David will need to create new AMS specific data tables. These tables will be matched up in the Eclipse screen below. Sending the following email to support@abiscorp.com should make the ticket you need. Be sure to replace your customer name, custno, and resource ID in the tag and body below.
Please create the AMS tables needed for Eclipse integration on [your customer's] system.
custno[CUSTNO]
resid[Your ResID]
escalate[y]
priority[p2]
Item Attributes
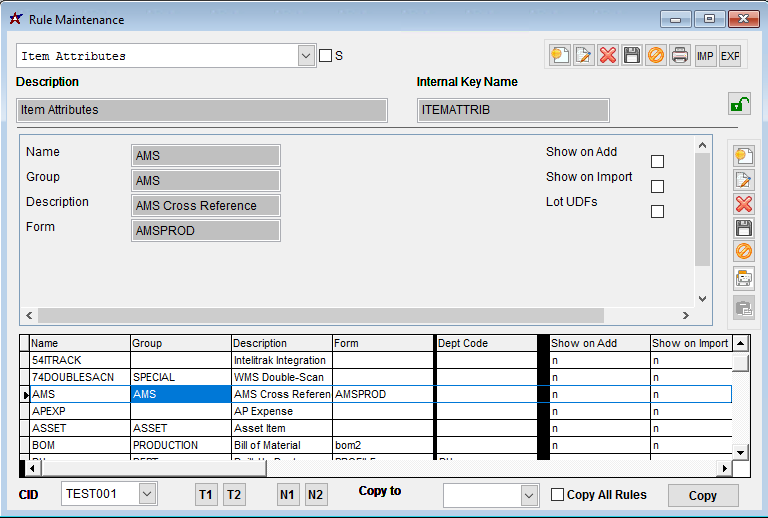
For Adjutant to recognize and push an item out to Eclipse, it needs to have the proper item attribute (Attribute name "AMS" with form "AMSPROD" in the Item Attribute Rule).
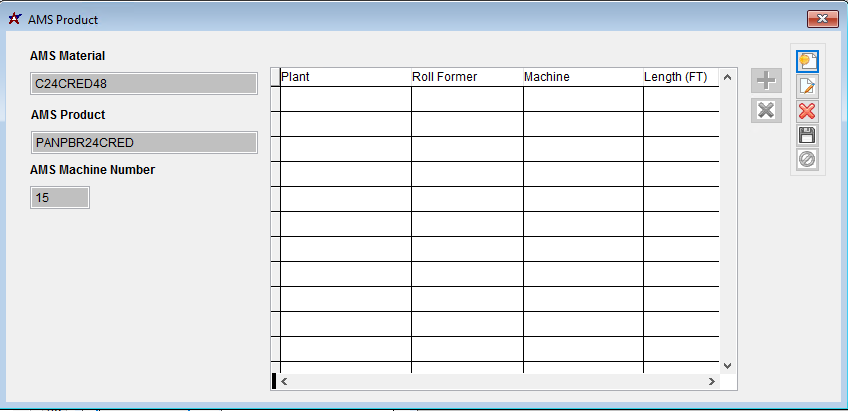
The Attribute jump screen has three fields. These fields will need to line up with the Eclipse data exactly. The preferred scenario is that they have set up their Eclipse items with the same names as their item codes in Adjutant. That makes for an easy data import. This information can be filled out using an excel import (download here) and shows data from the AMSXREF table.
- AMS Material: This is the material as AMS understands it to use make this item. Similar to the BOM material in Adjutant.
- AMS Product: This is the AMS name for the item you are making.
- AMS Machine Number: This is the corresponding Machine ID.
- Plant/Rollformer/Machine/Length(FT) Grid: This is used if there are different machines used in each plant. This is controlled in the AMSXREFD table.
Please note that any item and material that is interacting with AMS/Eclipse will need this attribute. This means that every coil will have the attribute with only the Material section filled out. Adjutant will remove the other fields and recognize it as material.
Rule Setup
There are a few rules that need to be set up.
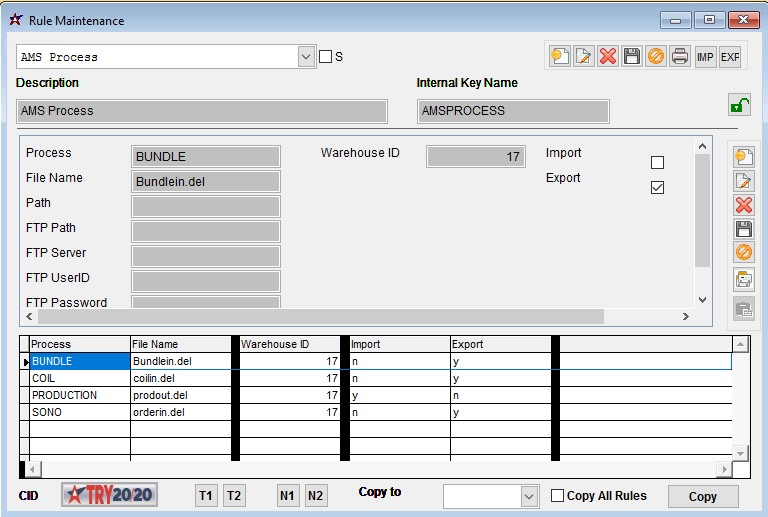
AMS Process Rule (AMSPROCESS)
This rule will determine the various processes that are used. These entries are warehouse specific, so if setting up for multiple warehouses, should include each entry seen below per each warehouse. Important note: The Loctid (num 1) is the Warehouse Key number.
Everything else should be set up as seen in the image, paying special attention to which is an import or export process (Log 1 and Log 2 respectively).
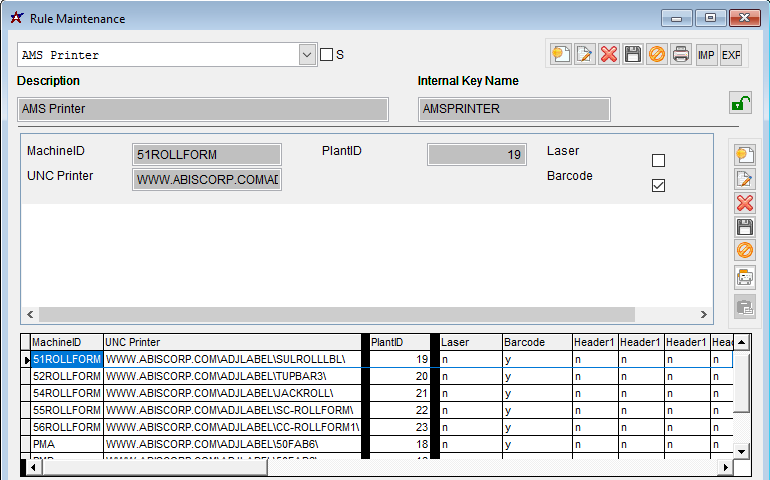
AMS Printer Rule (AMSPRINTER) - Optional -
This rule will allows you to set the printers per machine per location to print bundle and carton tags. There are certain set up options (see below) that are needed to print labels from the machine based on bundling done during the S2P process.
The machine name (Text 1) should match the profile machine rule exactly for it to work. The UNC Name for the printer (Text 2) should match the UNC name for the printer in Printer Control exactly. This will be paired with the Loctid (num 1) to allow you to print to machines in multiple warehouses.
Setup Options
Several set up options are available, depending on how Adjutant and Eclipse will be used together. Certain things need to be considered, such as bundling, scrapping and label printing.
Below are several important options related to AMS. Not all are required - required options will say "(REQ)" next to the option. This list is not extensive. There are many more that are specific to certain customers and not relevant to a normal set up.
- AMS (REQ) - turns the whole thing on.
- AMSASSEMPWO (REQ) - enables the logic to auto assemble and complete work orders coming from AMS.
- AMSPRODSQL (REQ) - enables SQL transfer for production information.
- AMSORDERSQL (REQ) - enables SQL transfer for sending orders.
- AMSSQLLEN (REQ) -
- AMSCTAG - will print bundle tags for bundles created when they are sent to AMS. This will use the AMSPRINTER rule set up previously to determine which printer is used.
- AMSLABEL -
- SUBSTOAMS - will allow subassemblies to be sent to AMS during the S2P process.
- AMSANYCOIL - will allow Adjutant to accept and use whatever coil is scanned through AMS regardless of production plant.
- AMSADDCOIL - when set, adjusts coil in Adjutant to meet AMS demand.
- AMSSKIPBUNDLE - will skip the bundle process during the S2P. Orders will be manually bundles using the scanner.
- AMSSCRAP - will enable the AMS Scrapping process. This will need the AMSSCRAP rule set up previously.
Eclipse Setup
This section is an optional place to document any follow-up steps, further considerations, or links to other pages that may be helpful. Delete this section if it is not needed.
Just for reference, below is an example of an indented bullet list, along with guidance for when to use bold formatting.
- Menu Paths should be bold for easy reference
- Screen Names should be bold
- Tab Names inside of screen should also be bold
- Field Names should generally be bold. There may be cases where using single quotes for a 'field name' is appropriate.
- 'Sections' in a screen such as the 'Customer' section label in the Order Entry screen should use single quotes
- 'Column labels' in a grid should generally use single quotes
- 'OK' or 'Cancel' buttons (or any other buttons on a pop-up message) should have single quotes
- Field Names should generally be bold. There may be cases where using single quotes for a 'field name' is appropriate.
- Tab Names inside of screen should also be bold
- Screen Names should be bold
- I have used italics for things like Report Names when I am referring to the report and not the screen name for the report, and for filenames.xlsx
Updating the Category tags is critical to helping customers find content. Review the Categories list and tag all categories below
