Page History: HOW TOs: Contract Management
Compare Page Revisions
Page Revision: Tue, 09 Aug 2011 08:59
General Information
Default Menu Location Maintain >> Contract Management >> Contract Master
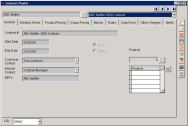
 Contract Master Screen |
Create a New Contract
Contracts are created in the
Contract Master screen
General tab is used to setup contracts.
- The field located at the top left of the screen, enter the name of the organization you are creating a contract for
- Click New to create a new contract
- Enter the name of contract in the Contract # field
Fields/Filters
Contract #: Enter the name of the contract
Start Date: Enter the date the contract takes effect. Sales orders and service orders started before this date cannot be applied to this contract
End Date: Enter the date the contract ends. Sales orders and service orders started/completed after this date cannot be applied to this contract
Customer Contact: Select the contact person inside the organization regarding this particular contract
Internal Contact: Select the contact person inside your company regarding this particular contract. This is the contract manager. Only people with the Contract Manager attribute will be available for selection
Bill To: Enter the customer being billed for this contract
Allow Non-Listed Billings: Check this box to allow the adding/billing of additional items
Default: Check this box to make this contract the default for the organization
Click
Save when you are finished and move on to the next tab or go straight to the
Copy From tab
Copy a Contract
Create a new contract by copying from an existing contract
Maintain >> Contract Management >> Contract Master- Open Contract Master screen
- Enter the customer's name
- Fill out the Contract Name, Start/End Date, Customer Contact, Internal Contact (contract manager), and Bill To
- Go to Copy From tab (Select the Contract you wish to copy by entering that contract's customer name)
- Edit the contract details accordingly
How To Video: Copy a Contract
Generate Other Charges
Transaction >> Contract Master >> Generate Other Charges
- Select a Contract the charges are coming from
(Click
here to learn where to setup a contract)
- Edit the Quantities inside the grid (Default quantities, previously set up in the contract, will be displayed)
- Click the ADD button to add any additional charges that do not already appear in your grid
- Select Work Category and Department in the fields
- Leave the Bill Date as today's date and change the Bill Cycle to the month you are billing in
- Choose the correct Statement Form (if necessary)
- Preview the statement by clicking the Preview Output button
- Click the Build button to generate the charges
- Click the Print button to print the service order that was created
How To Video: Generate Other Charges

