Page History: AP Invoice Master
Compare Page Revisions
Page Revision: Thu, 07 Jul 2016 14:58
General Information
Default Menu Location Transaction >> Accounts Payable >> Add/Edit AP Invoice
Screen Name APMAST
Function The AP Invoice Screen has many uses.
From this screen you can:
1. Create a new AP Invoice.
2. Create an AP Invoice from a PO Receipt, or several PO Receipts.
3. Edit an existing AP Invoice.
4. Void an existing AP Invoice.
5. Mark an invoice as approved.
6. Print a Manual Check for an invoice.
7. Set up
Recurring Payables.
8. Create a "Pass-Thru" that creates an AR Invoice from an AP Invoice.
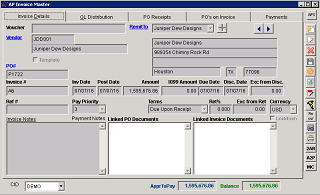
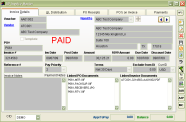 AP Invoice Master Screen |
Invoice Details Tab
Voucher - Voucher
Vendor - Soldfrom vendor which is where one got the purchase form
RemitTo - Who to send the check to for the purchase or bill
PO# - The purchase order that the invoice corresponds to. An invoice can have multiple purchase orders that it corresponds to which one can add more corresponding Purchase Orders on the "PO's on Invoice" tab.
Invoice # - The invoice number of the bill.
Inv Date - Invoice Date
Post Date - Post Date
Amount - Amount of the bill.
1099 Amount - Report payments made in the course of the invoice to a person who is not an employee or to an unincorporated business.
Due Date - Due date of the invoice
Disc. Date - If an invoice has a discount for paying by a certain date, this is where one would put the due date for the discount.
Exc from Disc. - The amount that is excluded from the discount.
Ref # - Reference #
Pay Priority - Select the priority of the payment. One can set a default payment priority for a vendor in the RemitTo attribute screen for that vendor. If the payment will not be a check created from the system; this is where you will set whether it is an EFT, manual check, credit card, or non check payment for the invoice.
Terms - Terms of the invoice. One can set a default terms for a vendor in the RemitTo attribute screen for that vendor.
Ret%" - Retainage Percent
Exc from Ret - Excluded from Retainage.
Currency - Currency of the invoice. If the currency is not US dollar, Euro, or Canadian Dollar; please let ABIS support know and ABIS will provide a solution.
LockExch - Lock Exchange Rate. Checking off this box freezes the exchange rate at the current rate for the payment for the invoices.
Invoice Notes - Where one would put any notes for the invoice.
Linked PO Documents - Linked PO Documents
Linked Invoice Documents - Linked Invoice Documents
Currency - Currency of the invoice
Information on Payment Priorities can be found
here.
 AP Invoice Master Invoice Detail Tab |
GL Distribution Tab
General Information
The GL Distribution Tab is there to assign the correct corresponding accounts for the invoice.
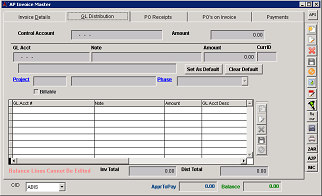 AP Invoice Master GL Distribution Tab |
Account Numbers
The GL Dist tab specifies the GL Account Distributions of your Invoice amount.
The
Control Account is the Payables account specified on the CID Maintenance screen, unless the vendor has another control account specified in the Sold From screen.
An auto-balance account number will appear in the grid by default. It will be marked red and cannot be edited.
It will be one of three accounts:1. If you are creating an invoice without a PO Receipt and the vendor does not have a default GL account, the account number will be the default Purchase Clearing account (as listed in the CID Maintenance screen).
2. If you are creating an invoice without a PO Receipt and the vendor has a default GL account, the account number will be the vendor's default account (as listed in the Sold From screen).
3. If a PO Receipt is being invoiced, the account number will be the GL account specified on the PO line item.
Change GL Distributions
If you want to change the GL Distribution from the auto-balance account, click the ADD button and add another account and amount.
The amount on the auto-balance account will automatically change according to the amount you entered.
The Invoice Total and Distribution Total must match before the AP Invoice can be saved.Setting Default Accounts
You may set a default account for any vendor by going to the Organizations screen and clicking on the Sold From attribute once you have selected the vendor. Enter the account in the Default Acct field.
You can also set a default account directly from the GL Distribution tab. Once you have entered the account number, click the
Make Def button.
If the default account is incorrect (or has changed), you can click the
Clr Def button to delete the default account.
Void AP Invoices
An AP Invoice may be voided if a payment has not been generated for it.
To void an invoice, go to the
AP Invoice Screen and pull up the invoice number.
Click the
Void button (the Red X) and click
Yes.
The invoice will be marked with VOID and the GL entries will be reversed.
Once an invoice is voided, you cannot do anything with it.
Related Videos
Edit GL Distributions after Save
Invoicing Multiple Purchase Orders
Set a Default Expense Account
Apply Custom AP Discount and Exclude Charges From Discount Amount
