Page History: Tap Setup
Compare Page Revisions
Page Revision: Tue, 20 Nov 2012 10:42
General Description
Default Menu Location: Transaction >> Tapping >> Tap Setup
Screen Name: TAPENTRY
Function: The Tap Setup Screen is used to create new tap and inspection service orders, enter builder payments, and maintain legal (S-B-L-T) locations of addresses.
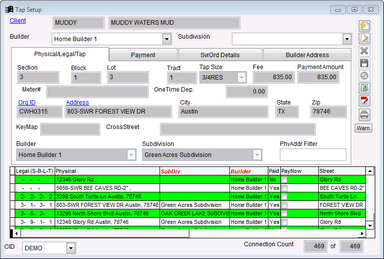 Tap Setup - Click for full size |
Physical/Legal/Tap
The first tab on the Tap Entry screen will display all addresses (linked SHIPTO children) in the District you select at the top of the screen.
You can edit existing addresses and add new addresses from this screen.
Underneath the District ID and Name fields are two other fields that will filter the list of addresses:
- Builder: A list of all builders (organizations with the BUILDER attribute) will appear in this list. Builders are linked to an address via the Connection Information screen. You will be forced to choose a builder when entering payment for an address on the Payment tab.
- Subdivision: : A list of all subdivisions (linked SUBDIV children) in the District you select at the top of the screen. You can fill out the subdivision on the Connection Information screen or you can fill it out here.
Please see the below video for instructions on how to add subdivisions to a district
Instructions
Edit an Existing Address
STEP 1: Enter the District ID or Name in the fields at the top of the screen.
STEP 2: Locate the address you want to edit within the grid. You can filter by Builder, Subdivision, or by anything in the street number or name by using the Street Address Filter.
STEP 3: After selecting the address in the grid, click the EDIT icon to edit the corresponding fields for the address.
STEP 4: Click SAVE once finished editing.
Add a New Address
STEP 1: Enter the District ID or Name in the fields at the top of the screen.
STEP 2: Click the ADD icon.
STEP 3: Fill out as much information as possible and then click SAVE.
Please note that all information from the previously selected address will remain in the fields when you start adding. This is done on purpose so that you only have to change a few fields when adding many street addresses at the same time (all on one street for example).
You can specify the address's ID or you can leave that field blank and let the system assign an ID for you. The ID will be validated against others in the system so that you do not create a duplicate. The address is NOT validated.
Set up a new tap:
STEP 1: Enter the District's name in the
District field.
STEP 2: Select the address in the grid. Click
Edit .
STEP 3: Select the
Tap Size from the drop-down menu. Enter the
Fee if the tap is a Commercial Tap per quote.
STEP 4: Enter the Builder's name in the
Builder field (located under the Address field in the middle-left portion of the screen).
STEP 5: Enter any other needed information, such as S-B-L-T, Address info, Key Map, Cross Street, etc
STEP 6: Click
Save and move to the
Payment tab.
Function: The Payment tab/screen is used to apply a check or payment to a single or multiple taps.
To apply a check/payment to a tap
STEP 1: First, click the "new" button in the upper right hand corner (the user must ensure there is a builder selected before creating a new payment).
STEP 2: This will immediately take the user to the "Payment Date" field. This date may vary depending on the company's preference (date could be the deposit date, the check date, etc).
STEP 3: Next, enter the check number for this payment. Note: One check can be used to pay multiple taps. However, each separate check will require separate entry.
STEP 4: Next, enter the check amount.
STEP 5: If this payment is associated with an existing contract, use the Contract drop down box to associate the appropriate contract.
STEP 6: The "Generate SvrOrds" box on the left side of the screen is used to generate various associated service orders for the taps (one example of this would be inspections required for the tap).
STEP 7: Once all of the check and service order information has been entered, now the user will select the addresses (taps) the payment was made for.
STEP 8: Note: In order to save the payment, the 'Check Amount' and 'Total Applied" must be equal, and the 'Remaining Balance' must be 0.
STEP 9: The final step is to press the save button in the upper right hand portion of the screen. Upon saving, the user will be prompted to print working service orders and the system will notify the user of the service orders generated by this payment.
STEP 10 Once the payment is saved, click the
Service Order Details tab to modify service order details.
