Page History: Cut Charge / Freight Charge Setup
Compare Page Revisions
Page Revision: Thu, 09 Apr 2020 16:05
General Information
Default Menu Location Maintain >> Order Entry >> Cut/Freight Charge Setup
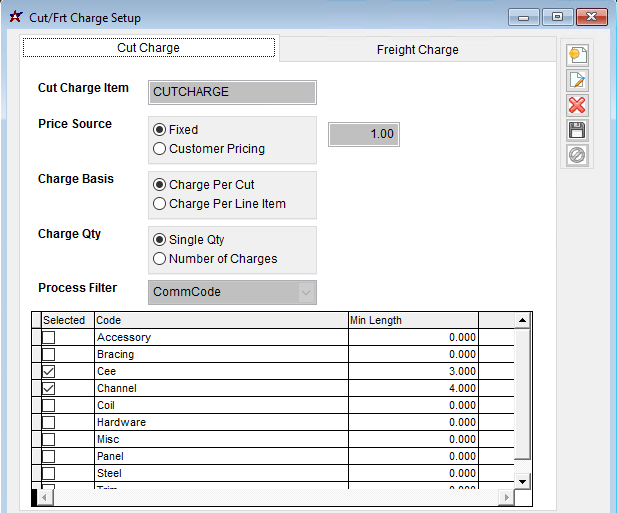
Cut Charge Setup Function The Cut Charge Setup screen allows user to implement and control the automatically calculated cutting charges for material sales that fall below a specific length requirement. The setup screen allows length controls to be established by one of four different criteria called Process Filters. The pricing and format of the cut charges can also be customized. Once the charges are set up and tied to an item code, the calculations are handled automatically on both Sales Orders and Quotes.
 Cut Charge Setup Screen |
Fields / Filters
Cut Charge Item: Enter a non-stock item code from Item Master. All cut charges are controlled and set by a single item code. This screen will not allow more than one item code for tracking cut charges.
Price Source-Fixed: The Fixed option will use the fixed per unit charge amount in the associated field (set as 1.00 in the image above) to determine the cut charge charge.
Price Source-Customer Pricing: The Customer Pricing option will use the pricing in Item Master for the Cut Charge Item, along with the rules established in Customer Pricing to set the cut charges.
Charge Basis-Charge Per Cut: The Charge Per Cut option will apply the cut charge to each item quantity that requires cutting according to the setup. For example, if I sell 5 items on a single line that all need cutting, the cut charge will be 5 X the charge amount.
Charge Basis-Charge Per Line Item: The Charge Per Line Item option will calculate a single charge per line item that requires cutting, regardless of the quantity sold on that line. For example, if I sell 5 items on a single line that all need cutting, the cut charge will only be 1 X the charge amount.
Charge Qty-Single Qty: The Single Qty option will create a line item for the cut charge item that sells a quantity of 1 with the amount set to the total for the calculated charges. For example, if the calculated charges are $10, the cut charge line on the Sales Order will sell a QTY of 1 at $10 each.
Charge Qty-Number of Charges: The Number of Charges option will create a line item for the cut charge item that sells the quantity that matches the total of the calculated charge with the amount set to the price for a single charge. For example, if the calculated charges are $10, the cut charge line on the Sales Order will sell a QTY of 10 at $1 each.
 Cut Charge Setup Screen |
Additional Features
The XLS button at the bottom of the screen will allow exporting the current grid data into an excel file.
The Printer button at the bottom of the screen will allow printing the grid results in a report format.
Certain fields in the display grid, such as Project#, Project Name, and PO# are clickable links, meaning you can double-click the field to jump directly to that record.
Column headings can be rearranged by right-clicking and dragging the column heading to the desired spot on the display.
Displayed records can be re-sorted by double-clicking the desired sort column.
If your organization is using tasks, you can define additional columns that can display in the Project Grid using the MSNGRIDDEF Rule Maintenance setting. The custom task columns will show the status (active/completed) of a limited number of task codes that you define in the rule along with a custom column header description. See the Wiki entry for the MSNGRIDDEF rule for details on this setup.
Security Tokens
MSNGRID, EDIT: If checked, the user is able to edit data on the Project Grid that will update the project record. Editable columns are denoted by a red column header.
Security/Screen Options
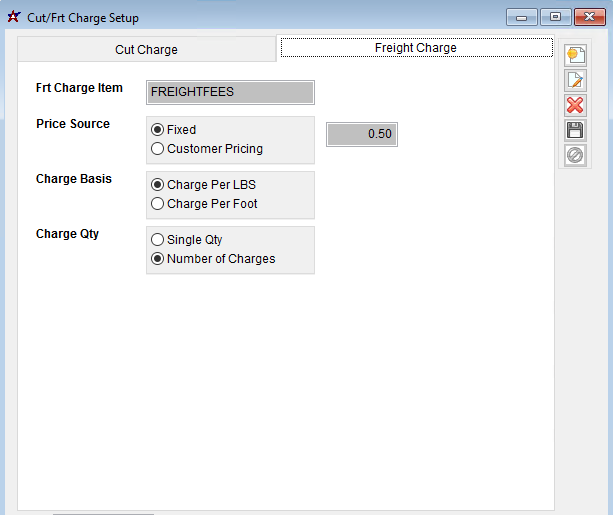
Freight Charge Setup Function
 Cut Charge Setup Screen |
Fields / Filters
A: The Status filter will be labeled 'All Status' buy default. Clicking the 'All Status' button will display a list of selectable project statuses. Select a status checkbox to include all projects that match that status. The 'A' button will default all statuses to checked. The 'N' button will uncheck all statuses.
B: When the Show Phases box is checked, the returned list will be a list of project phase records from the Project Phases tab. This filter also causes the date filters to filter against the Project Phase dates rather than the Project Master tab dates. Keep in mind that some data displayed in the results grid may appear to be duplicated when displaying phases.
C: This date range filters against the Project Master start date (first date entry on the Project Master screen). When Show Phases is checked, this date range filters against the Project Phases start date.
 Cut Charge Setup Screen |
Additional Features
The XLS button at the bottom of the screen will allow exporting the current grid data into an excel file.
The Printer button at the bottom of the screen will allow printing the grid results in a report format.
Certain fields in the display grid, such as Project#, Project Name, and PO# are clickable links, meaning you can double-click the field to jump directly to that record.
Column headings can be rearranged by right-clicking and dragging the column heading to the desired spot on the display.
Displayed records can be re-sorted by double-clicking the desired sort column.
If your organization is using tasks, you can define additional columns that can display in the Project Grid using the MSNGRIDDEF Rule Maintenance setting. The custom task columns will show the status (active/completed) of a limited number of task codes that you define in the rule along with a custom column header description. See the Wiki entry for the MSNGRIDDEF rule for details on this setup.
Security Tokens
MSNGRID, EDIT: If checked, the user is able to edit data on the Project Grid that will update the project record. Editable columns are denoted by a red column header.
Security/Screen Options
